Color Management
Color management in ProSelect ensures the accurate reproduction of displayed images. To ensure proper color rendering, it is crucial that the original images used to build the album have an embedded color profile. ProSelect utilizes the embedded profile when importing images to generate the preview image. The images displayed in ProSelect are rendered in the sRGB color space, but this does not affect the original source files.
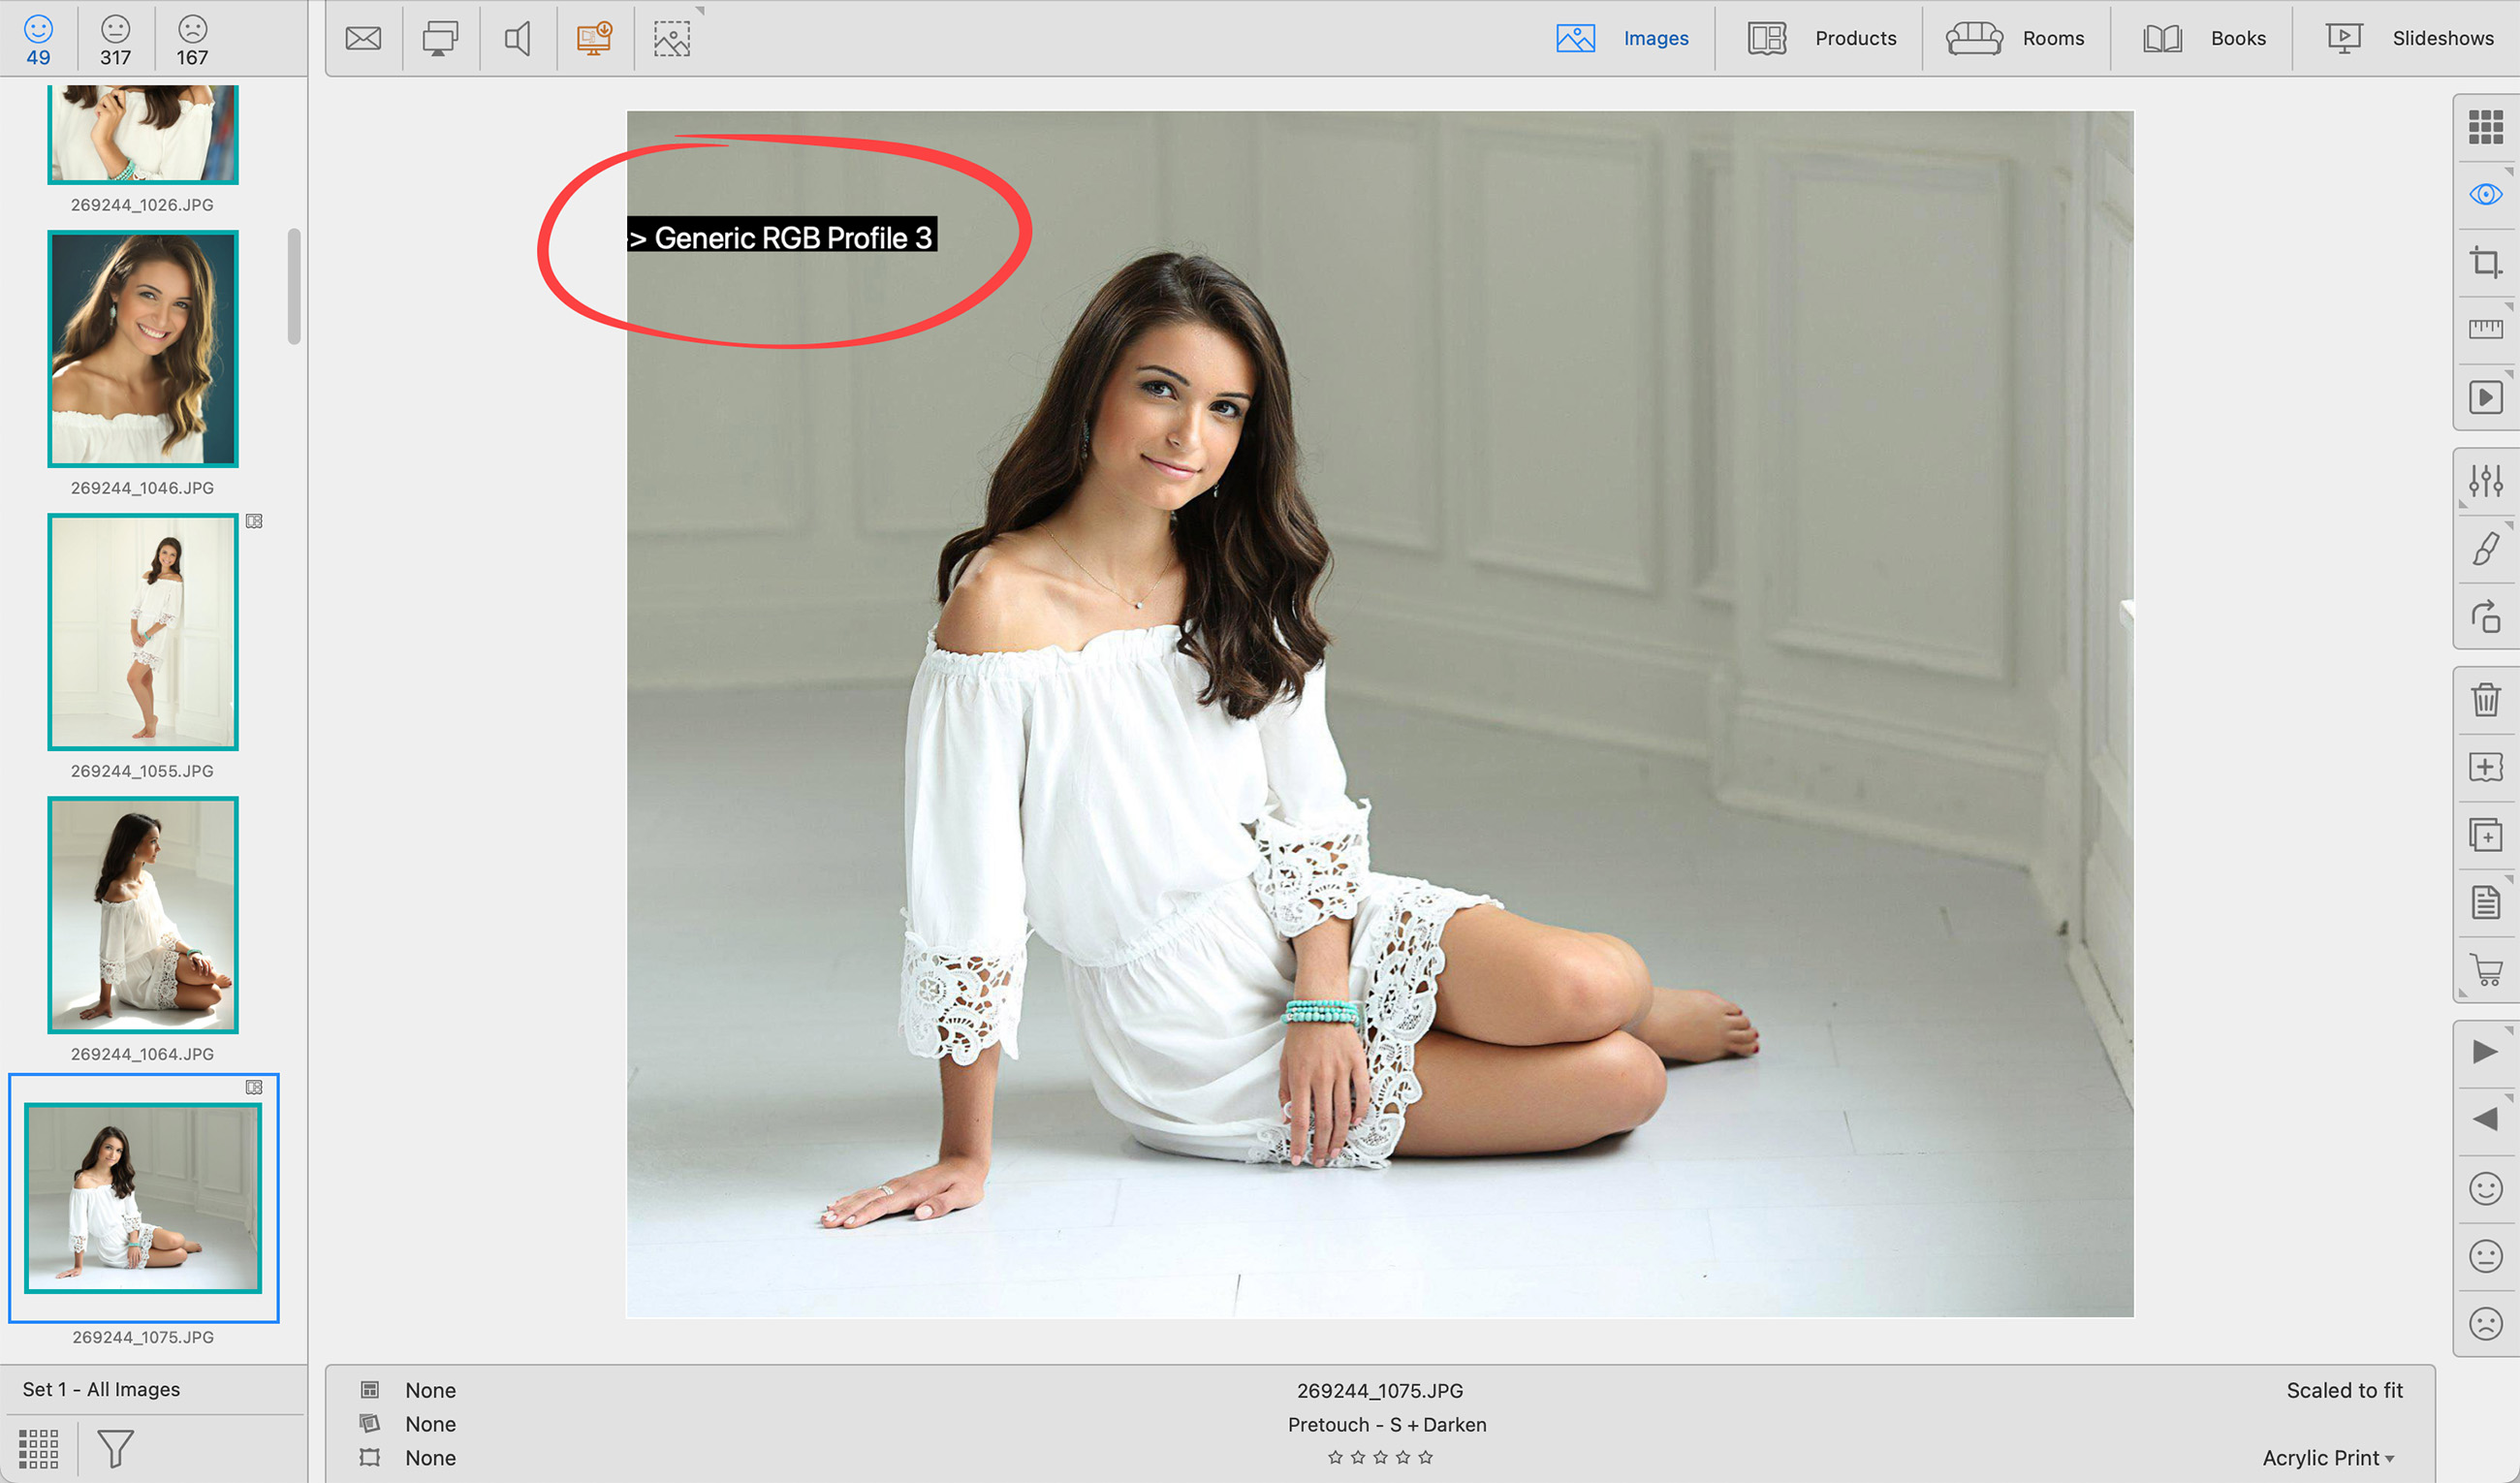
If you notice color variations in multiple images, you can enable additional troubleshooting information. Navigate to the top menu, ProSelectEdit > Settings > Display > Color Management > Screen Display. Check the "Show conversion details on Images" option. This will overlay each image with temporary profile information, assisting in identifying and resolving color issues across multiple images. This process is usually done with assistance from the Pro Studio Software support team.
- It is recommended that source images have an embedded profile of either sRGB or Adobe1998.
Output Files
All files created in Pro Production mode adhere to the user's Photoshop Color Settings. Proper setup in Photoshop is critical for accurate color reproduction. For detailed instructions on configuring Photoshop Color Settings, please refer to the knowledgebase article, Photoshop Color Settings.
If you use the "File > Export Selected" function (for exporting images, products, or rooms), any exported files will have an embedded sRGB color profile. This ensures consistent color representation when sharing or using the exported files on websites or marketing applications.
If the colors of the images displayed in ProSelect do not match the colors of the source files, it is likely because the imported image does not have an embedded color profile. To check the embedded color profile of a source image, follow these steps:
- Navigate to Working with Images.
- Select an image.
- Use the shortcut Cmd + ICtrl + I to view the Image Information.
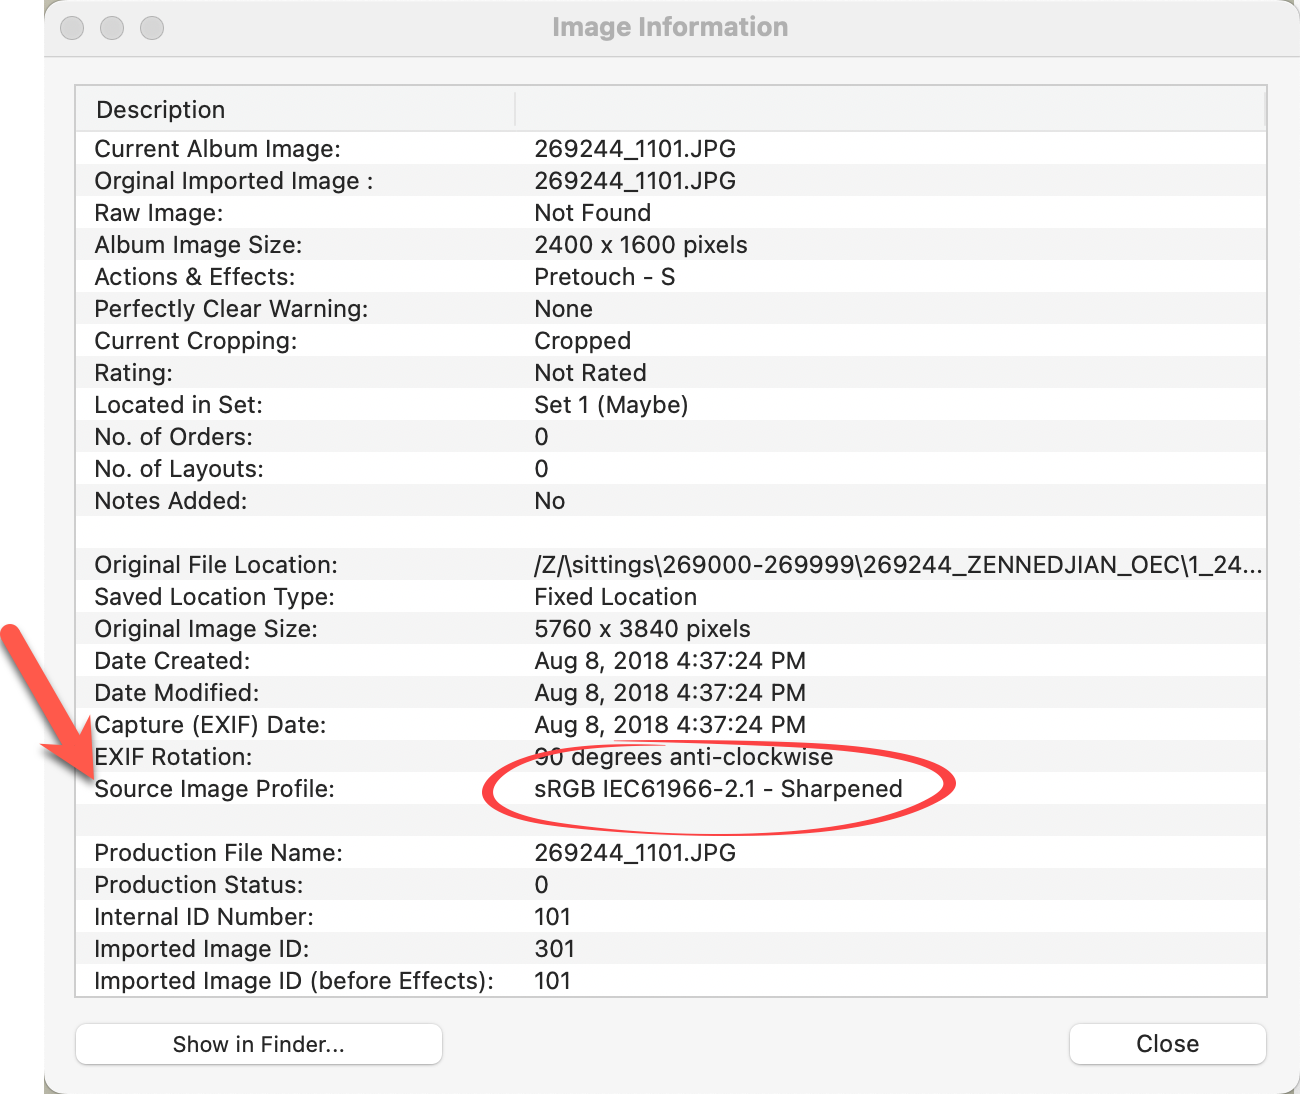
- The Image Information window will display the source's embedded color profile, or indicate if it is missing.
Photoshop and Adobe Camera Raw Color Settings
Using embedded color profiles is crucial in any color-managed workflow. However, Adobe Photoshop's default color management settings can sometimes apply or maintain unintended profiles. To establish an effective color management scheme, it is important to communicate with your professional color lab to determine the preferred color profile for final print production. In most cases, when printing images on standard photographic paper used by most color labs, sRGB is the preferred choice. For wide-gamut inkjet reproduction, Adobe RGB (1998) can be used.
If you are uncertain about the preferred color profile, choosing sRGB is always a safe option.
To access the Photoshop Color Settings, follow these steps in Photoshop:
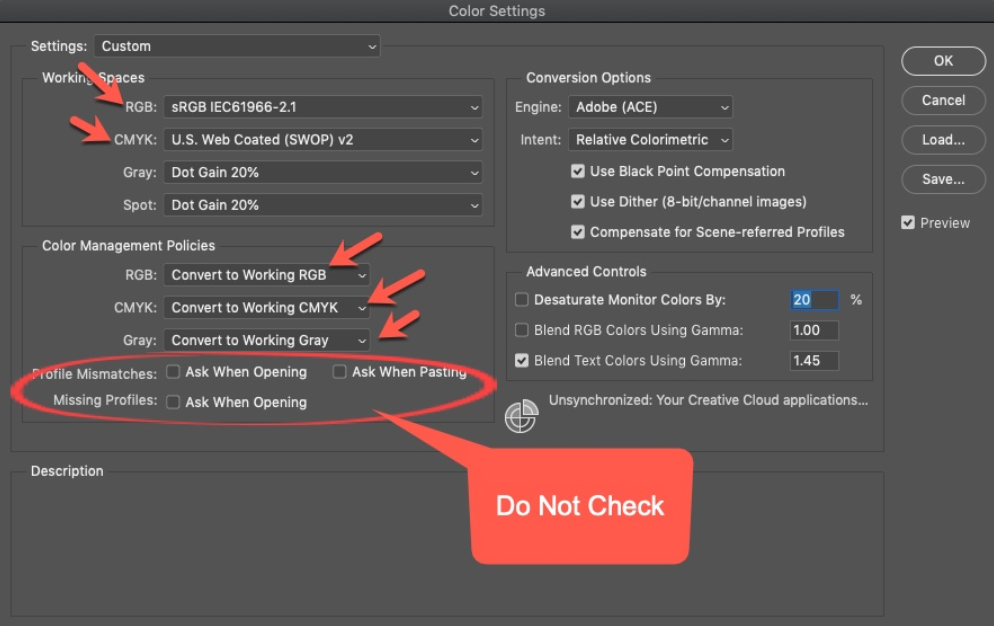
- Go to Edit > Color Settings.
- The following dialog box will appear.
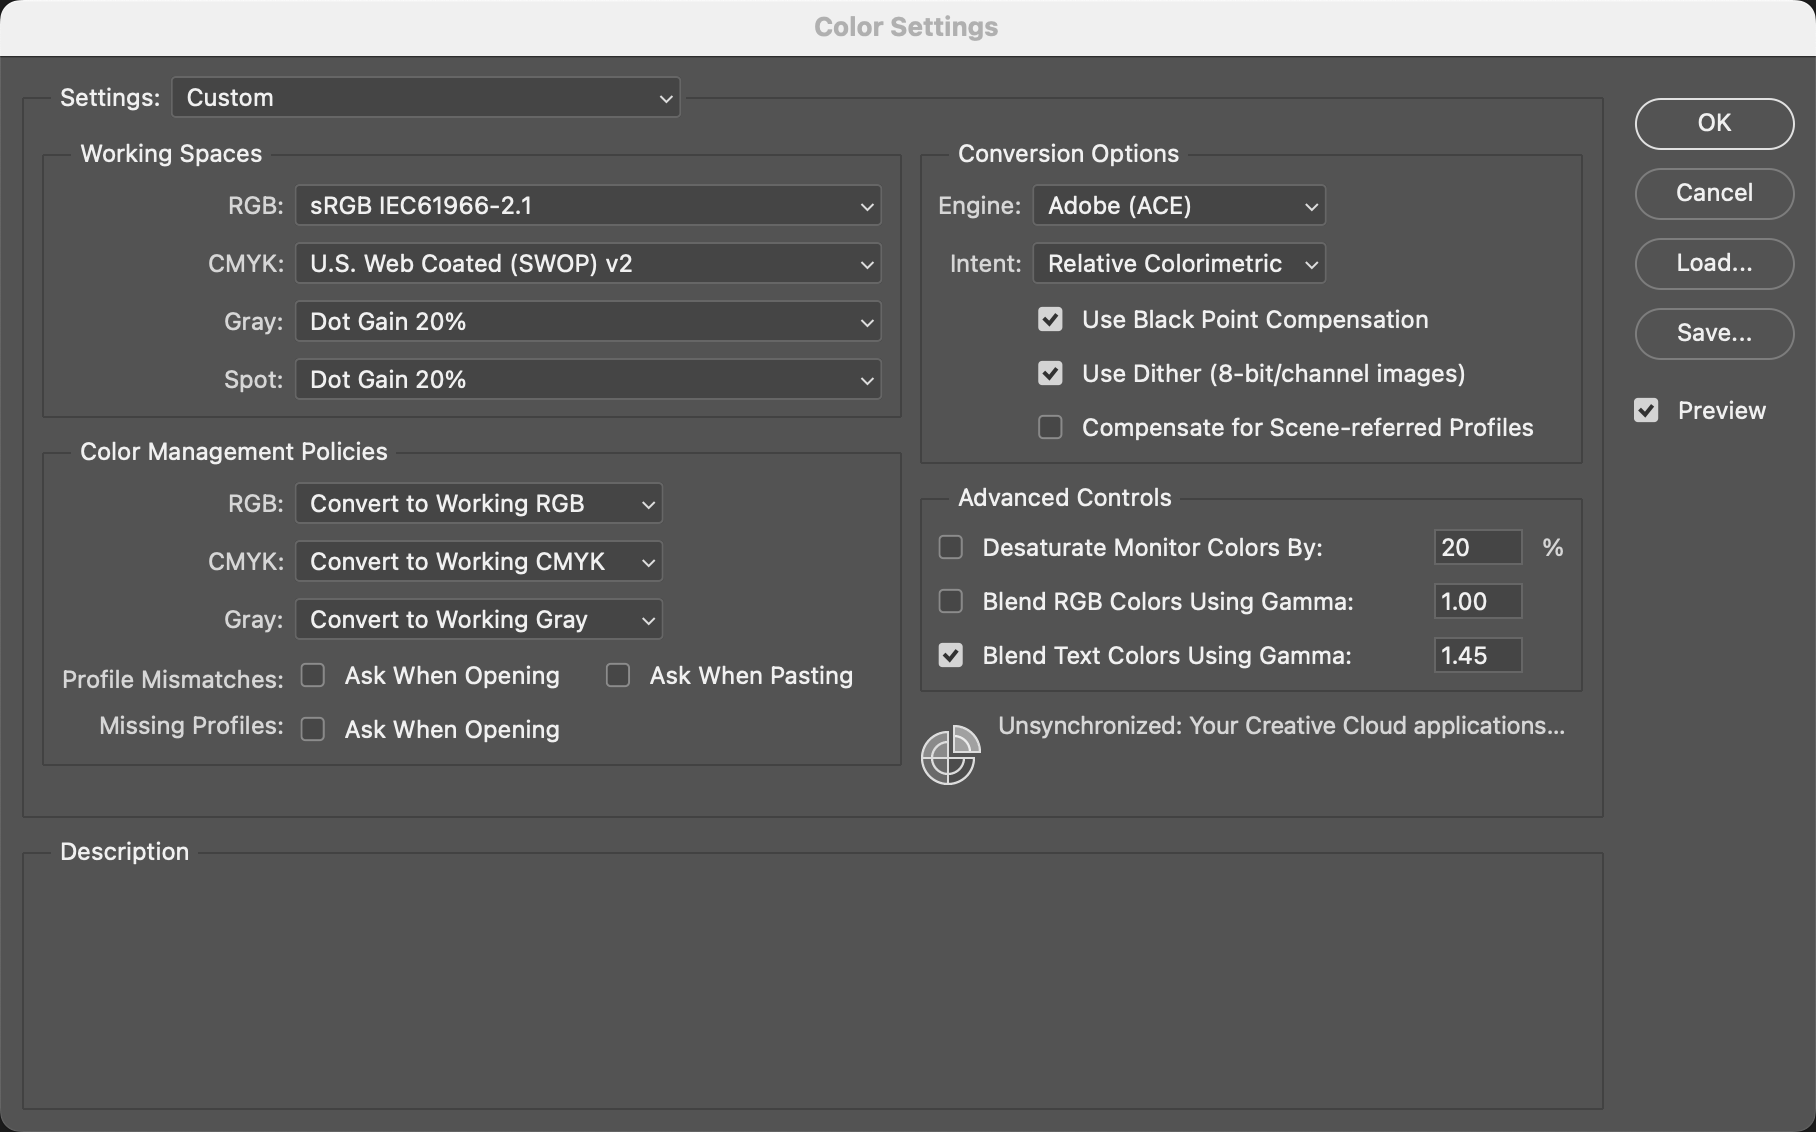
- Use this as a guide for configuring your settings. These recommendations are not limited to ProSelect but are suggested for studio workflows in general.
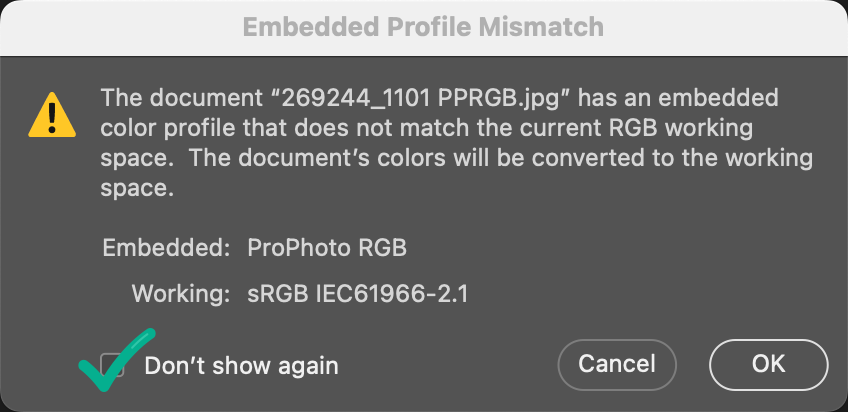
These settings will automatically convert any image you open in Photoshop to your preferred color settings and bypass profile mismatch warnings. Once you have adjusted all these settings, the first image you open with an embedded profile different from your chosen settings will display a profile mismatch warning. Check the "Don't show again" box, then click OK. You will no longer receive warnings, and all images will open with your preferred color profile embedded. These settings will also be applied during Pro Production.
Adobe Camera Raw/ Bridge
If you are processing raw files in Adobe Camera Raw or Adobe Bridge, you need to apply profile conversion settings there as well.
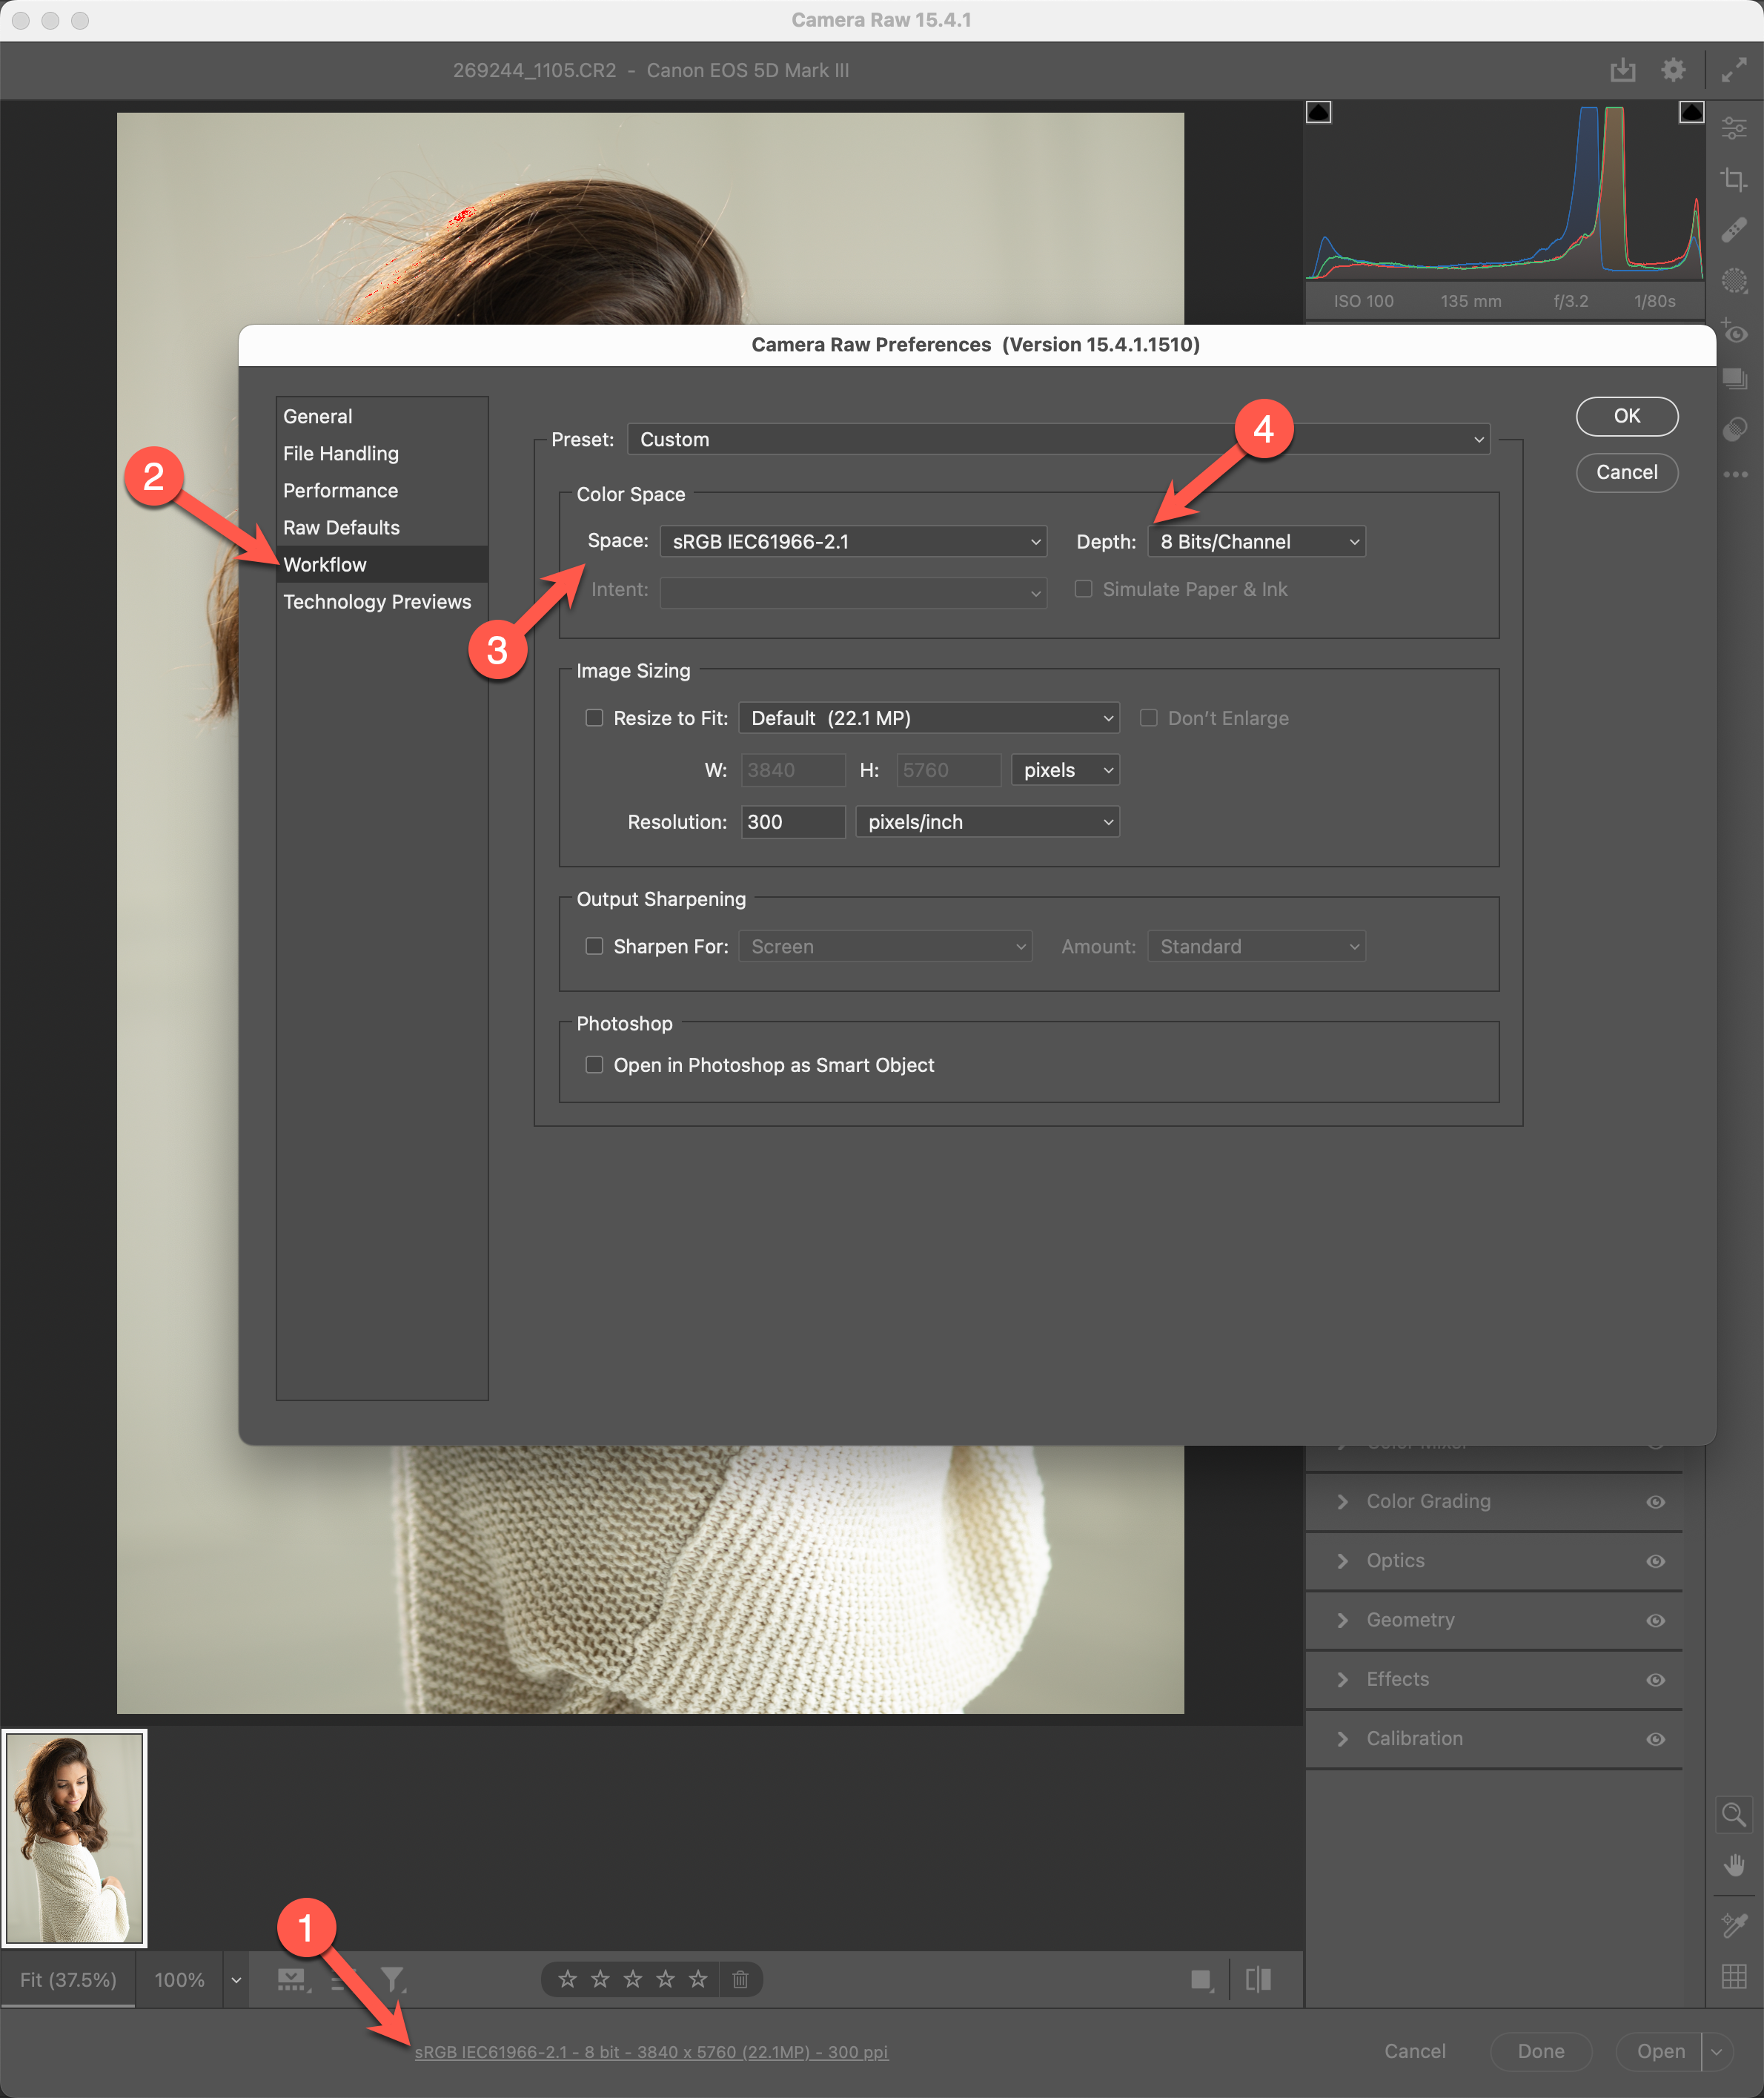
- First, open a raw file in Adobe Camera Raw.
- At the bottom center of the Adobe Camera Raw window, click the profile conversion link to open the Camera Raw Preferences.
- On the left sidebar, click "Workflow."
- Select either sRGB or Adobe RGB (1998), matching what you have set in the Photoshop Color Settings.
- Choose "8 bit/Channel" in the "Depth" field.
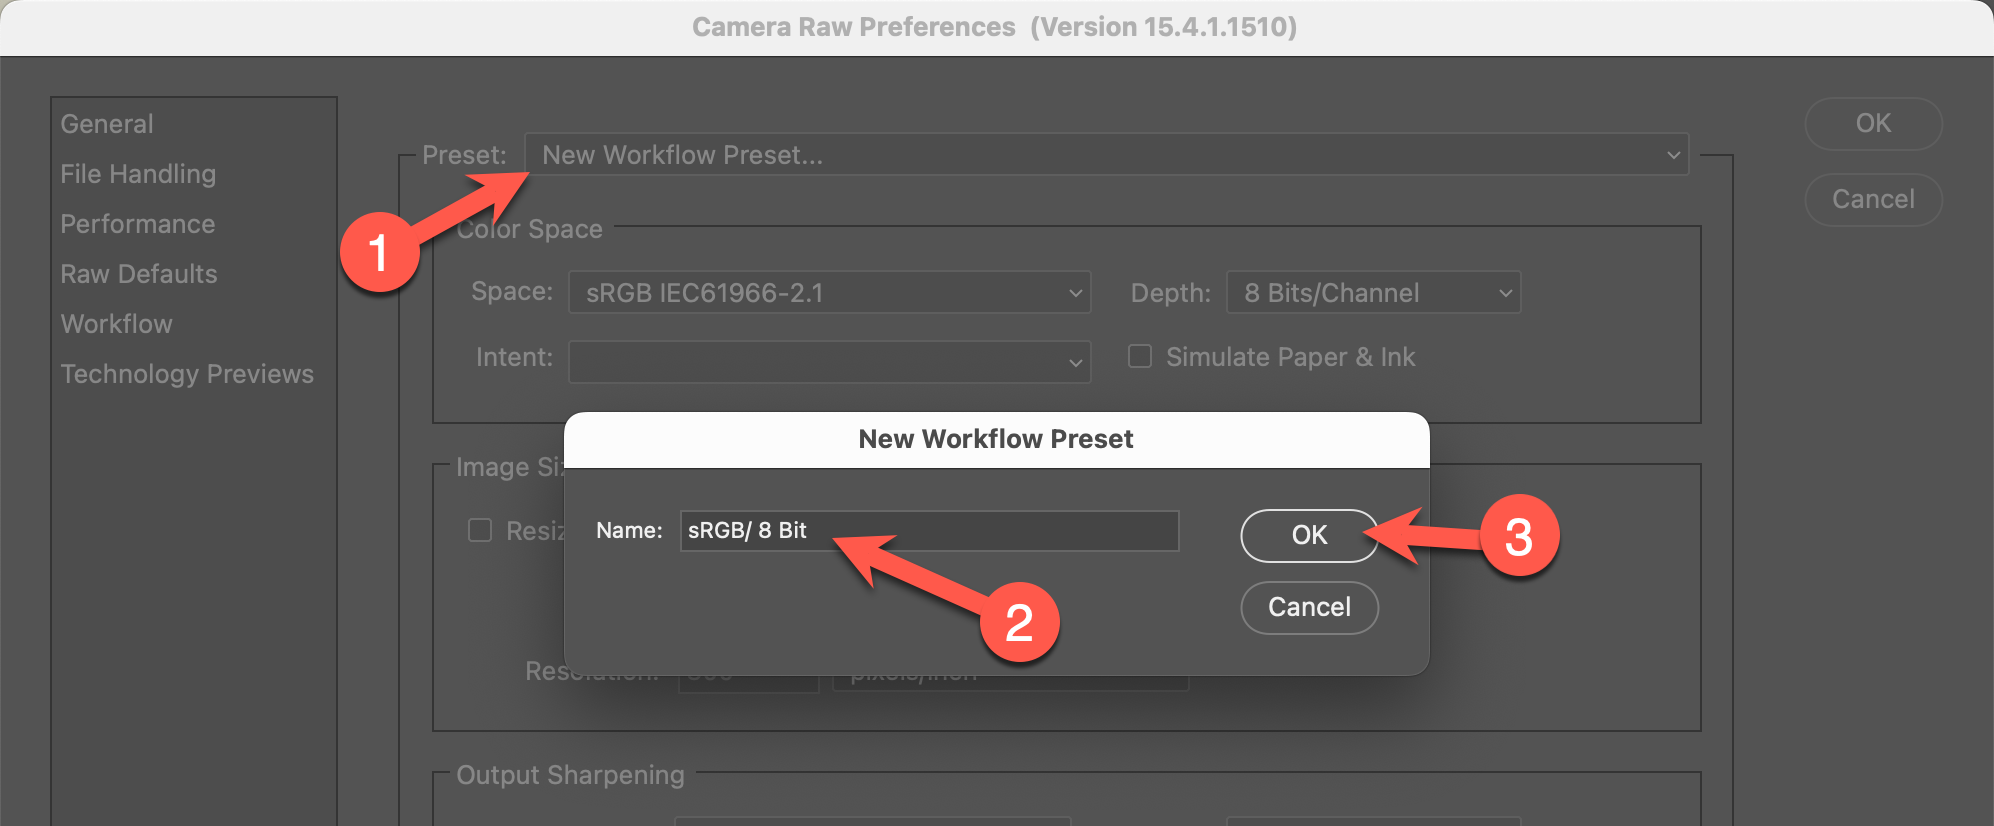
- Next, click "Preset" and select "New Workflow Preset."
- Type either "sRGB/8 Bit" or "A98/8 Bit" (depending on your chosen color space), then click OK.
- Now, click "Open" to open the image in Photoshop. This step is necessary to ensure that the settings are applied to the file, as this is more of a last-used setting than a preference. The next image you open in Adobe Camera Raw will display your preset at the bottom and continue using that setting until you change it.
Lightroom Classic
When creating or adding to ProSelect albums from Adobe Lightroom, the ProSelect plug-in for Lightroom simplifies the process of applying the correct color profiles. The plug-in provides the option to select either sRGB or Adobe RGB (1998) within the plug-in options. It is important to note that the ProSelect plug-in is automatically installed alongside the ProSelect software.
If you prefer to manually export files from Lightroom, it is recommended to create a user preset and utilize it for each export. By creating a preset with the settings the same as those used in Photoshop, you can ensure consistent and accurate color management throughout your workflow.

Photoshop Color Settings: What Works Best for Your Studio
Choosing the right color space for your studio work can be confusing, but the best approach is often the simplest. While some instructors recommend using ProPhotoRGB because of its wide color gamut, that space offers more theoretical benefit than practical use in a typical studio setting. Although ProPhotoRGB can represent more colors—almost half of what the human eye can see—no monitors can display that full range, and most printers can’t reproduce it. What you see on screen won’t match your print, and using it often leads to unnecessary complications.
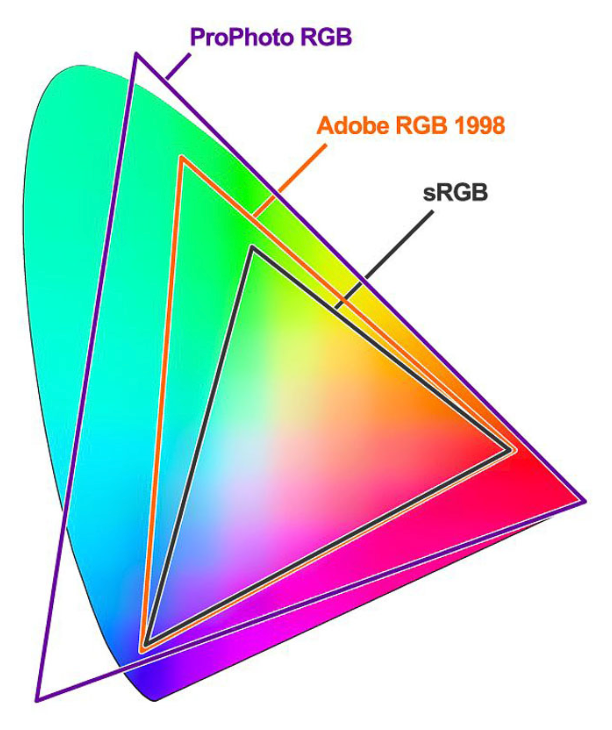
A color space defines the range of colors that can be displayed or printed. sRGB and Adobe RGB (1998) represent about one-third of visible colors. sRGB is the most compatible with monitors, labs, and online platforms. Adobe RGB offers a slightly wider range, but mainly benefits those printing exclusively with wide-gamut inkjet printers.
For most studios, sRGB is the best choice. It minimizes conversion issues, simplifies workflows, and matches the output capabilities of nearly all professional photo labs. Even labs that accept Adobe RGB usually convert files to sRGB before printing, especially when using traditional photographic paper. Portrait work, in particular, shows little difference between sRGB and Adobe RGB when it comes to rendering skin tones.
If you produce digital files for clients, deliver them in sRGB. If you're printing only on wide-gamut inkjet printers and know your workflow inside out, Adobe RGB may be acceptable, but it’s not necessary.
Recommended Photoshop Settings
To apply the correct color space in Photoshop:
- Go to Edit > Color Settings.
- Set your working space to sRGB IEC61966-2.1.
- When prompted with a profile mismatch warning after opening a file, choose “Don’t show again” and click OK. This ensures your images will open in the correct working space without interruption.
Following these guidelines helps maintain consistency from screen to print and avoids headaches caused by unnecessary color conversions.
ProSelect is designed to automatically detect and apply the correct color profile for each connected display when you have a multi-monitor setup. This helps ensure that your images are shown with consistent and accurate color across screens, especially important during client presentations or image review sessions.
However, in some cases, when ProSelect is run on Windows machines, it may not be able to auto-detect the correct color profile for a monitor. This could happen due to missing or improperly installed monitor profiles, limited operating system permissions, or certain types of display configurations (such as extended displays with third-party calibration tools).
To address this, ProSelect allows you to manually assign a color profile to each screen. This manual assignment ensures that the color rendering is as accurate as possible, regardless of whether ProSelect was able to automatically determine the settings.
The Importance of Color Accuracy
When presenting images to clients, especially for sales sessions, color accuracy is critical. If your main sales display is showing images with a skewed color balance due to an incorrect profile, clients may perceive the quality of the product differently. Manually assigning the correct ICC profile ensures consistent color accuracy between your working monitor and any external displays (such as a client viewing screen or a projector).
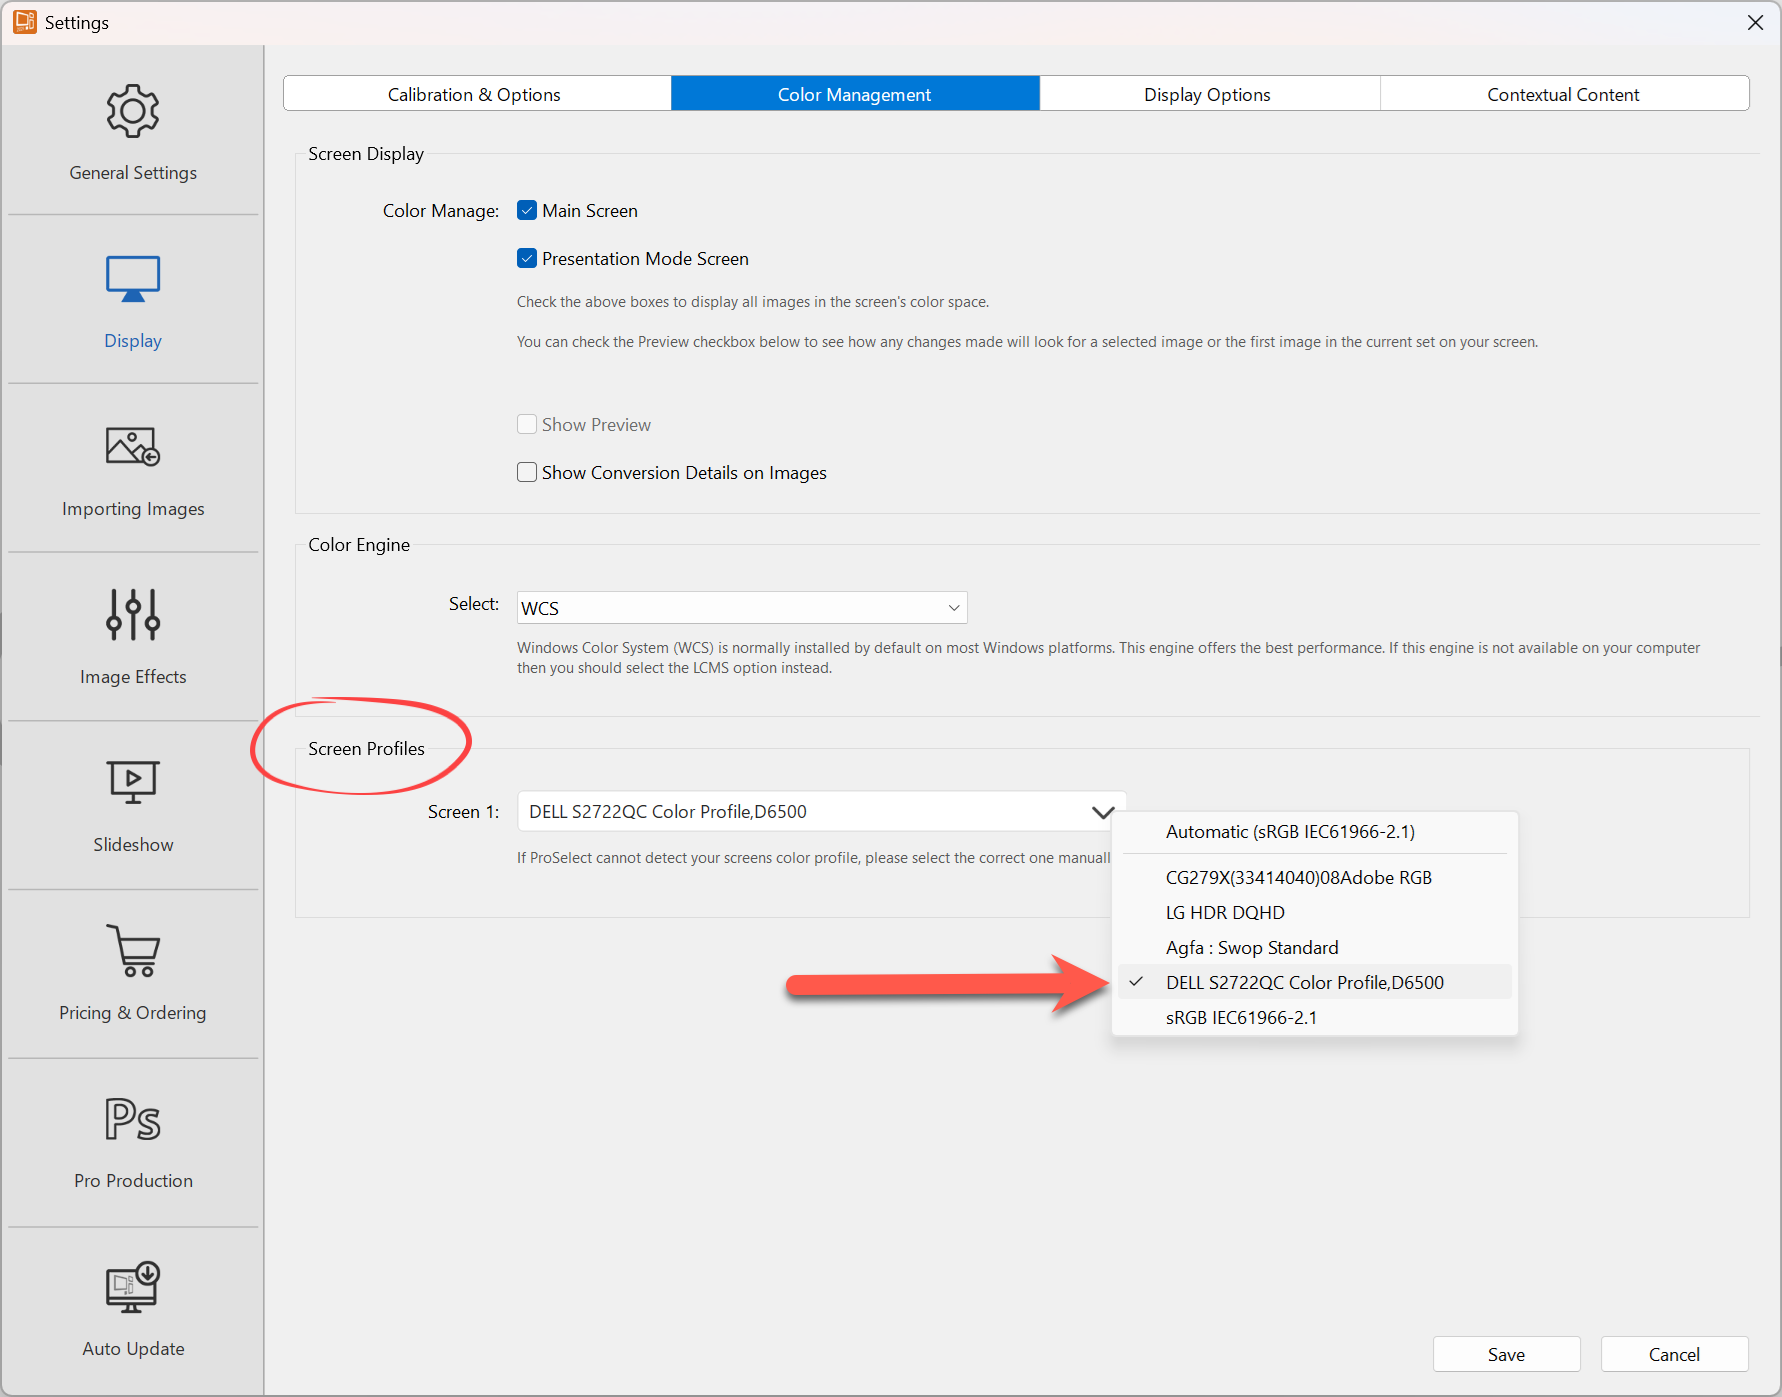
Steps to Manually Assign a Color Profile
- Go to the top menu, Edit > Settings > Display.
- Select the Color Management tab.
- In the "Screen Profiles" section, you can select each screen being used and assign a specific ICC color profile from your system. You’ll need to know which profile corresponds to your monitor—this is typically created by a calibration tool like X-Rite or Datacolor, or provided by the monitor manufacturer.
When to Use Manual Assignment
Manual assignment is especially useful in the following scenarios:
- Your calibration tool stores profiles, but the system doesn’t apply them globally.
- You use a non-standard display setup, such as a television or projector, as a client viewing screen.
- You experience mismatches between what you see in Photoshop or Lightroom versus what appears in ProSelect.
- You’ve noticed inconsistent color or brightness between screens, even after calibration.
Assigning the wrong profile manually can lead to even worse color representation, so always confirm that you’re selecting the correct ICC file. It’s also a good idea to periodically recalibrate your monitors and update the profiles to reflect any changes in ambient lighting or screen aging.