Framed Prints &
  Matted Prints
Many print labs provide the option to order a frame, mat, and print together for a fixed price. In ProSelect, you can set up Framed Prints, which include a print, mat, and frame all priced together. Similarly, you can also create Matted Prints that consist of just a print and a mat, also offered at a fixed price. It's important to verify how your supplier determines sizes. Suppliers may base their product dimensions on the frame or the print size. Always refer to your supplier's specifications on their website to ensure compatibility. For instance, if a supplier uses frame size to define dimensions, you might need to input non-standard paper sizes into ProSelect to accommodate these combinations properly.
- A product template is required. The template's Starting Size serves as the starting or minimum size for the product.
- The mat and/or frame applied to the template is not locked. The frame and mat may be swapped once the product is being used.
- Prices are fixed, and they include the frame and/or mat.
- Framed Print products do not have to include a mat, but they must have a frame.
- A frame can be added to a Matted Print product at an extra charge.
- These products are always dynamically sized based on the sizes you add in the Product & Pricing Manager.

- Choose a Supplier from the drop-down list on the Bottom Bar to exclusively display products associated with a particular supplier.
Before you start pricing your products, be sure you have selected the applicable price list from the drop-down menu on the bottom left.
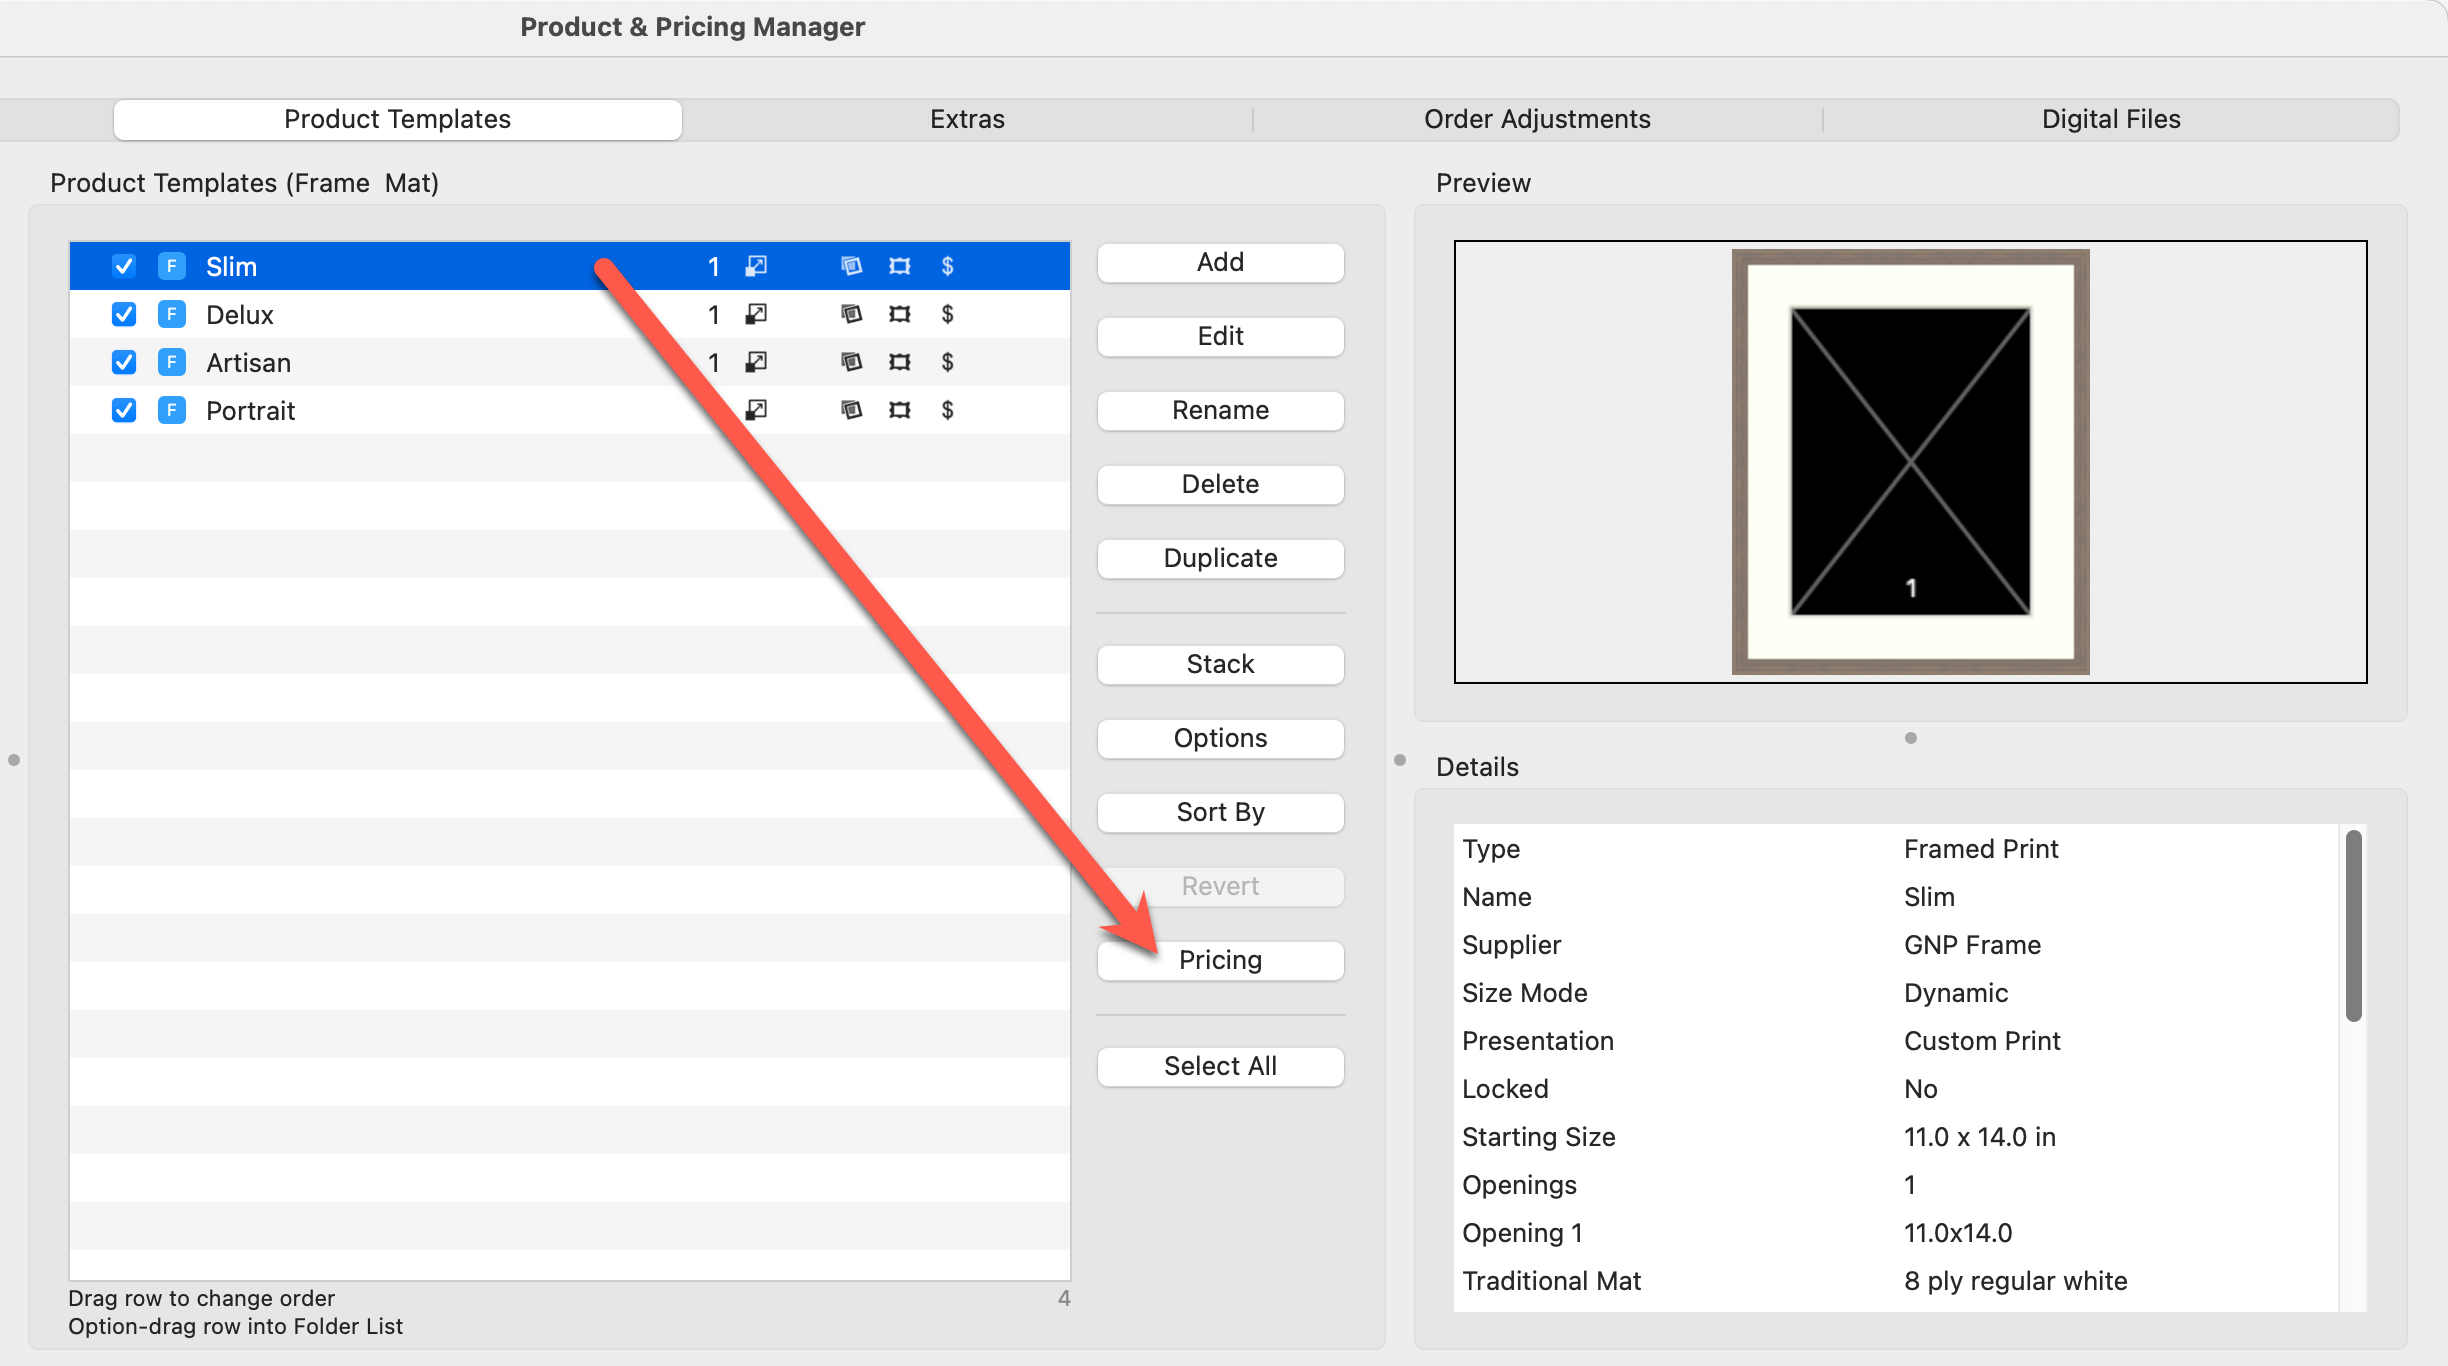
Product Templates are designed in the Product Editor. Click on Create a New Product Template to learn how to get started. For specifics on creating Framed Prints and Matted Prints, click on Framed Prints & Matted Prints.
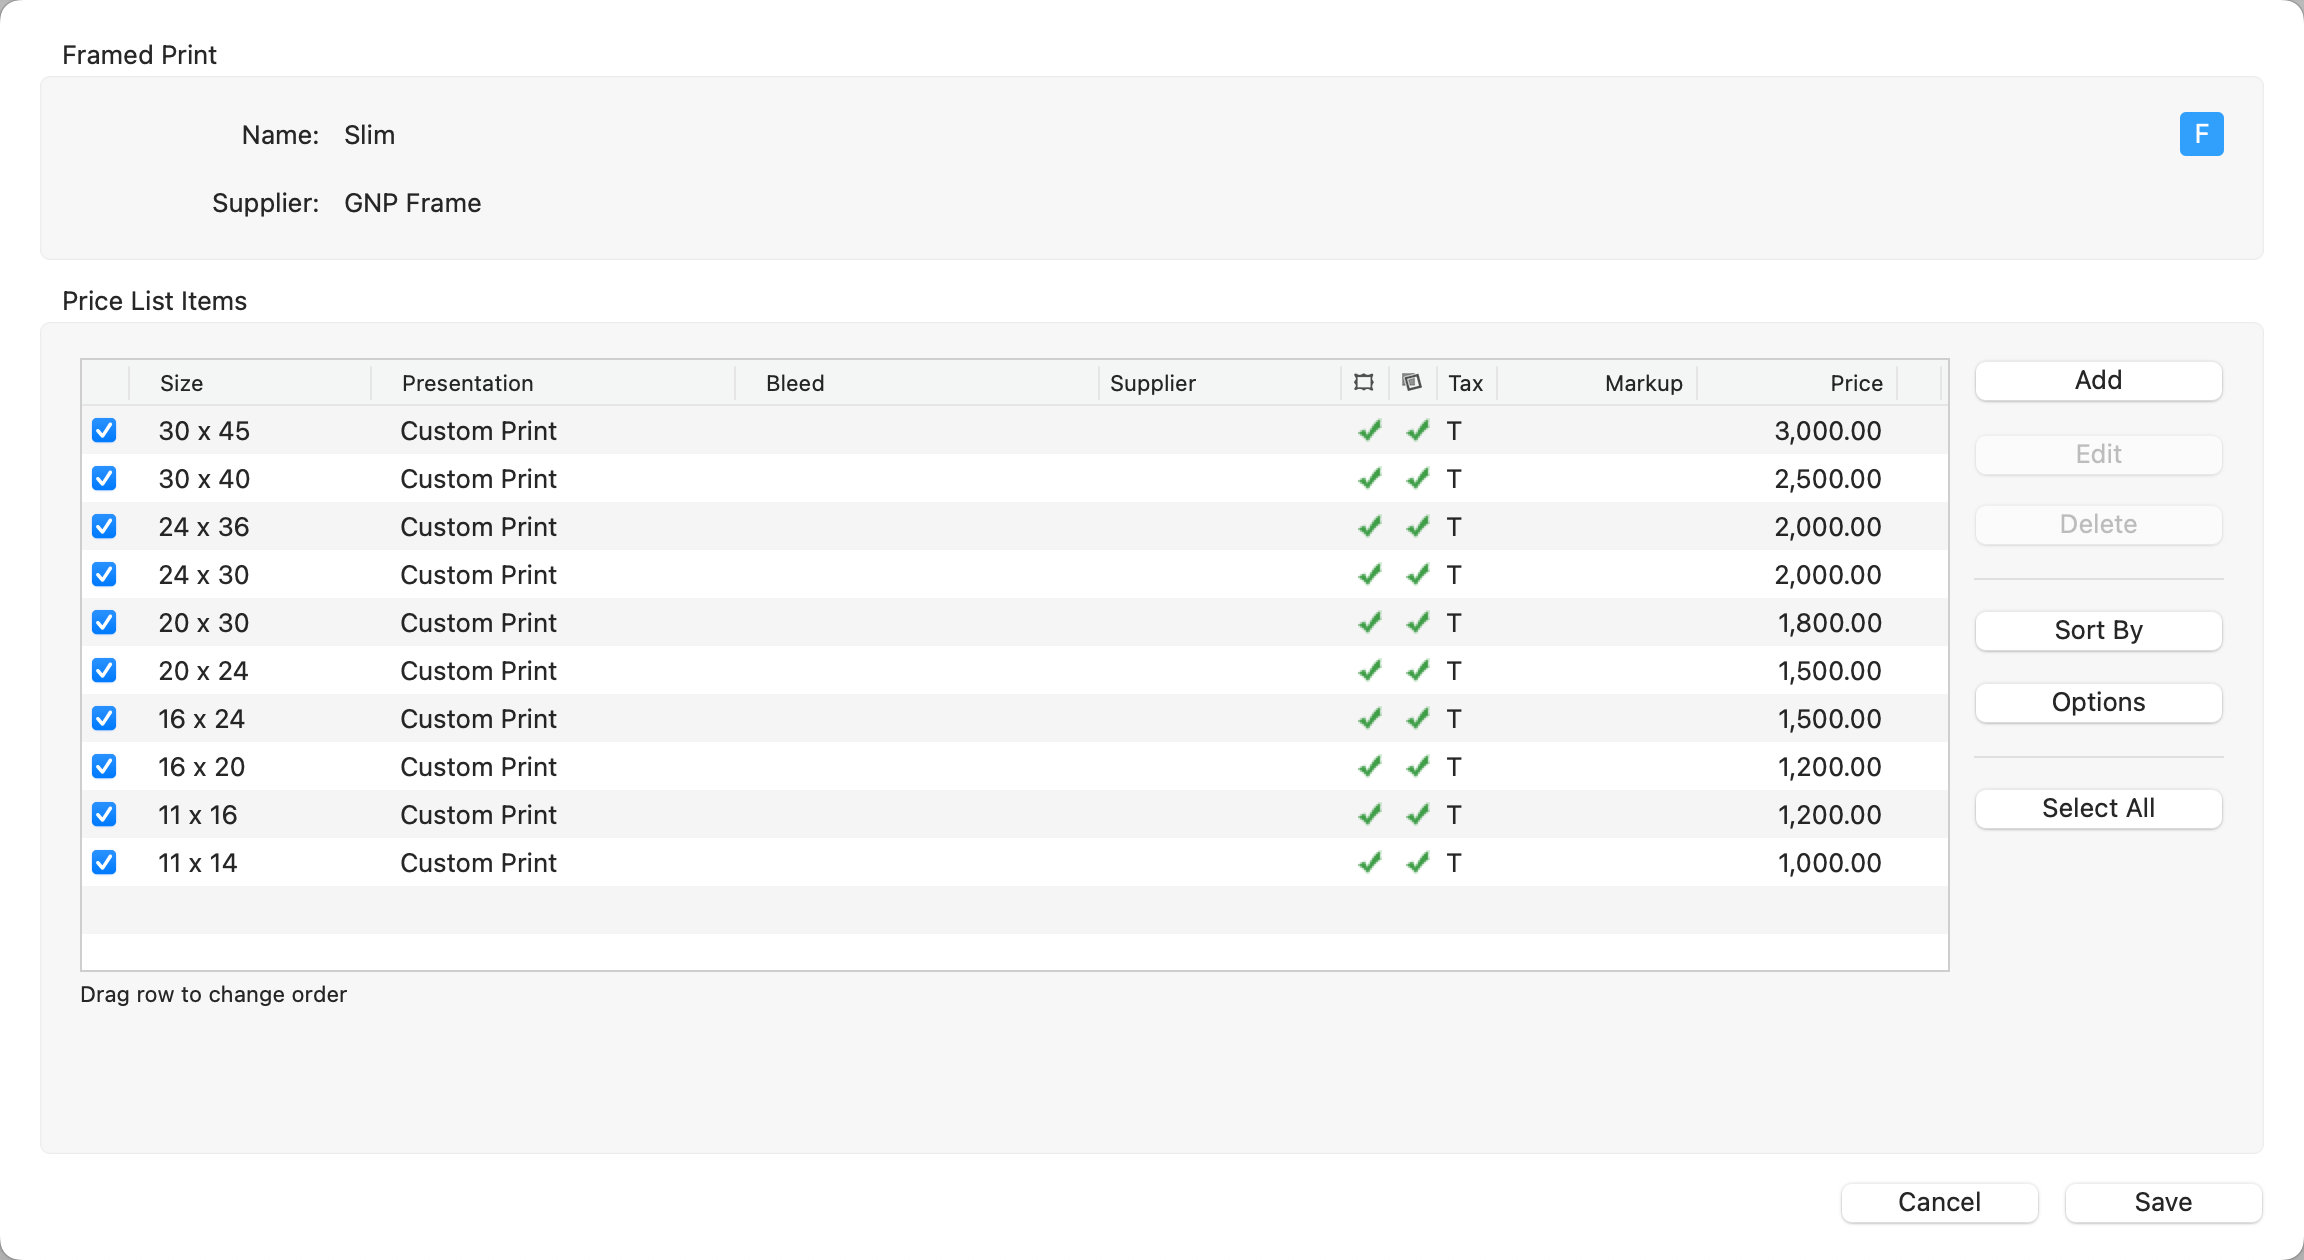
Framed Prints and Matted Prints have a single pricing option - fixed price.
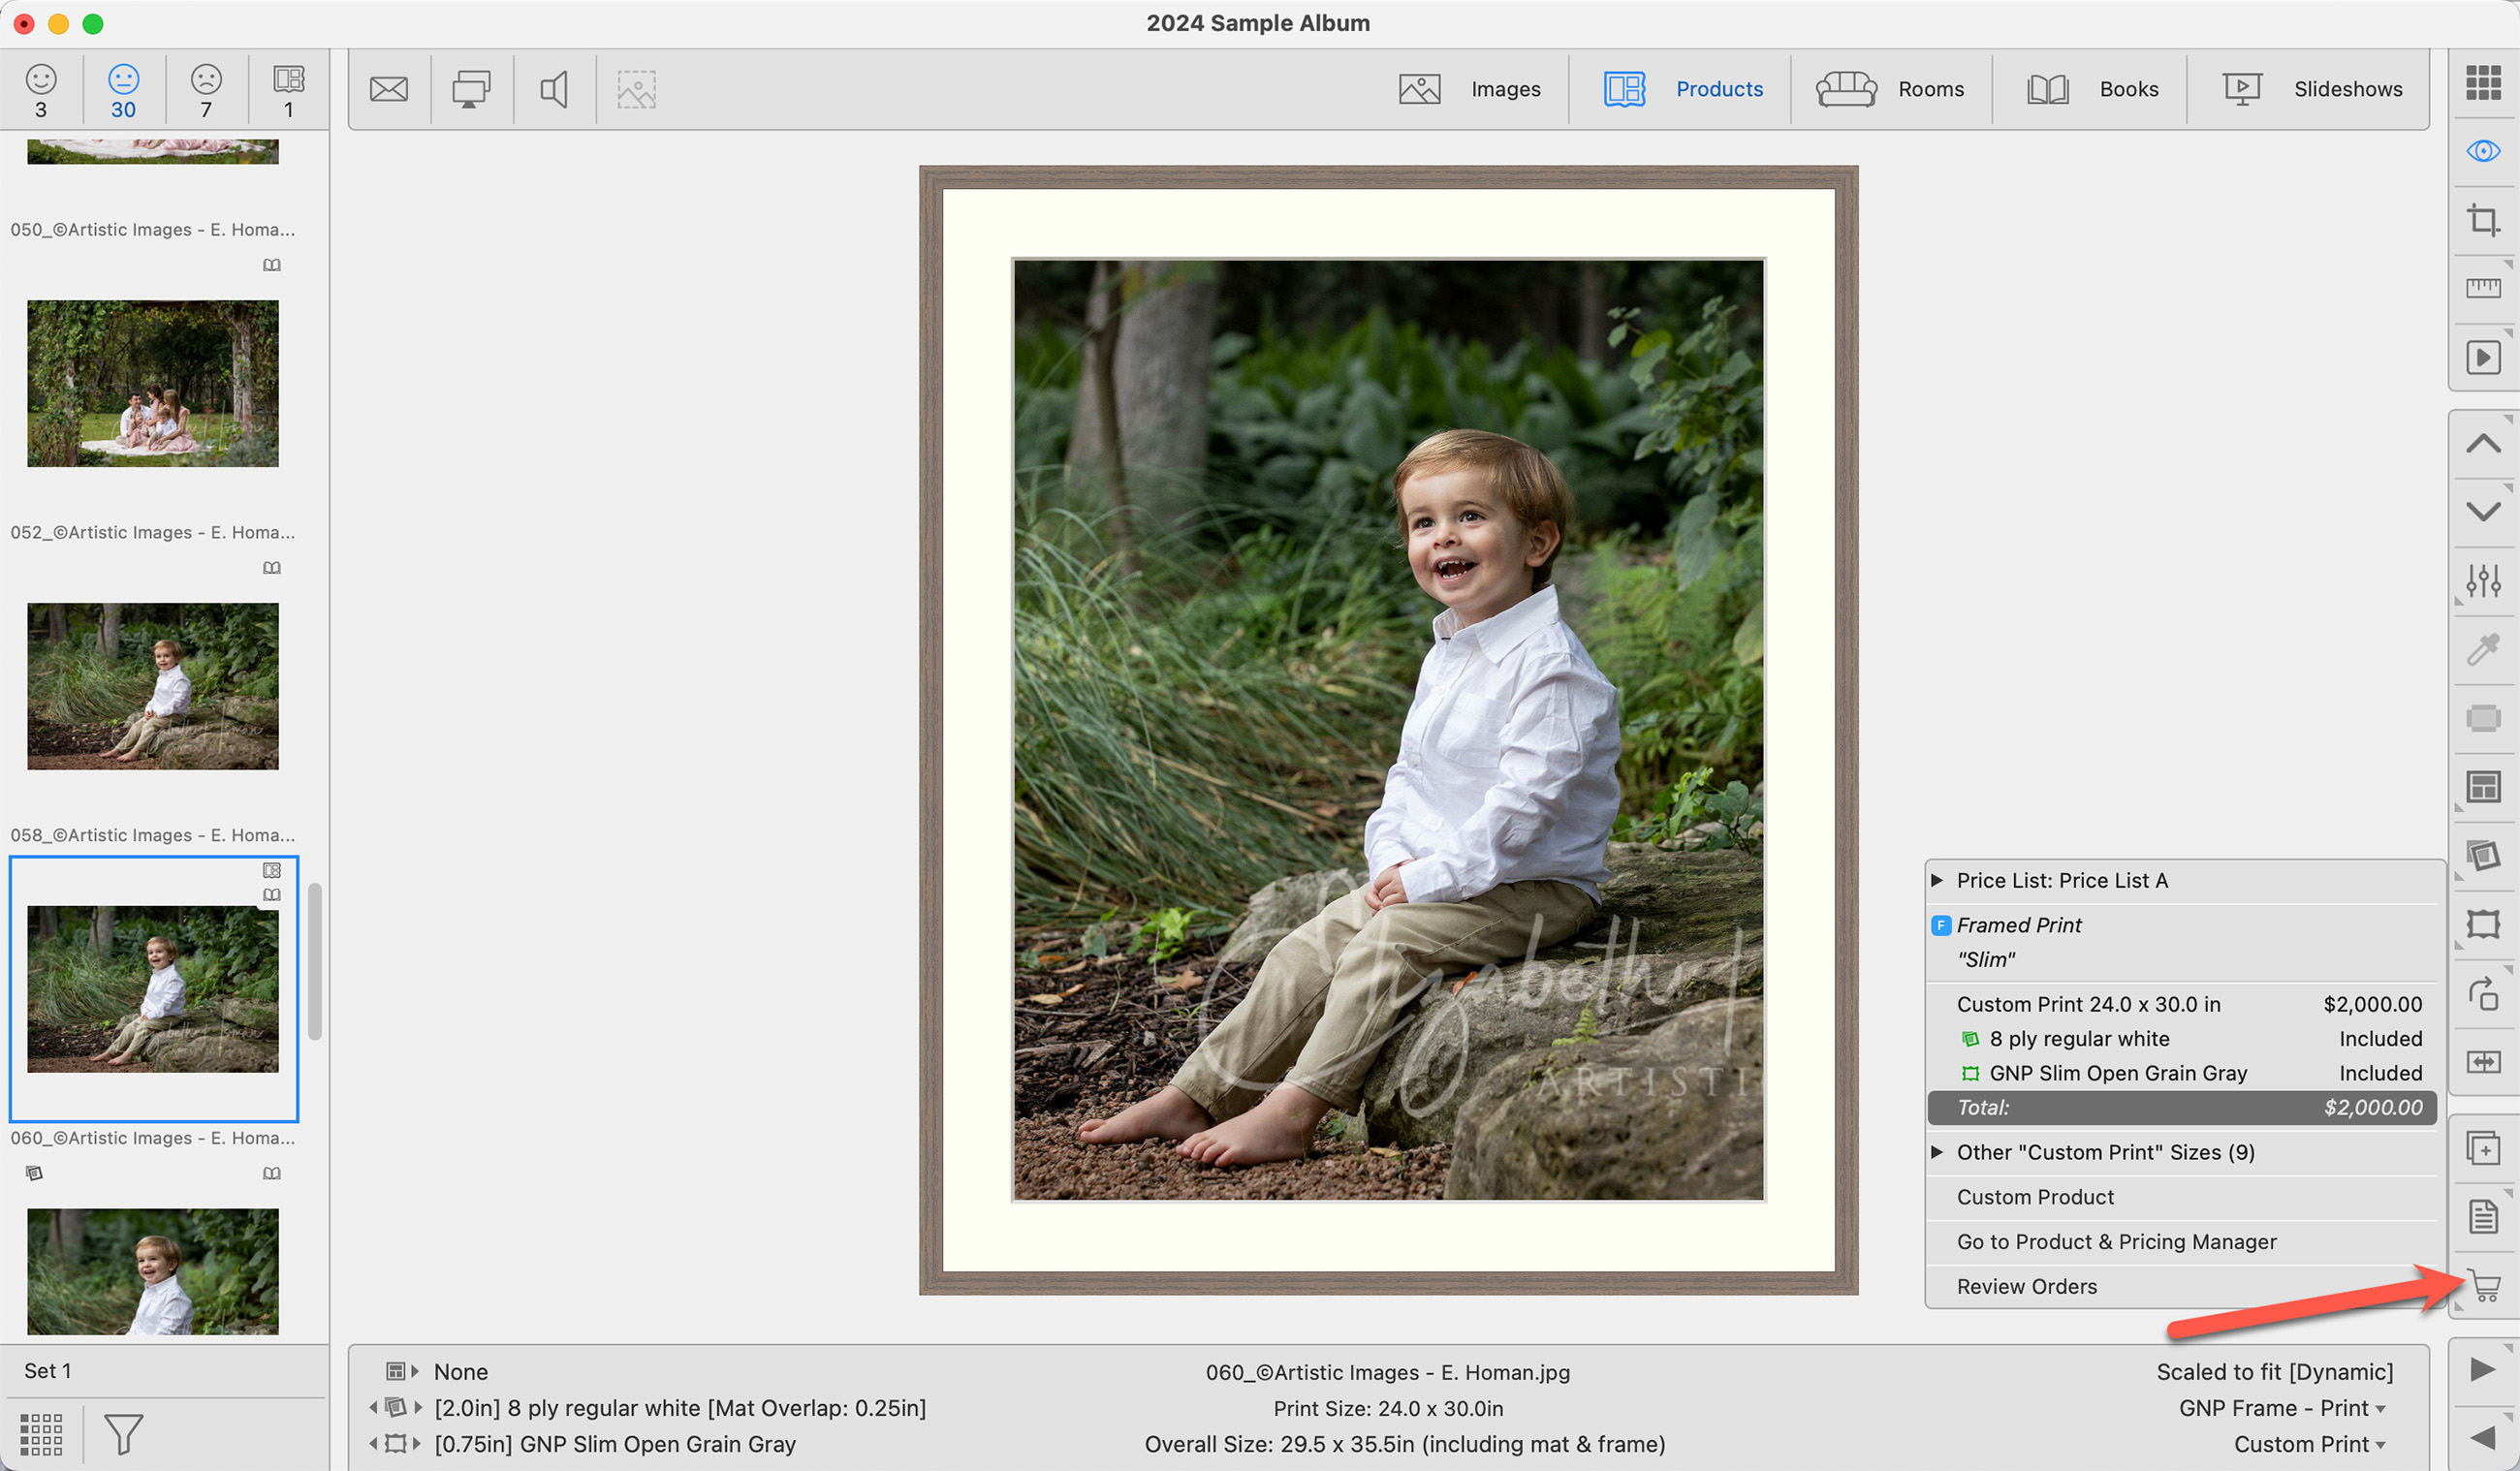
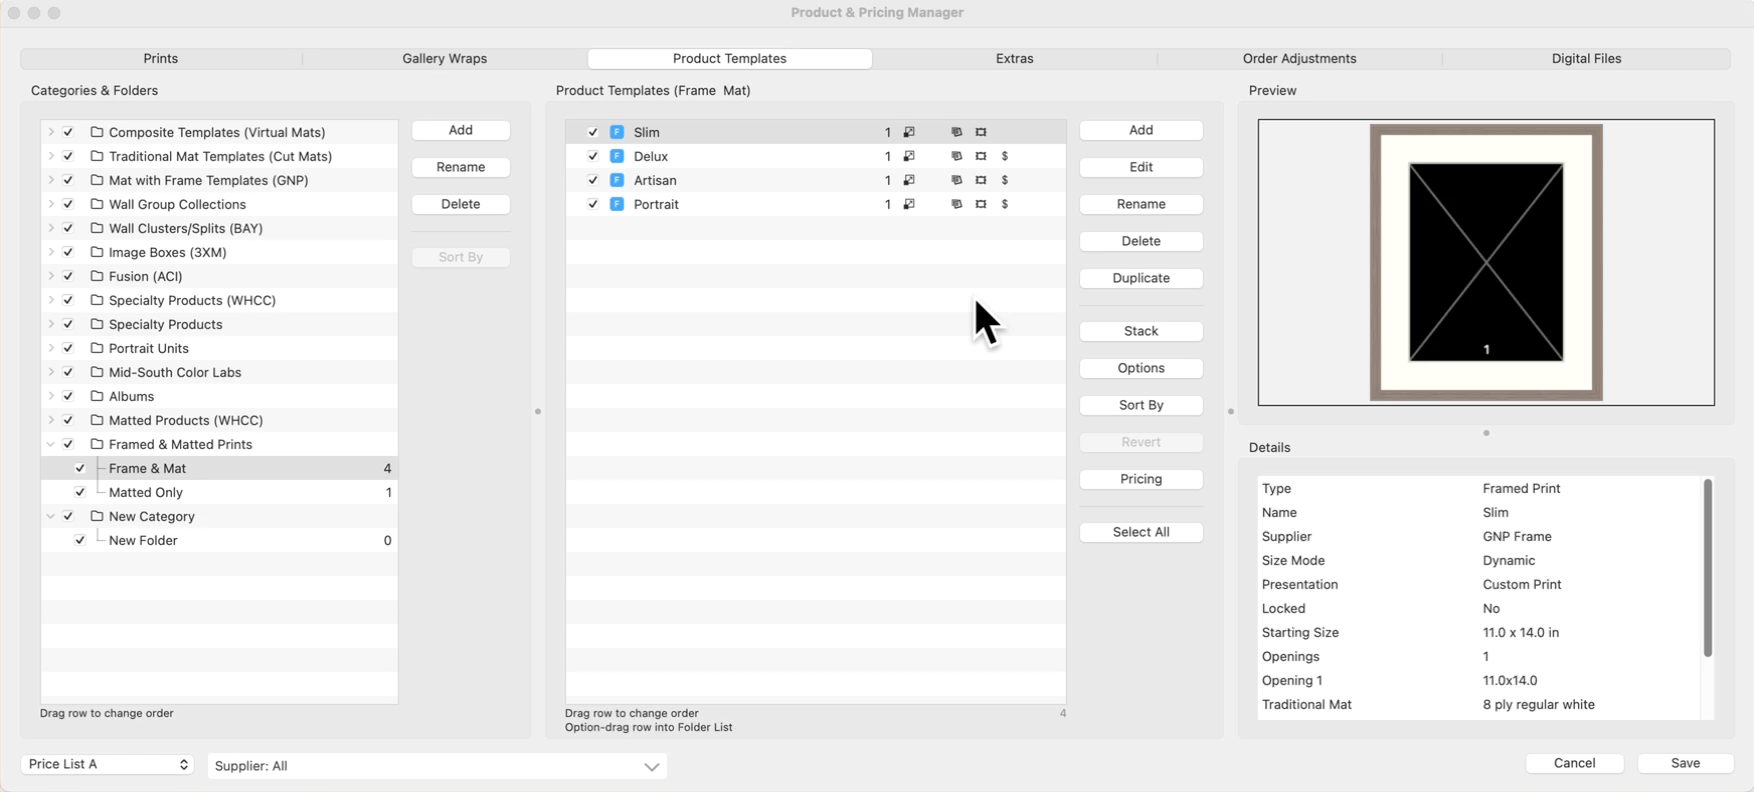
- The name of the product template (for example, Slim) appears at the top, as well as the Supplier if one has been assigned.
 : This checkbox indicates that the product is "turned on" and available in the current price list. Uncheck this box if you do not want a particular product to appear.
 - Size: This column lists the Paper Size used in this product.
- Presentation: This column lists the presentation option assigned to the product.
- Supplier: This column indicates the Supplier if one has been assigned.
 Frame: A checkmark will appear in the column if a frame has been assigned to the product.
 Traditional Mat: A checkmark will appear in the column if a traditional mat has been assigned to the product.
- Prod. Code: If you have enabled product codes in your Settings, this is where they appear.
- Tax: a T indicates the item is taxable. An N indicates the item is non-taxable.
- Markup: If you choose to price your product using "Supplier Cost x Markup", it will display here.
- Price: This column indicates the selling price of your product.
- You can change the order of the products by selecting a row and dragging it to where you want it to be.
When setting up frame, mat, and print combinations in ProSelect, it's important to verify how your supplier determines sizes. Suppliers may base their product dimensions on the frame or the print size. Always refer to your supplier's specifications on their website to ensure compatibility. For instance, if a supplier uses frame size to define dimensions, you might need to input non-standard paper sizes into ProSelect to accommodate these combinations properly. This step ensures that the products you create in ProSelect align with what your supplier offers.
- Select a Product Template you wish to price from the Product Templates Panel.
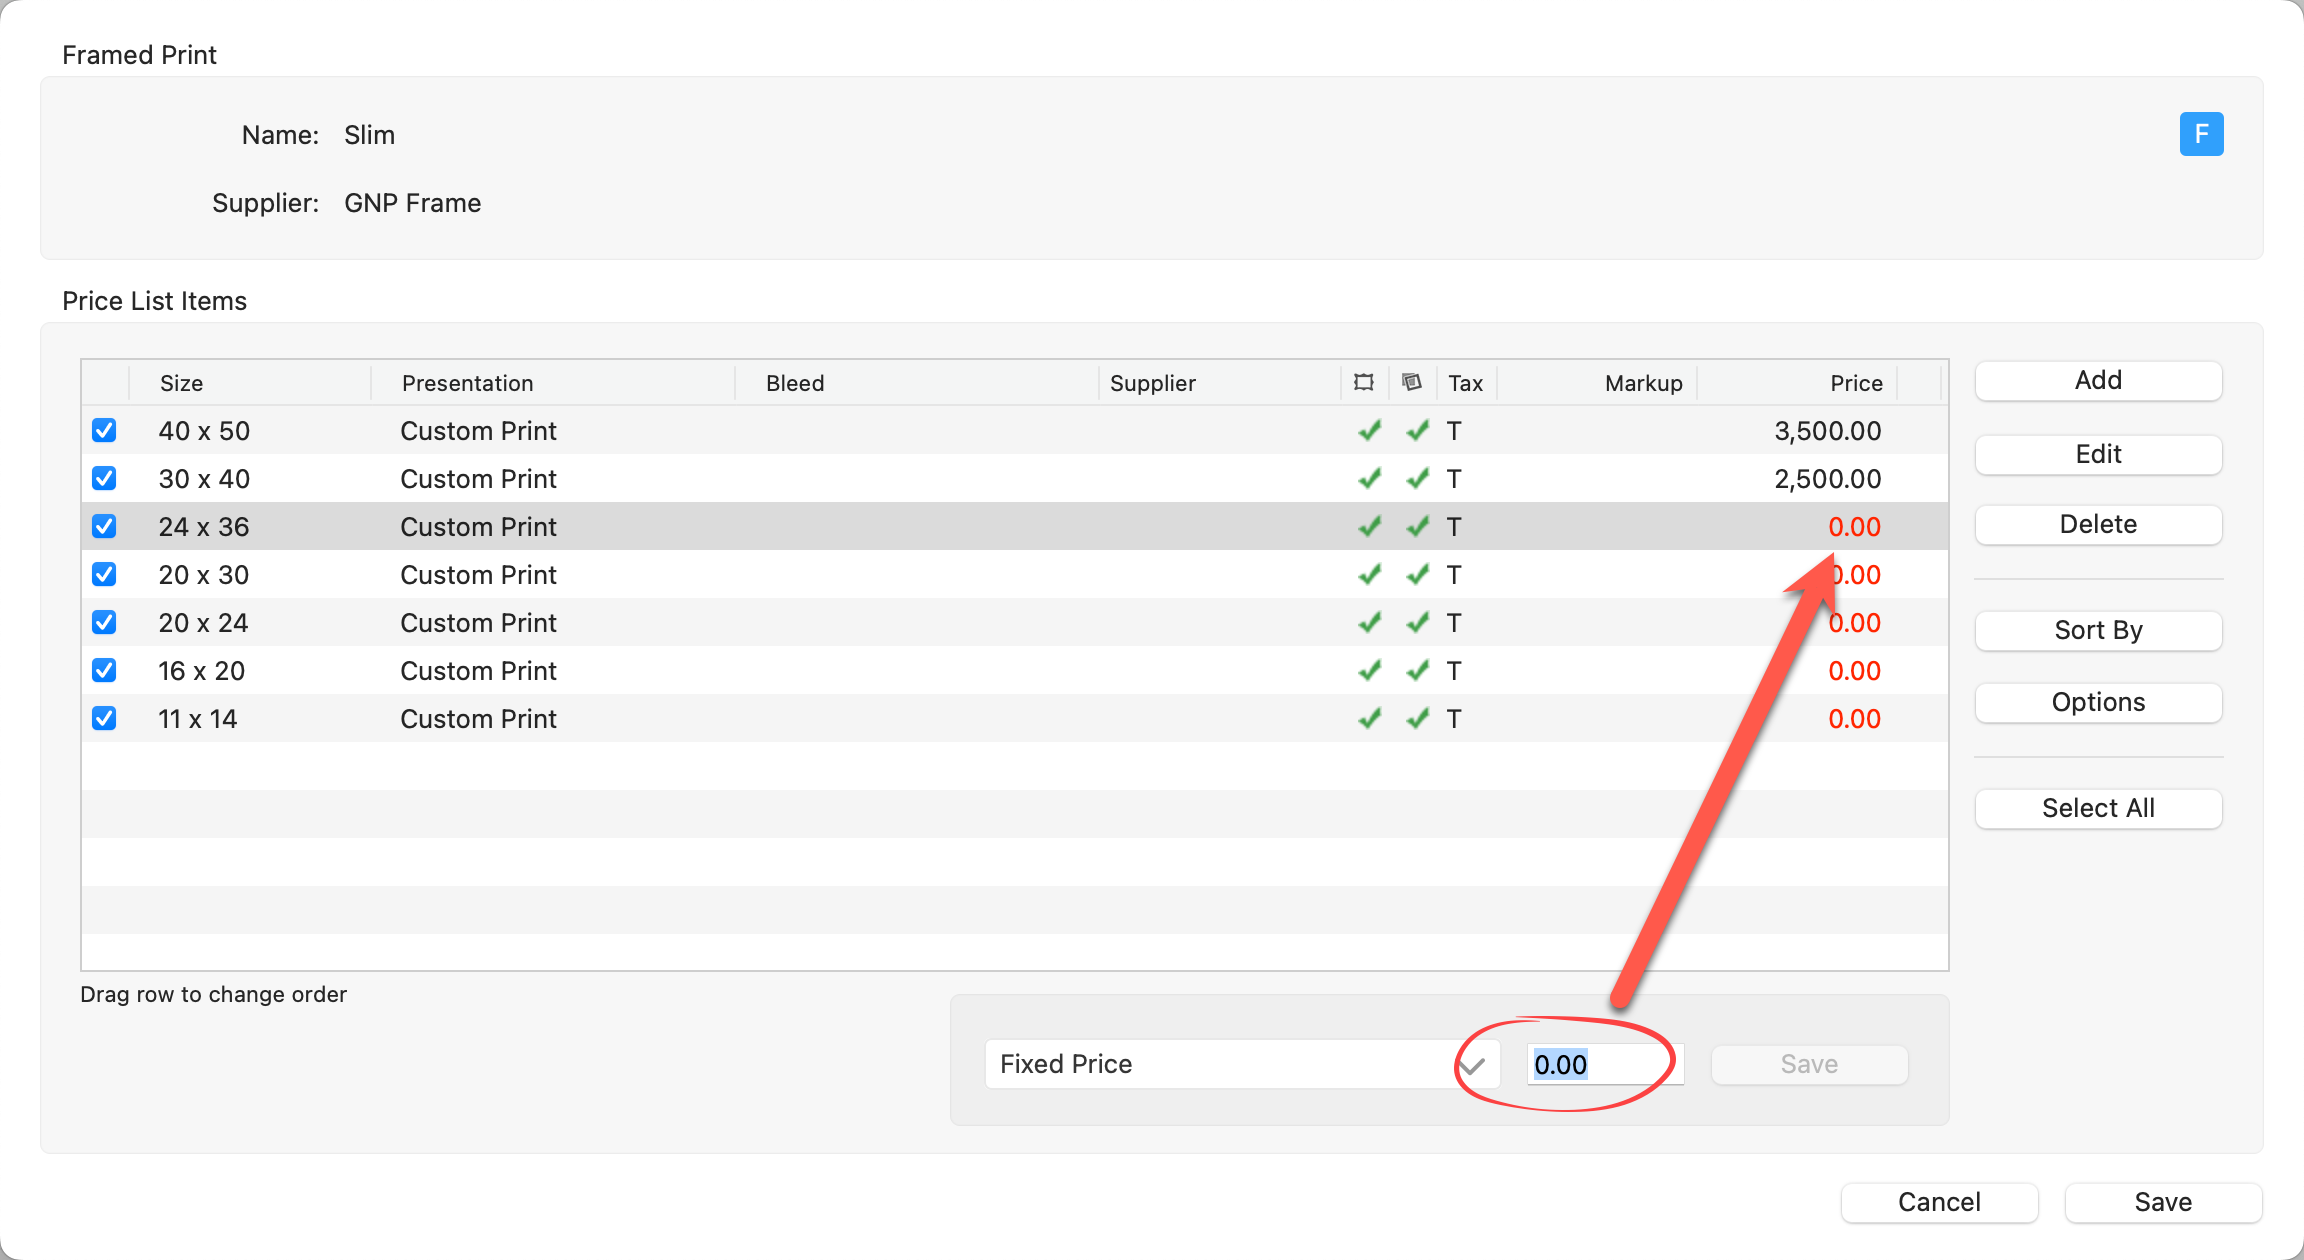
- Click the Pricing button to open the Price List Items dialog. This dialog is where all of your priced items will appear.
- Click the Add button on the right-hand side of the Price List Items dialog.
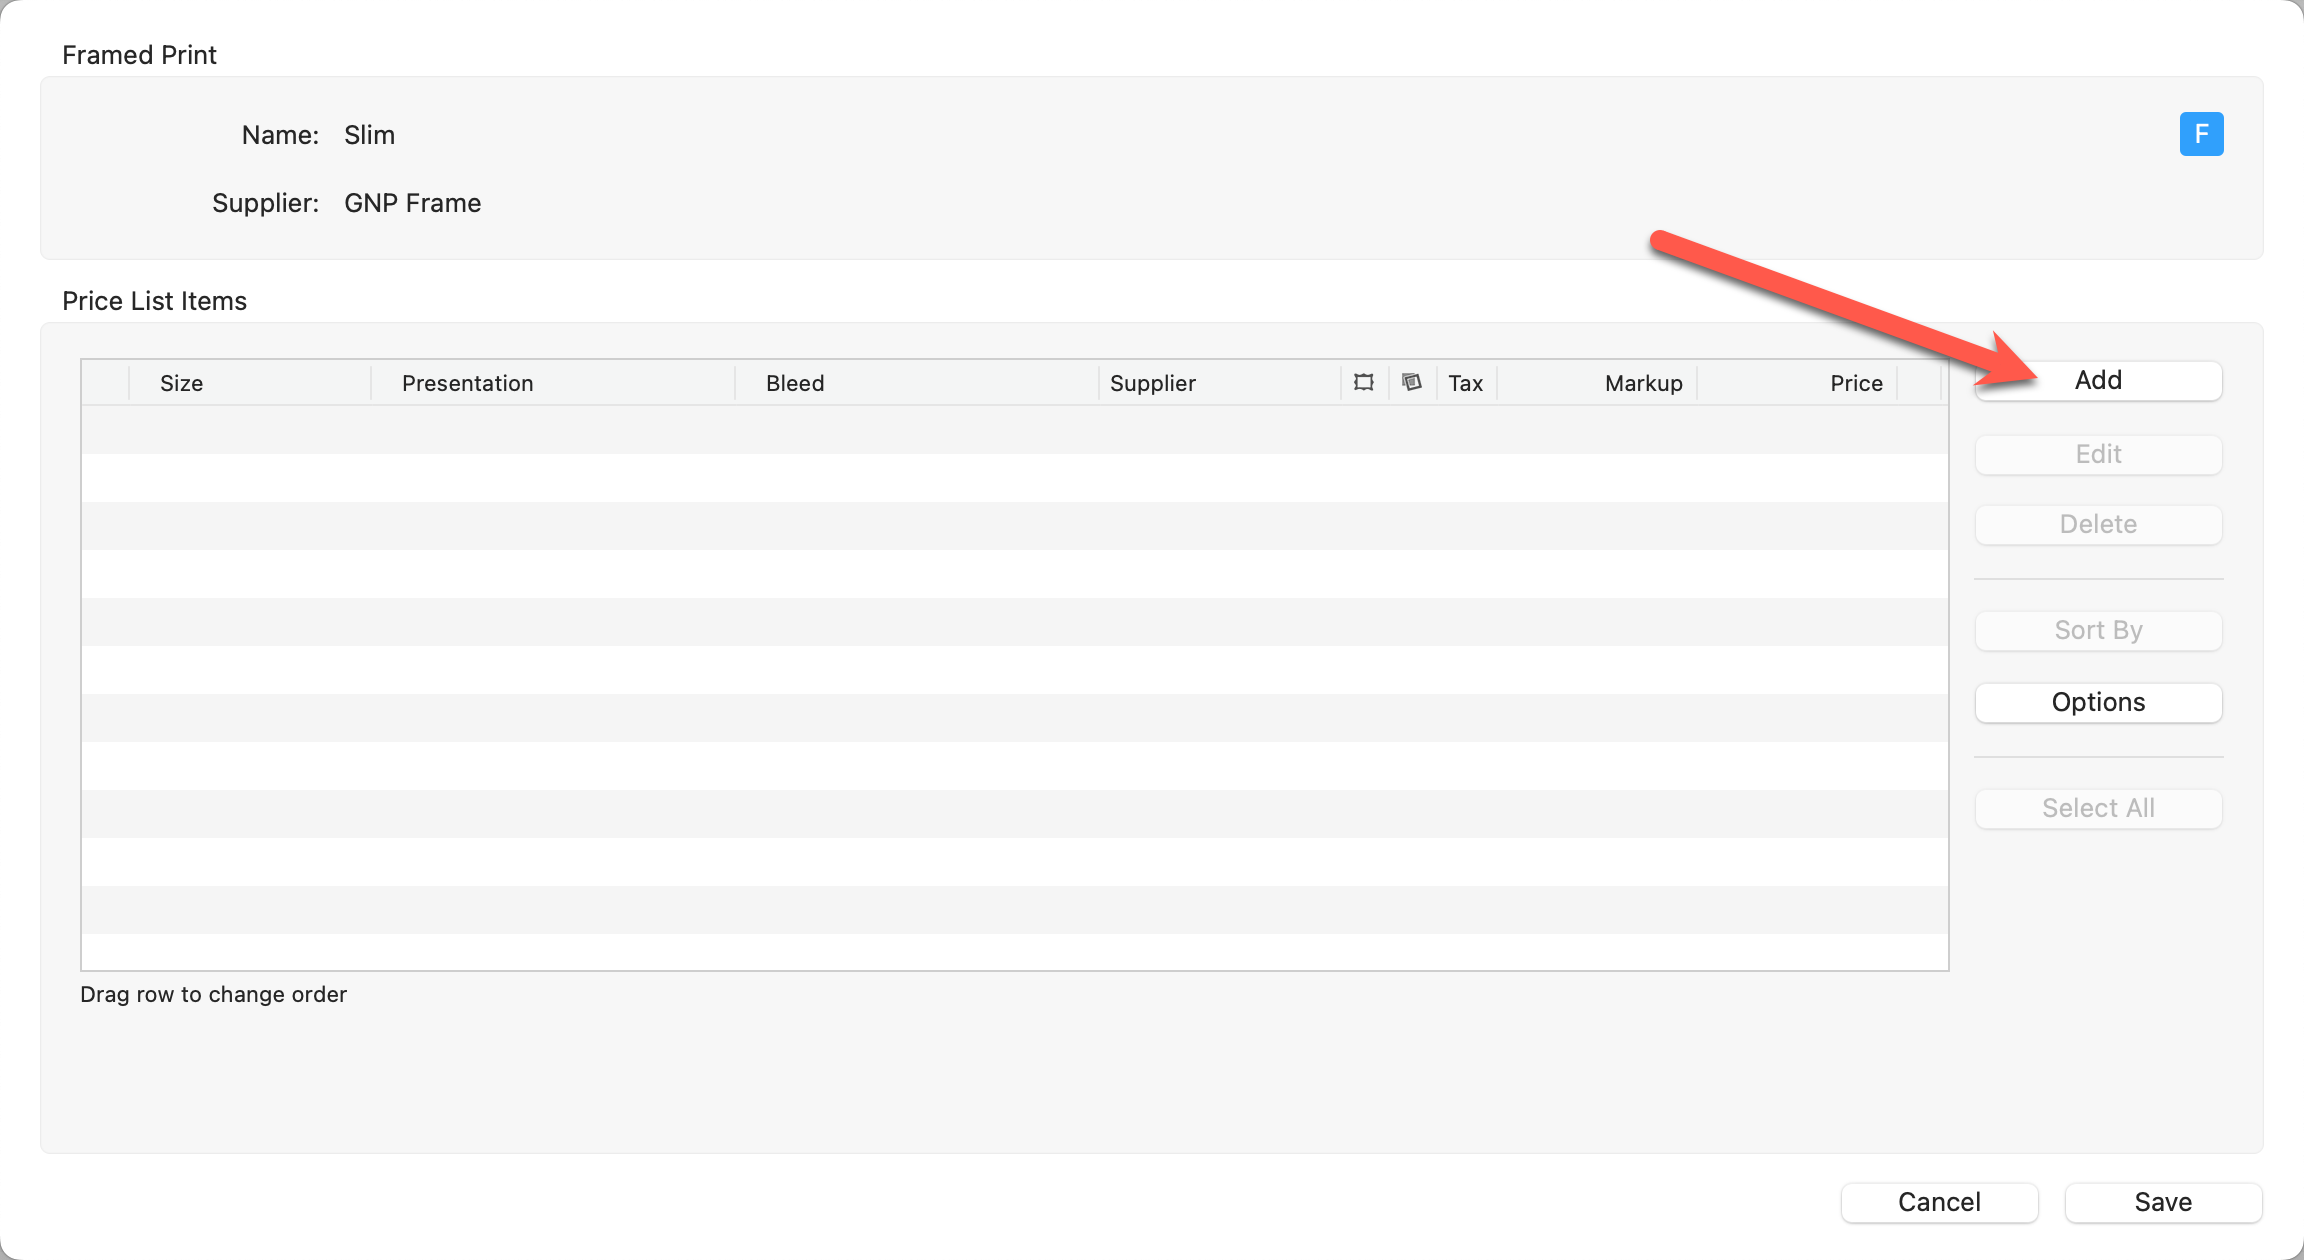
- This will open a new dialog where you can add sizes.
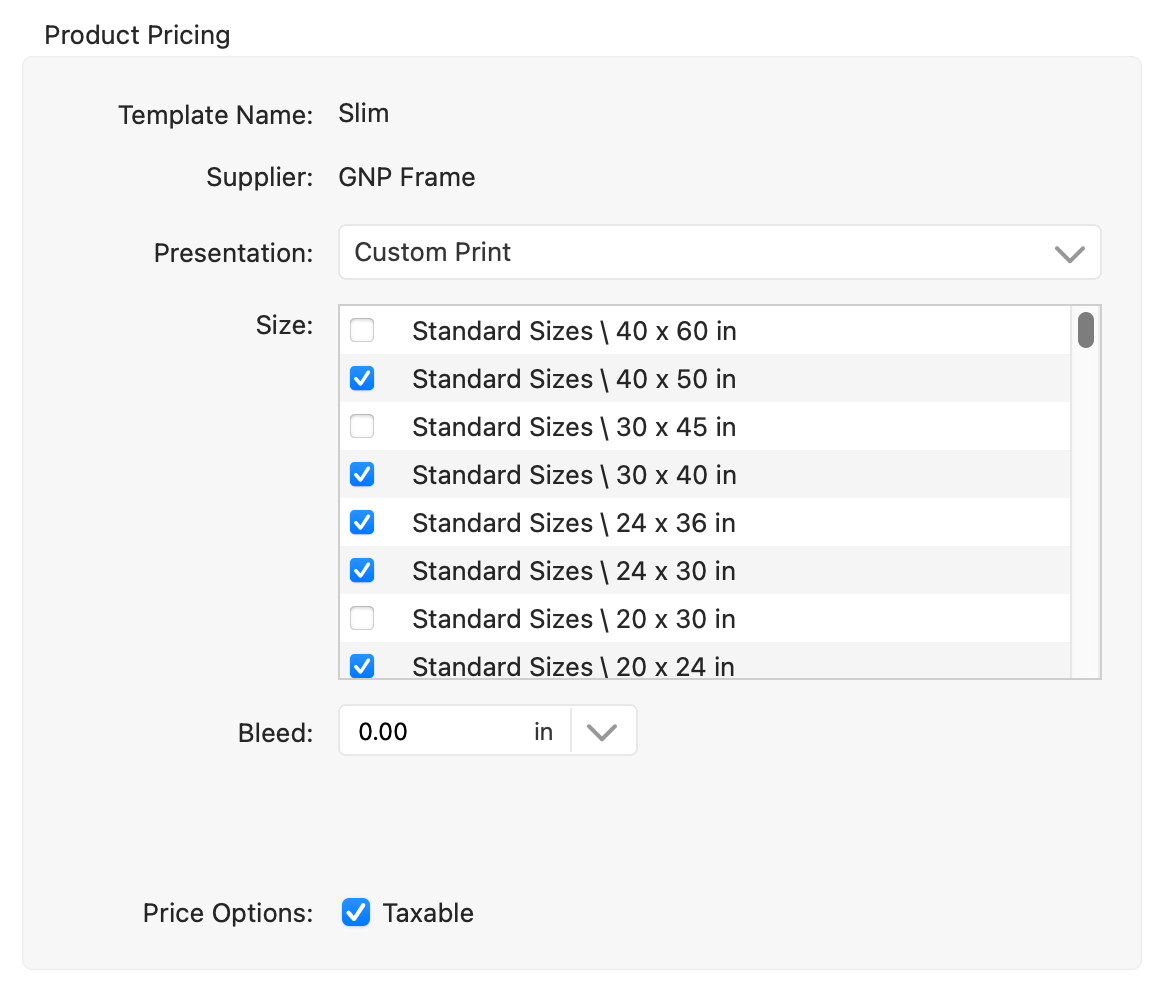
- Template Name: The name of the template is listed here.
- Supplier: If a supplier has been assigned to the product, the supplier name is listed here.
- Presentation: Select the presentation option for the new item(s) you would like to add. If the presentation option you want is not listed, select "manage" from the list and add it.
- Size: Framed & Matted Prints are dynamically sized. Use the checkboxes to add as many sizes as you would like. If a size is grayed out, it has already been added as a price list item.
- The size list is based on what has been set up in Paper Sizes.
- If the paper size you want is not listed, right-click on a paper size and select "manage." (This will take you to the Setup Paper Sizes dialog.)
- Tip: Use CmdCtrl+ A to select all sizes (or right-click on a size and choose "select all.") Once selected, you can check a single box to "check all" sizes.
- See the note at the bottom of this page regarding pricing multiple sizes at once.
- Bleed: Optionally add a bleed on the prints.
- Product Code: If enabled, one will be auto-generated.
- Check the taxable box if you wish the product(s) to be taxed.
Price
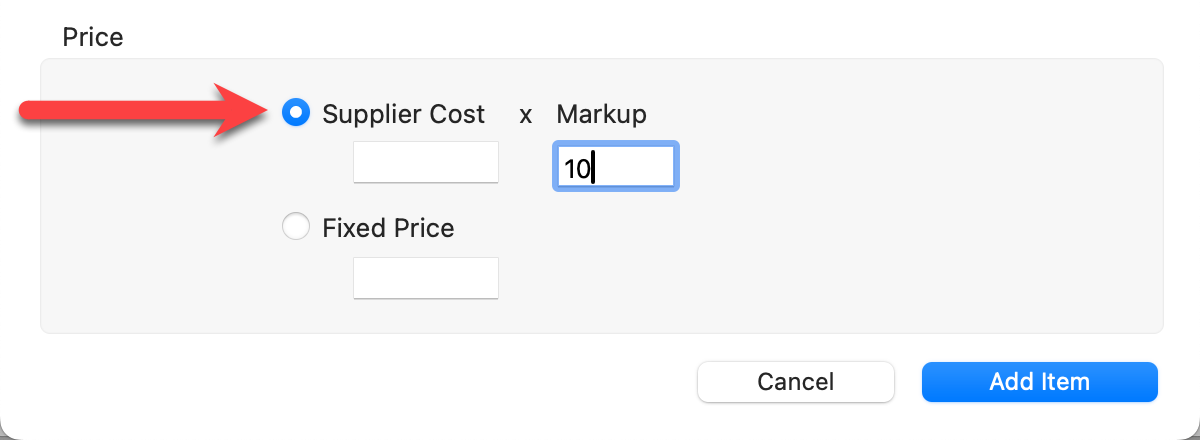
Choose Either Supplier Cost x Markup or Fixed Price.
- Supplier Cost x Markup: This pricing method is best used when Importing Pricing From a Spreadsheet.
- Leave the Supplier Cost box empty if you are adding multiple sizes. You will individually enter the supplier costs for each size after adding the sizes in.
- Enter the markup in this dialog. The markup will be applied to ALL sizes.
- Fixed Price: Select this option to enter a fixed price.
- Leave the Fixed Price box empty if you are adding multiple sizes. You will individually price each size after adding the sizes in.
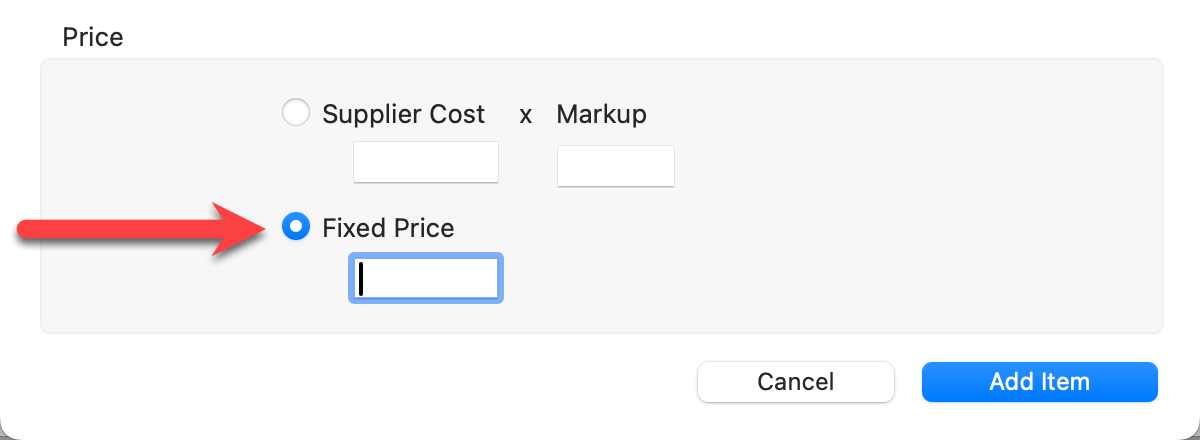
- Leave the Fixed Price box empty if you are adding multiple sizes. You will individually price each size after adding the sizes in.
- Click the Add Items button.
- Your new price list items will appear in the Price List Items dialog.
- From here, you can individually price each size you are offering.
- Click the Save button when finished.
- You can manage and update your prices using CSV file spreadsheets.
- Use the Select All button to make changes to all of the products at the same time. This works well when you are adding a universal markup.
- Hold down the OptionAlt key while clicking the Add Items button to add the items and keep the dialog open.
- When entering a price, hold down the OptionAlt key while clicking the Save button. This will save that price across ALL price lists.
Price Using "Fixed Price"
- Click on the row you wish to price.
- Type in a price in the Fixed Price box.
- Press ReturnEnter on your keyboard or click the Save button. You will automatically move to the next row.
- Once you are finished pricing all your products, click the Save button in the bottom-right of the Product & Pricing Manager. This will save all changes and close the window.
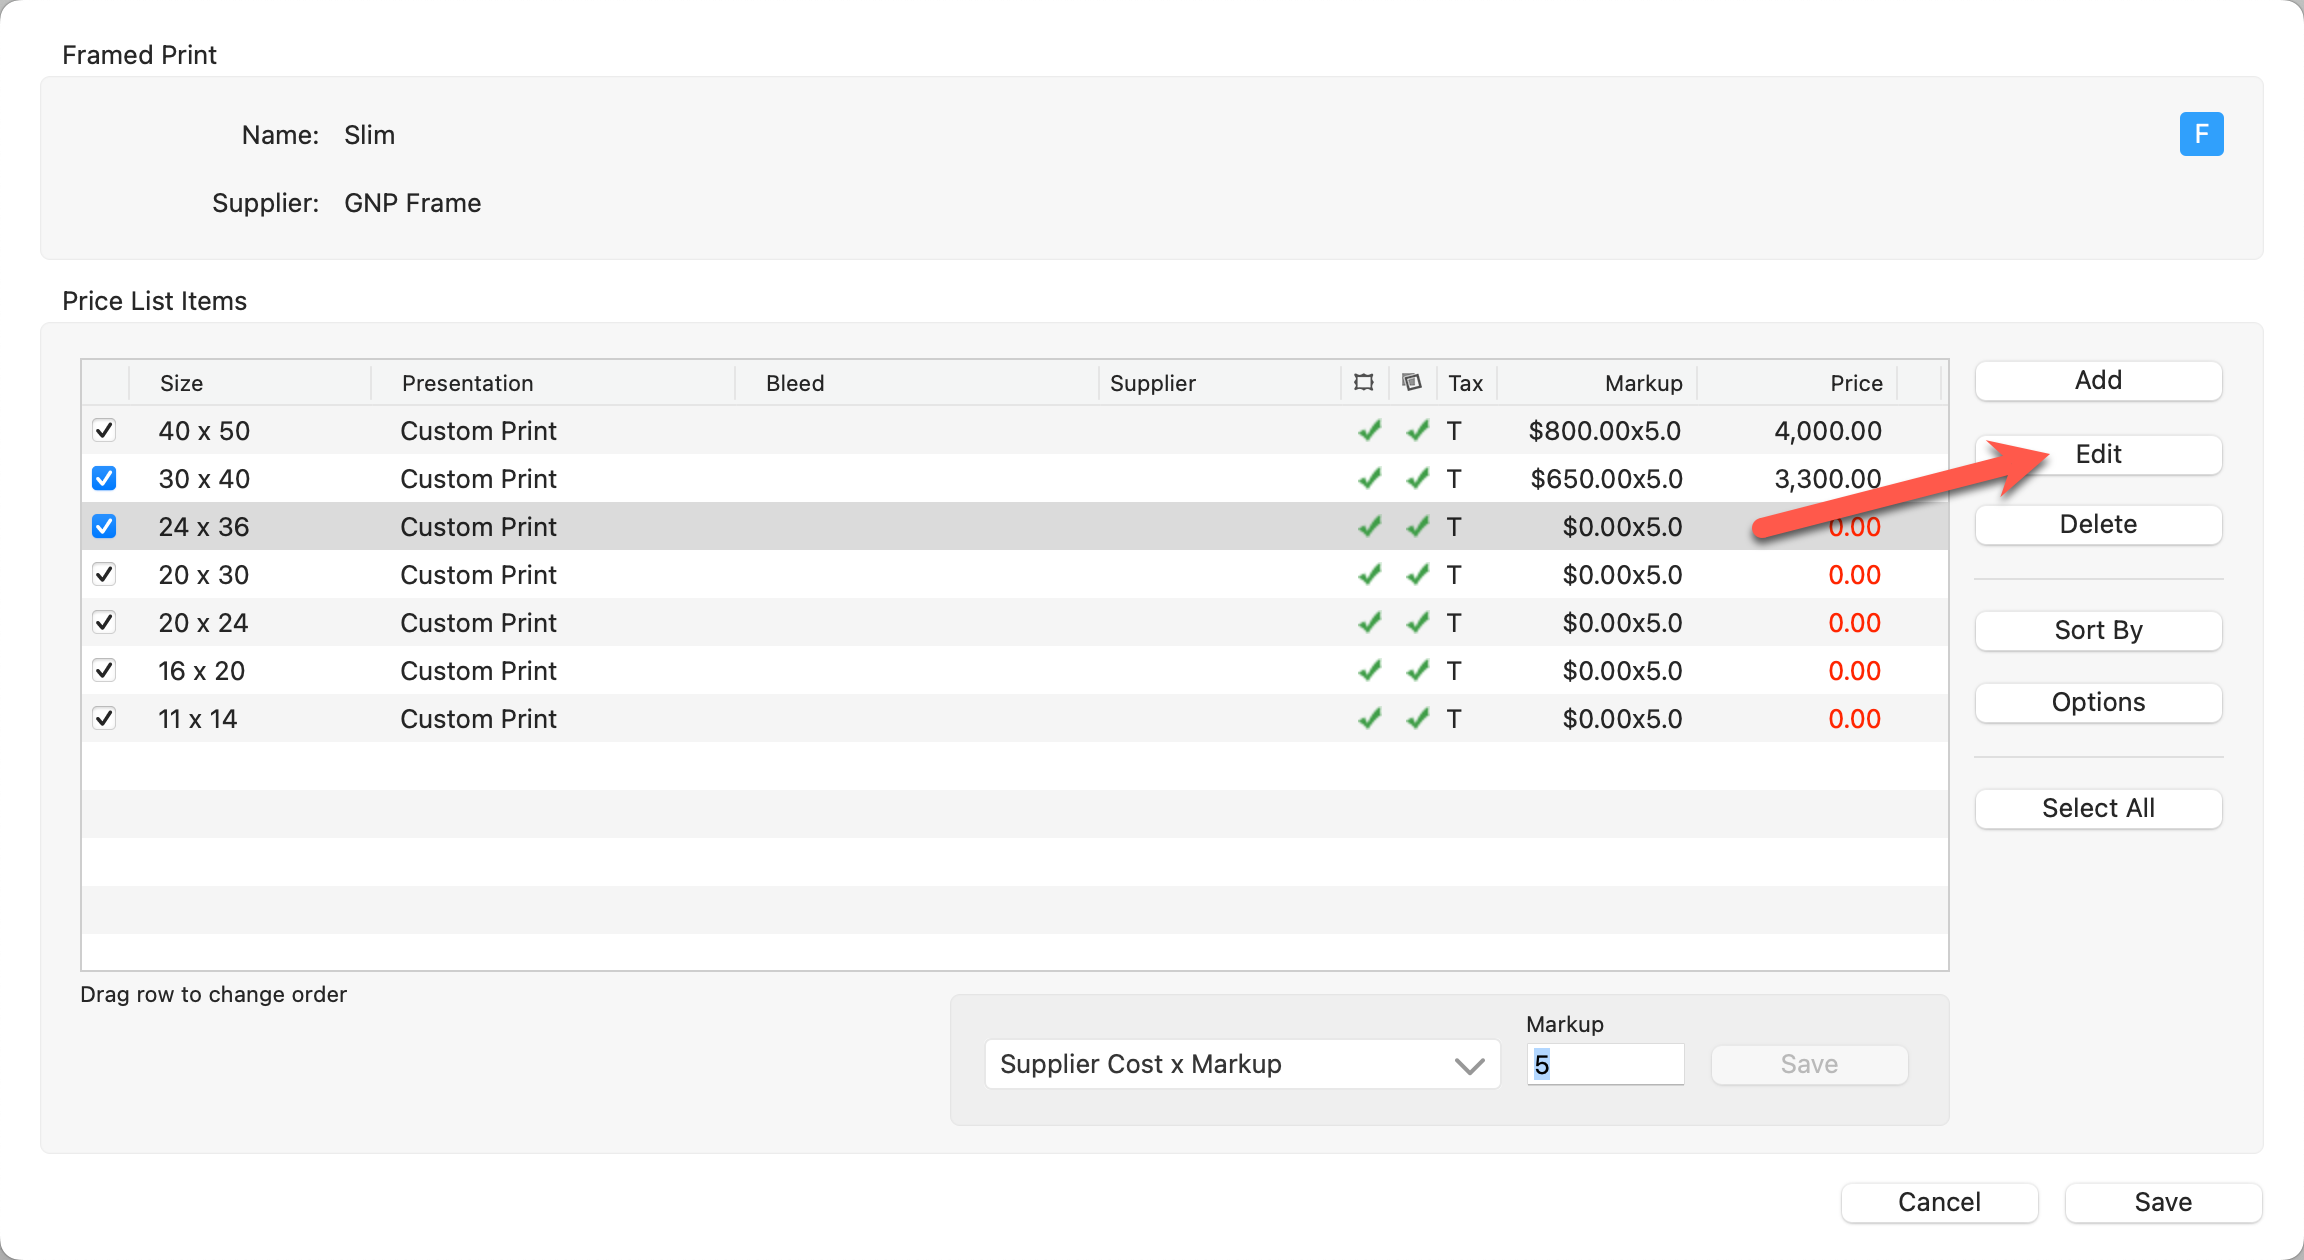
Price Using "Supplier Cost x Markup"
- This pricing method is best used when Importing Pricing From a Spreadsheet. You can also modify the markup of a locked Supplier Collection.
- Select each size individually and click Edit button to modify the supplier cost.
- Use the Select All button to select all print products to modify the markup on all the products at the same time.
When entering a price, hold down the OptionAlt key while clicking the Save button. This will save that price across ALL price lists.
- You can manage and update your prices using CSV file spreadsheets. Click here to learn more.
- Use the Select All button to make changes to all of the products at the same time. This works well when you are adding a universal markup.
These are the options available within the Price List Items dialog.
- Generate Price List Item Import Spreadsheet/Import: Use these options to import prices from a CSV spreadsheet.
- Export/Update Prices: Use these options to update your pricing using a CSV spreadsheet.
- Copy Price to All Price Lists: Use this button to copy the selected item(s) prices across all price lists. To copy the entire folder, click on the Select All button first, and then "Copy Price to All Price Lists."
- Select the product template you wish to work with.
- Click on the Pricing button.
- Click the Edit button on the right-hand side of the Price List Items dialog.
- The Product Pricing dialog will appear.
- Make changes to the presentation option, size, price, etc.
- You will notice the Reset Changes tool
 appear next to each line item that was edited. To clear your changes for that particular line item, click the Reset Changes tool.
 - Click the Change Item button when you are finished.
Products from Supplier Collections cannot be modified (except for price). They are locked.
Deleting a price list item does NOT delete the template. It removes the price list Item you have created. The original product template still exists in the Product Templates folder.
- Select the product template you wish to work with.
- Click on the Pricing button.
- Select the price list item you wish to delete.
- Click the Delete button on the right-hand side.
- A confirmation window will open, click Yes to remove the price list item.
Hold the OptionAlt key down while clicking the Delete button. This will delete the price list item immediately without asking for confirmation first.
The Sort By button is contextual. This means that depending on which type of product you are working with, different options will appear in your sort button. Sorting takes place within the individual folders. Some common ways of sorting are:
- Width
- Height
- Presentation Option
- Price
- Available To
- Display Name
If you have manually moved your products around by dragging them, the Sort By button will override this. In case you accidentally sort your products and wish to reverse it, click the Cancel button. Using the Undo button will not undo sorting.
Once you have created and priced your Framed & Matted Prints, they are ready for use in ProSelect.
- Navigate to Working with Products, Thumbnail view.
- In the Template Resource area, find the category where you created your products.
- Select a product template and drag it up into the working area.
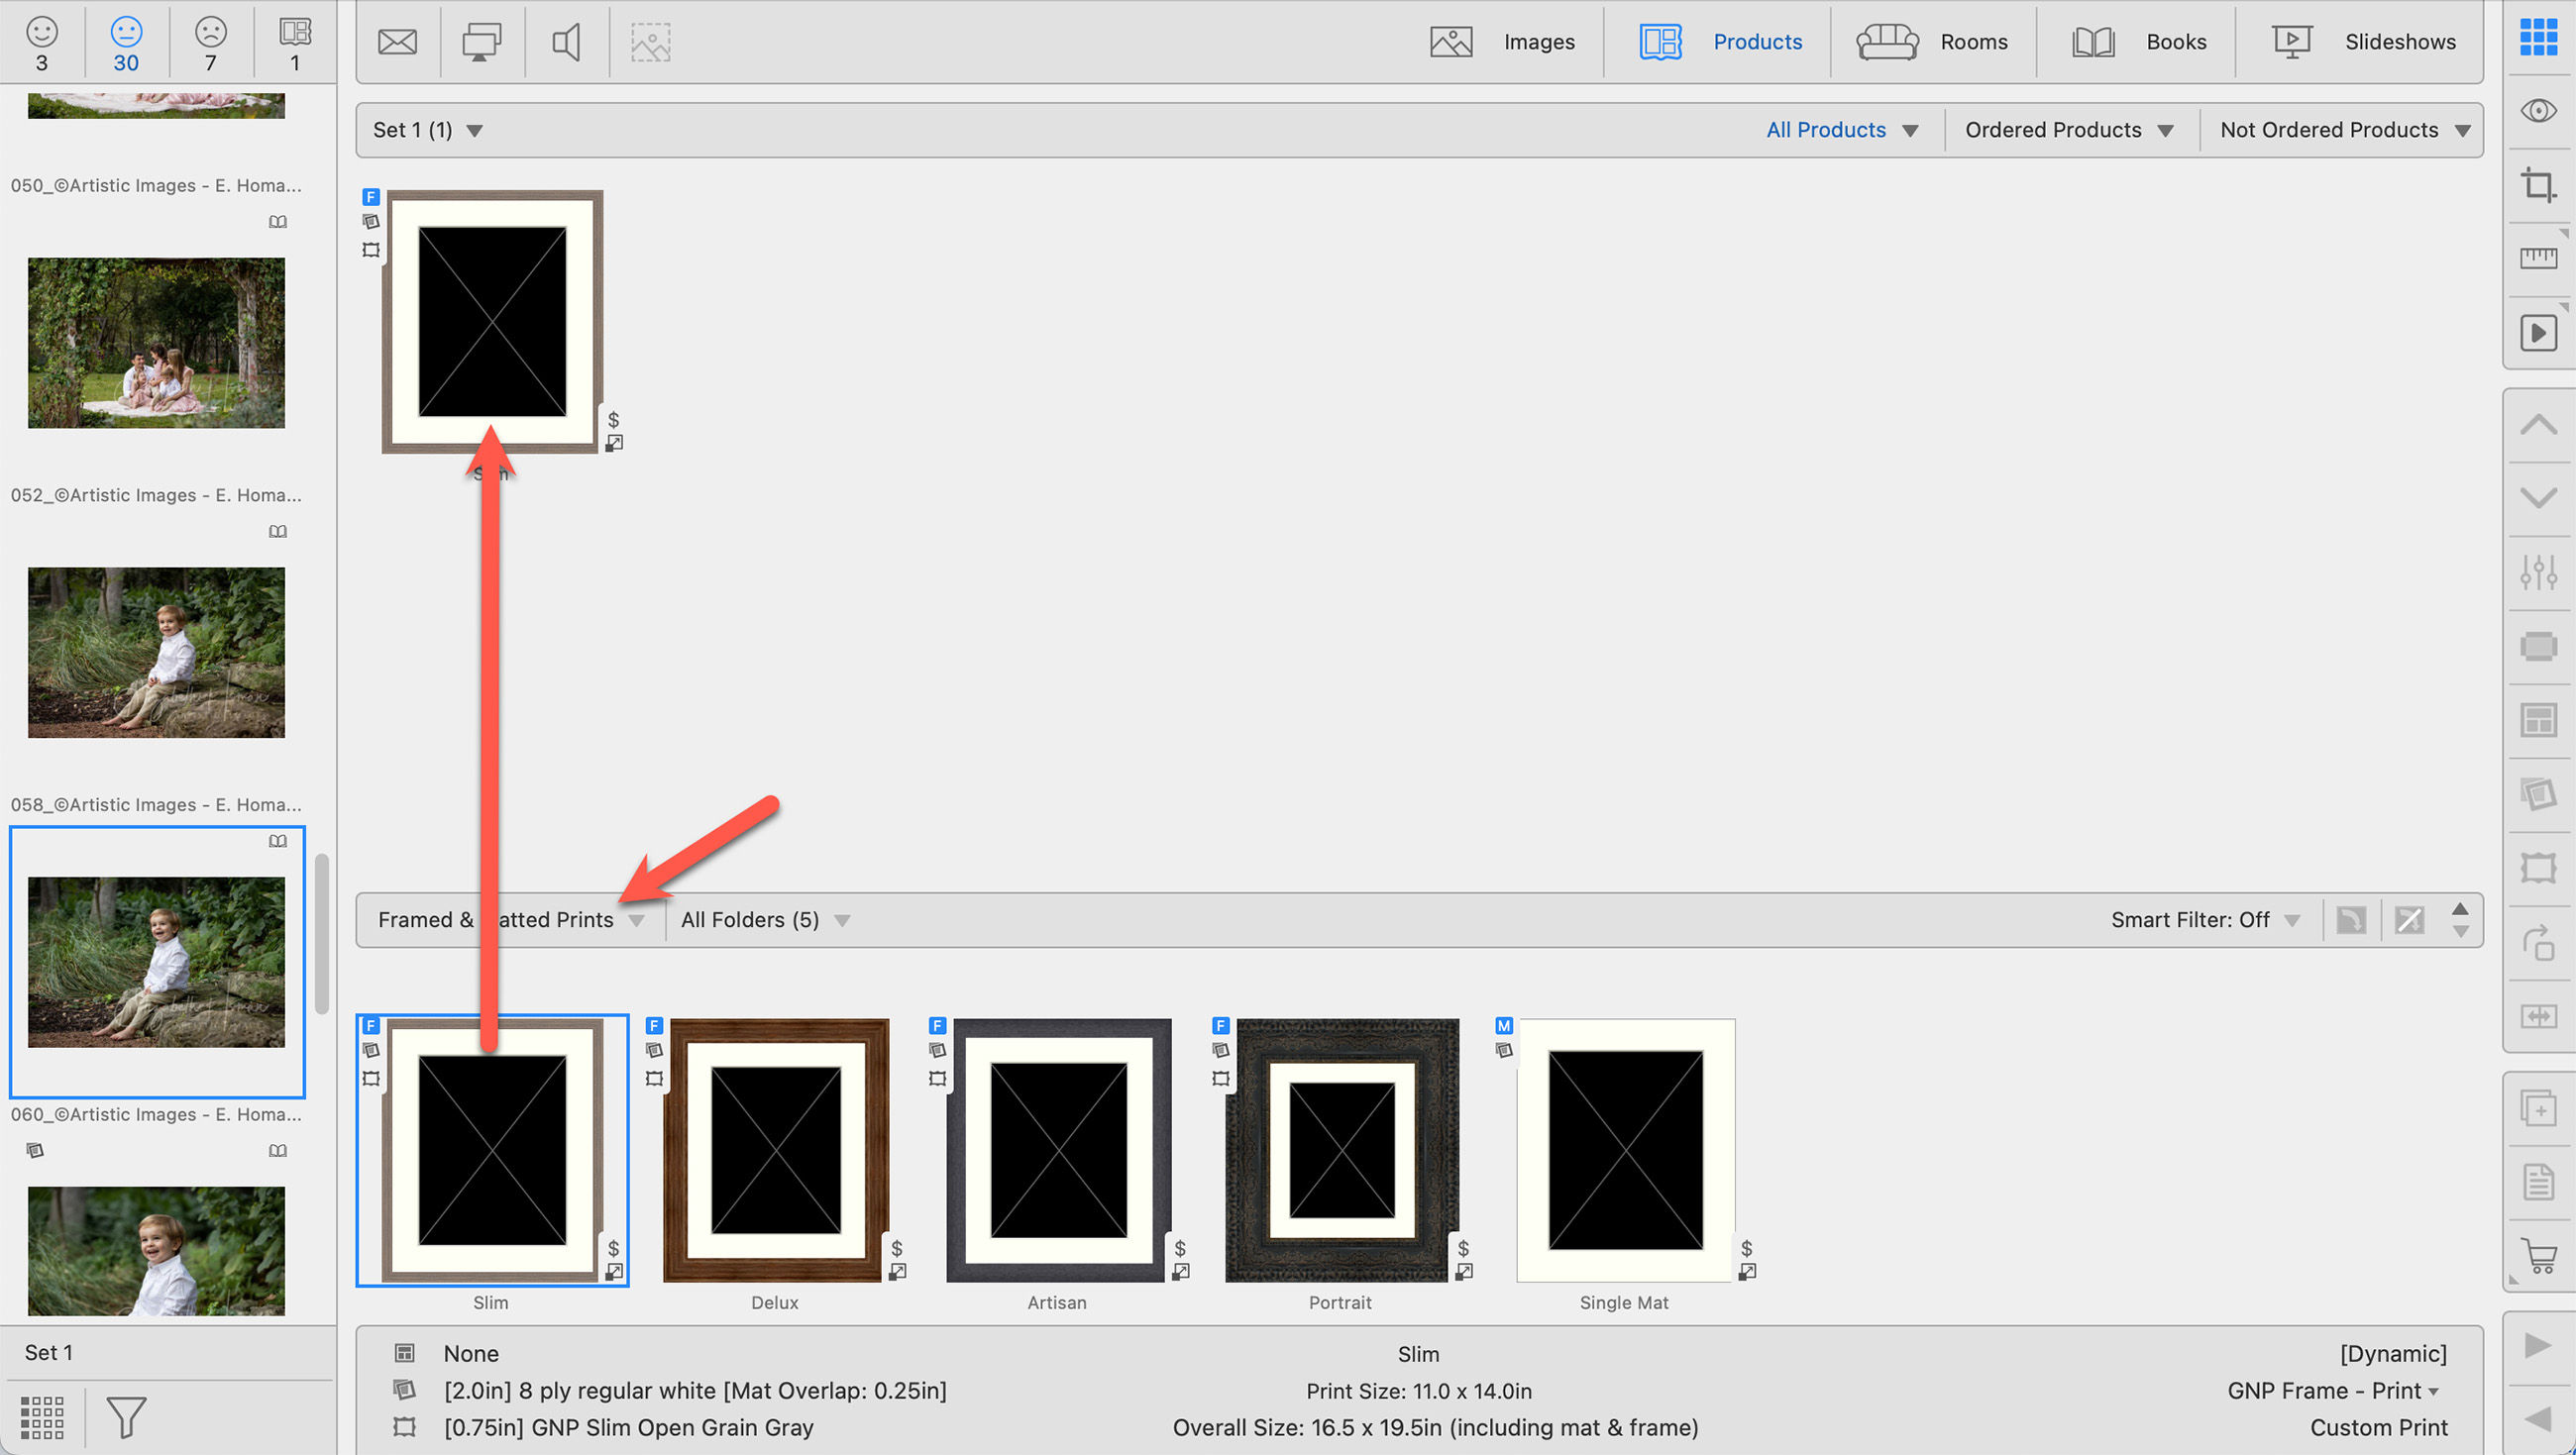
- Populate the product with an image.
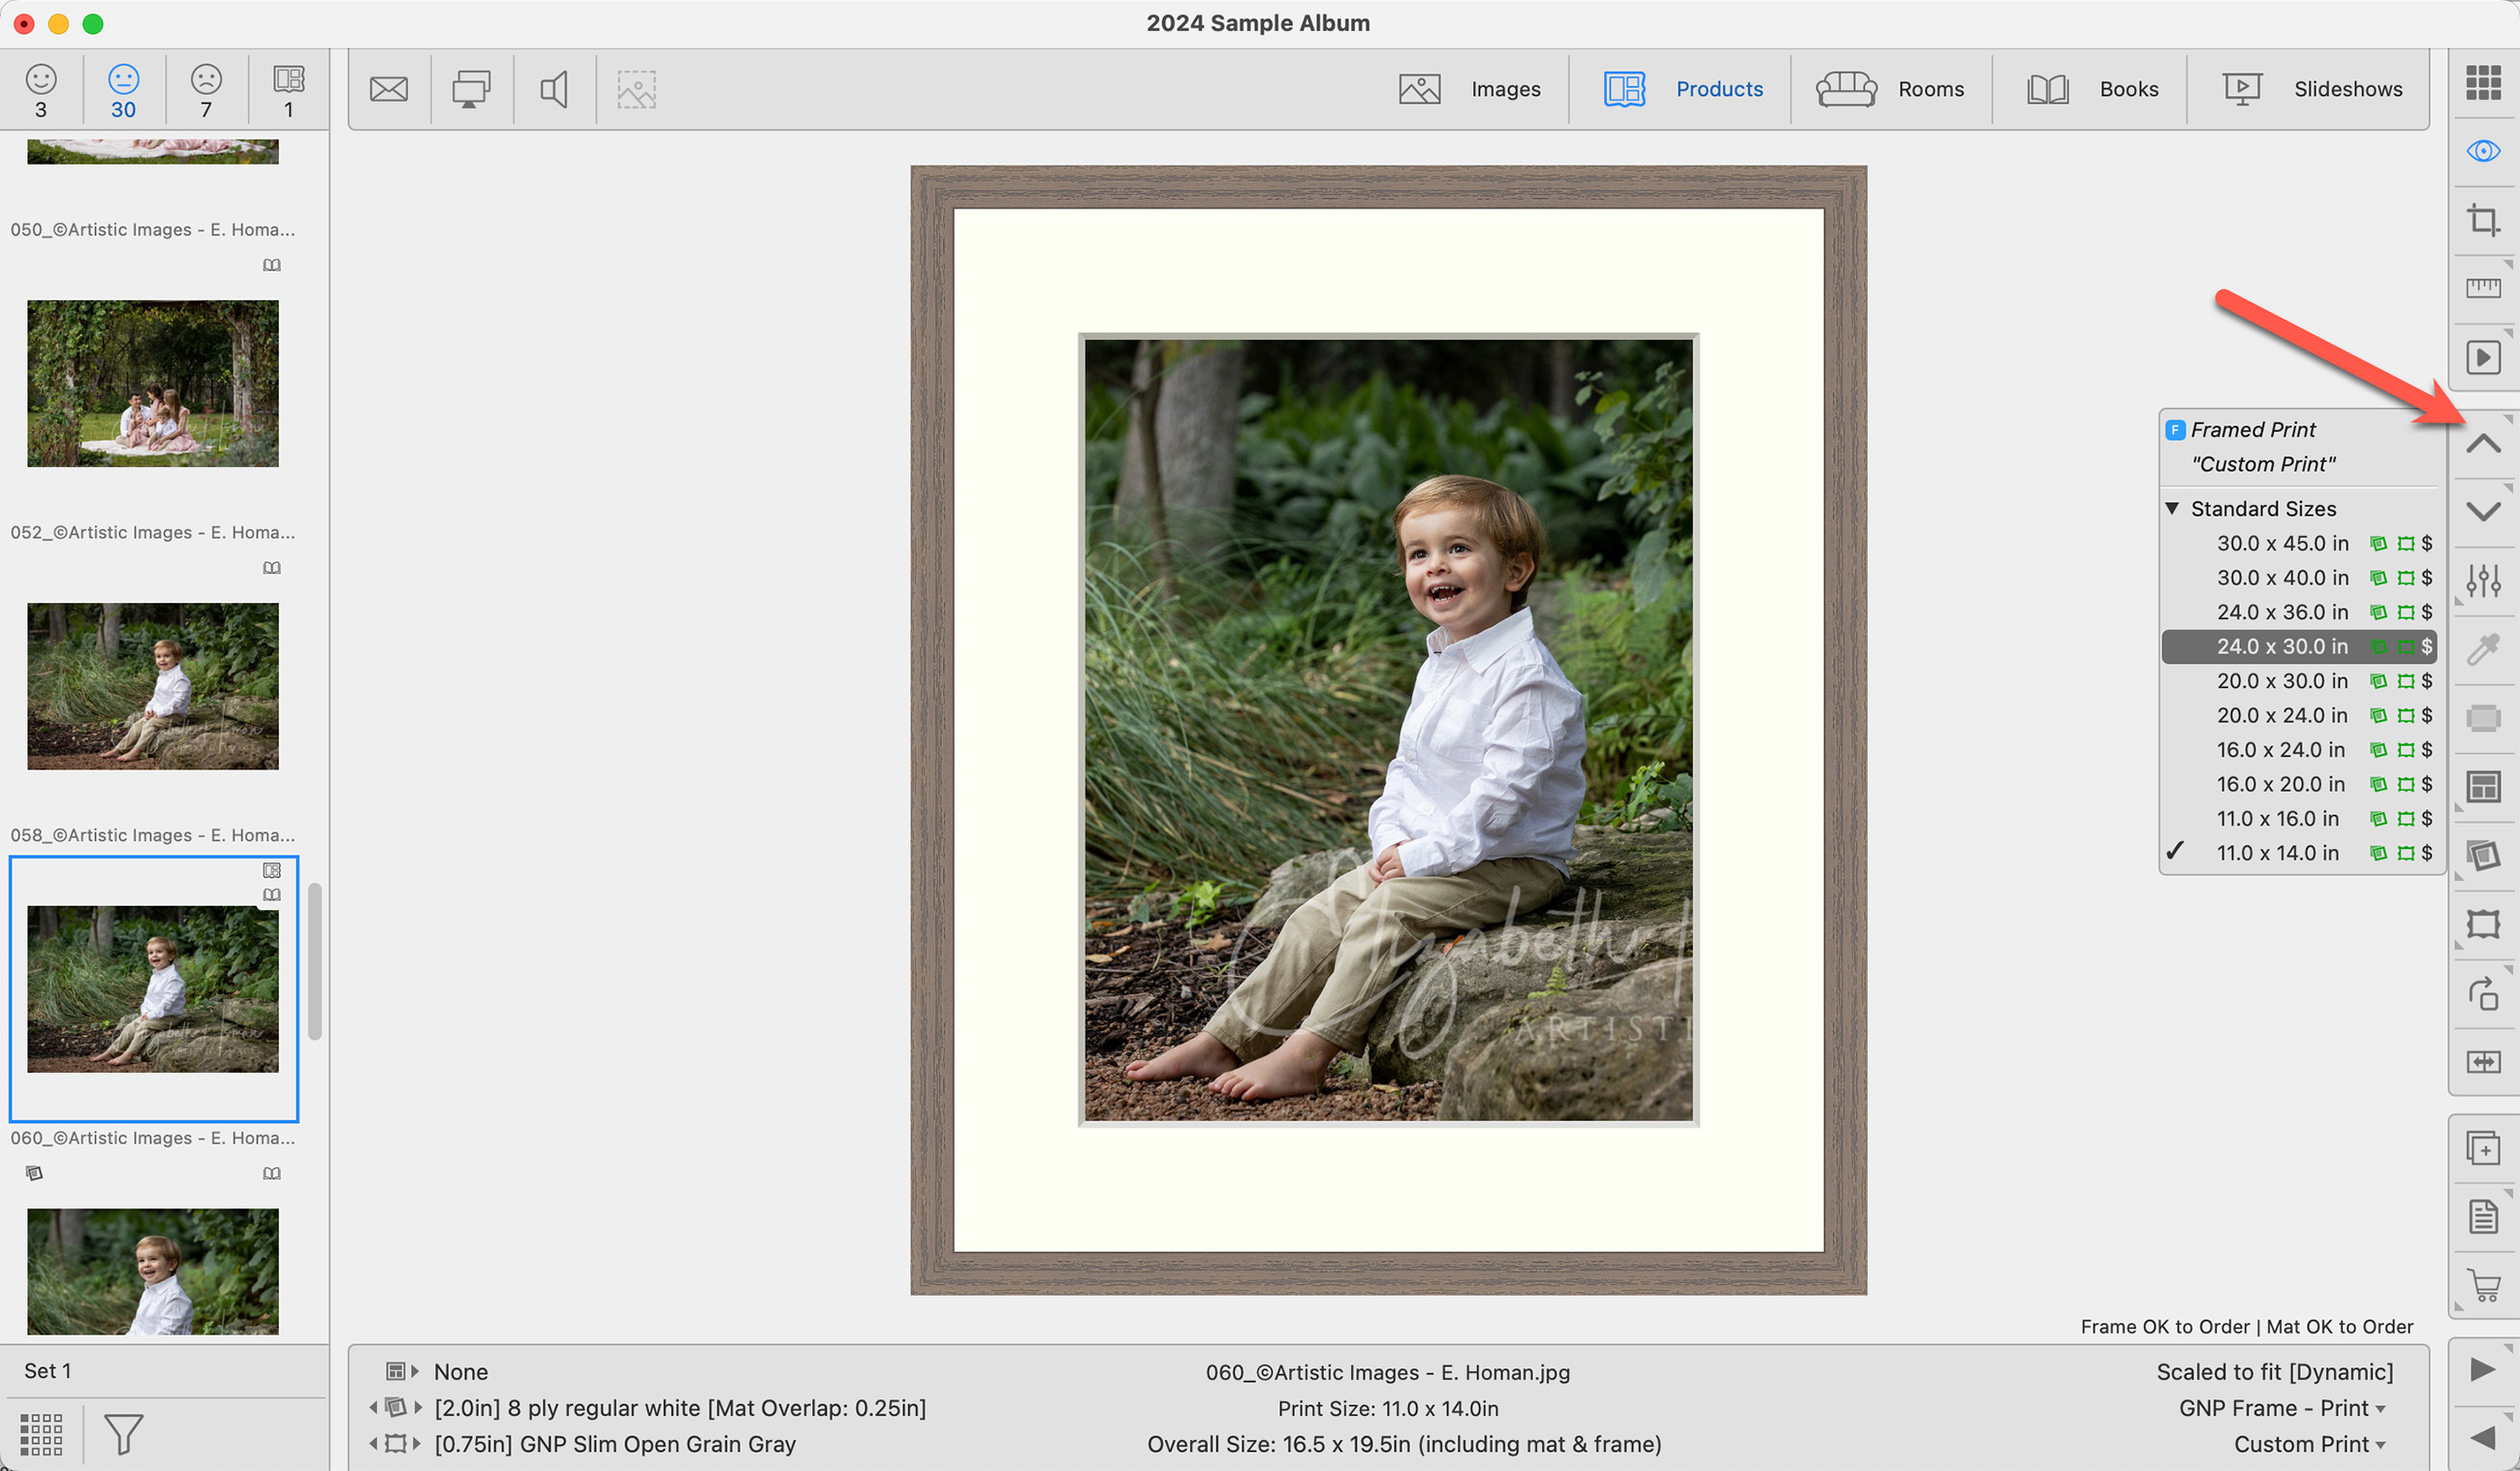
- You can size the image in Working with Products or Working with Rooms. Right-click on the toolbar tools to size up or down. Alternatively, double-click on the product to enter Show Products view. Use the up and down arrow keys to size the product. *Only the sizes you added in the Pricing dialog will appear here.
- Optionally, swap out the frame and mat. Keep in mind the following:
- Framed Prints MUST have a frame applied. They do not require a mat (though it is included in the price).
- Matted Prints MUST have a mat applied. A frame can be added at an extra charge.
- Keep in mind that this product includes the mat and/or frame in the price. Be careful when assigning frames, as ProSelect does not limit which frames can be used. Be sure to price your products accordingly.
- Order the product using the Shopping Cart tool. Mats and Frames are included in the price.