Creating Product Templates - Introduction
Before you start creating product templates, it's a good idea to familiarize yourself with the Product Editor. This is where you'll design your product templates.
- First, determine the type of product template you need. Each type supports different attributes during the creation process. The Product Types list provides a variety of examples. Alternatively, use the Product Template Types list to search by attribute.
- It's also helpful to look at existing product examples in the "Products" folder to understand how templates are structured and applied. The Products folder is located in the table of contents of this online help guide.
- Additionally, product templates accommodate various sizing modes. Be sure to read about the sizing modes below to learn more about which mode best suits your product.
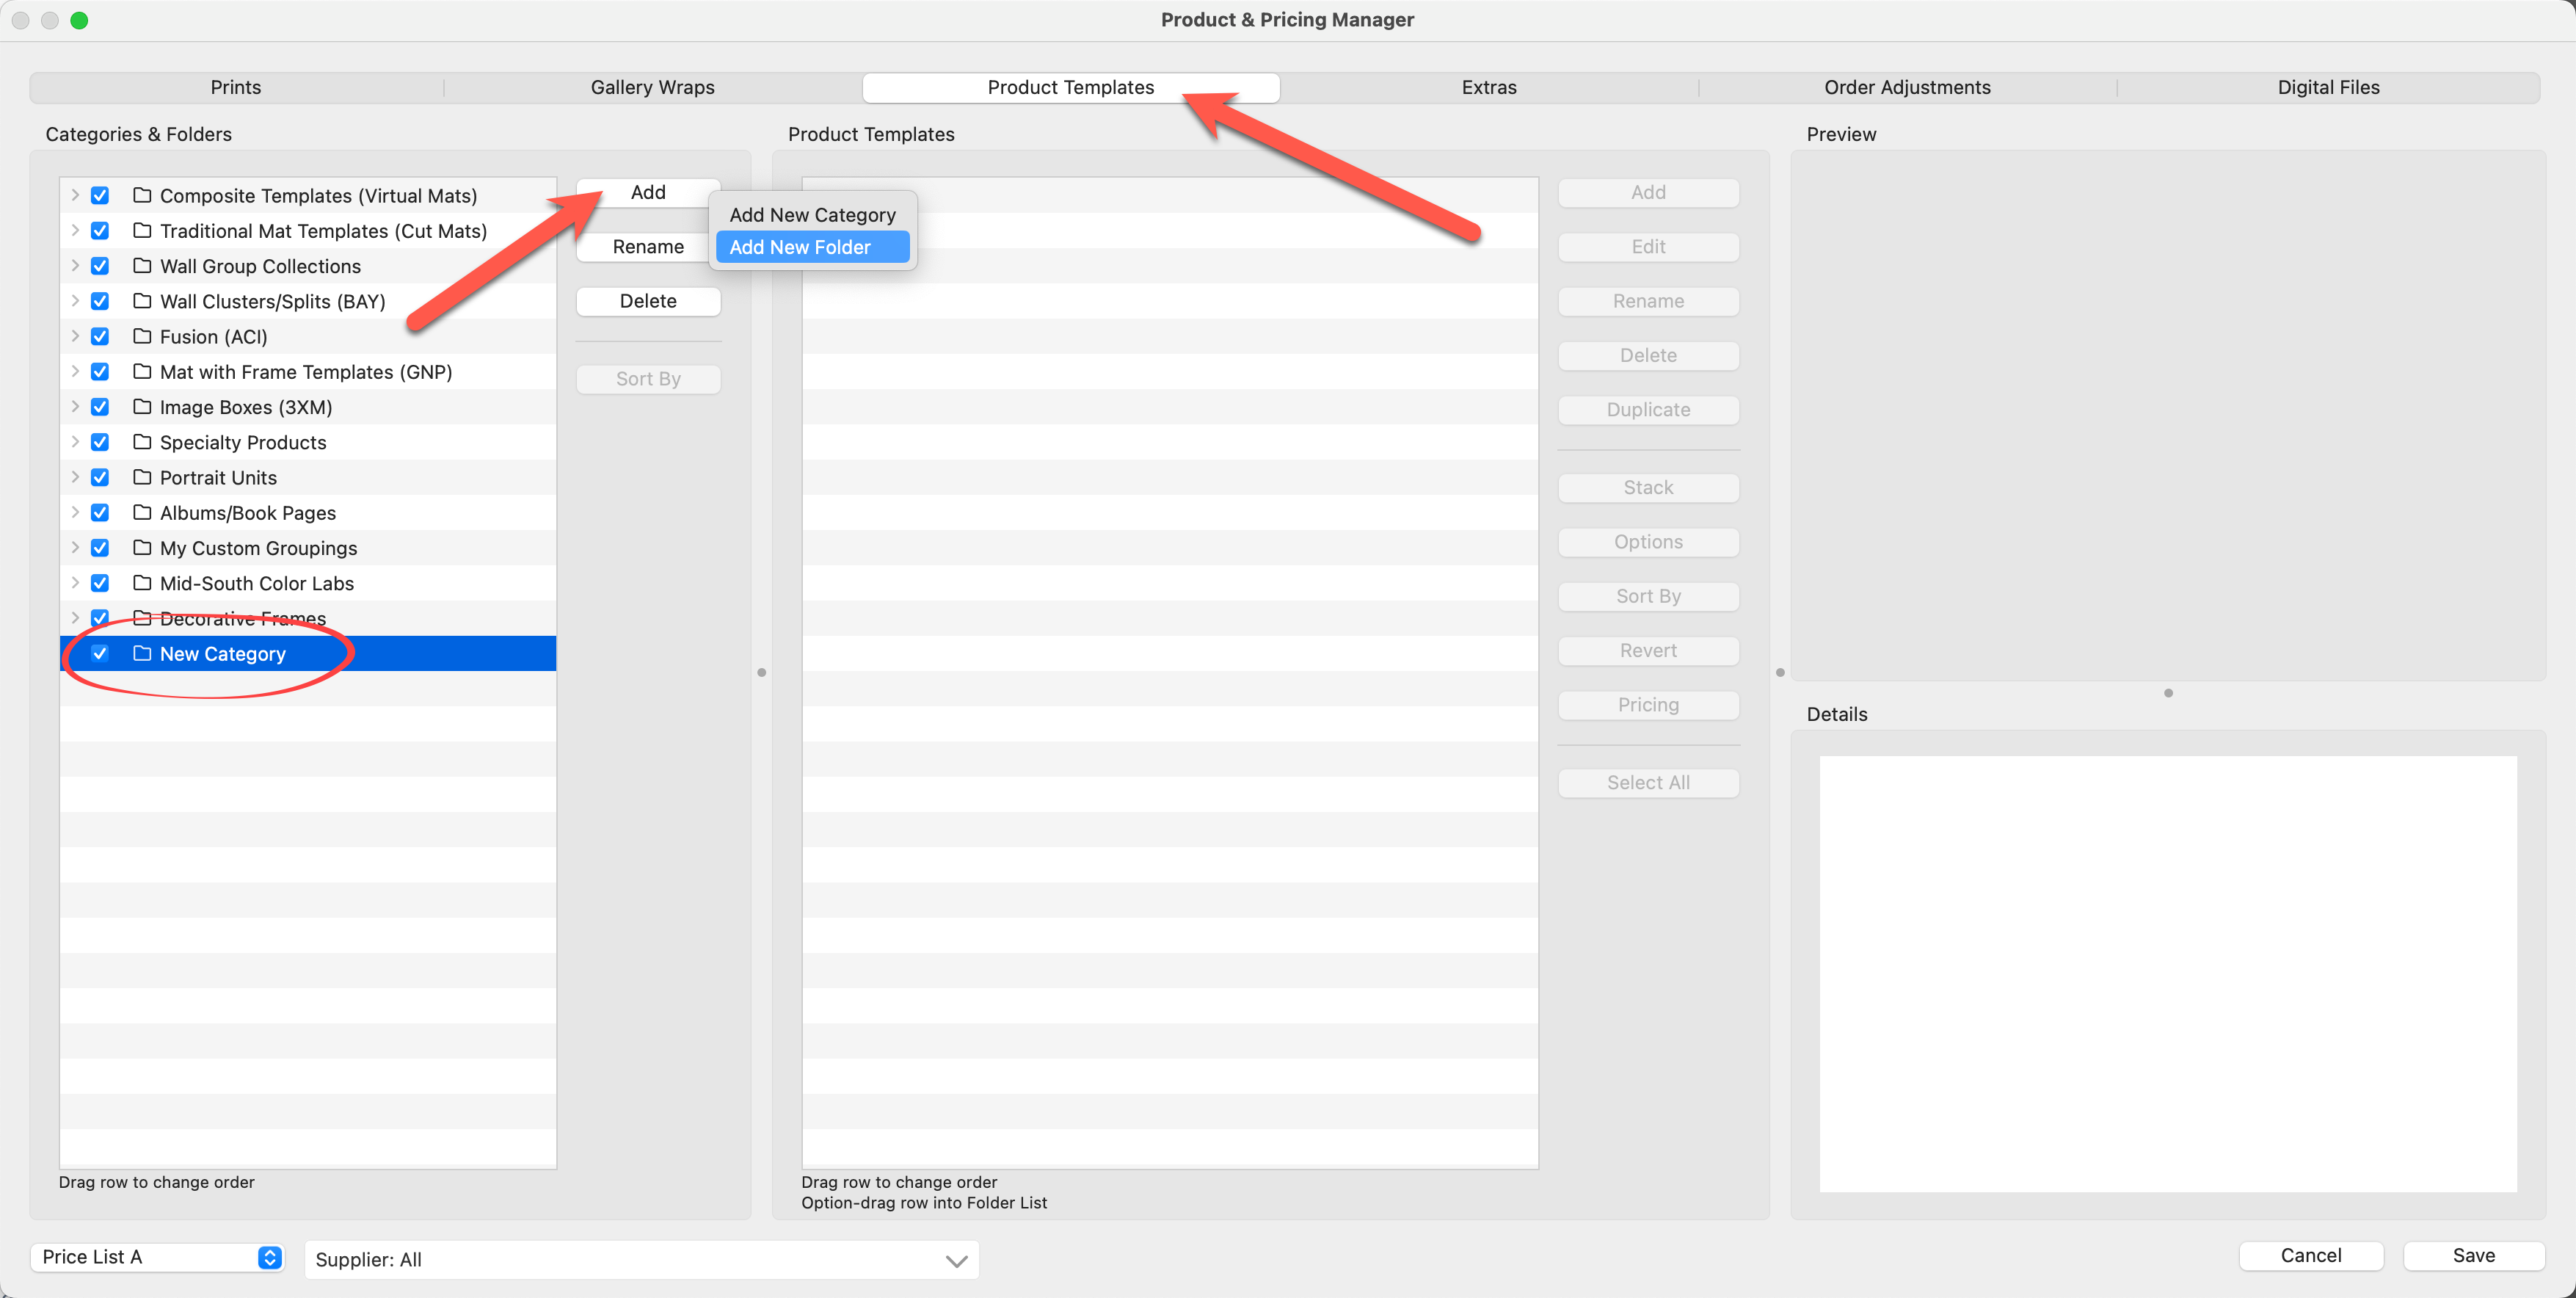
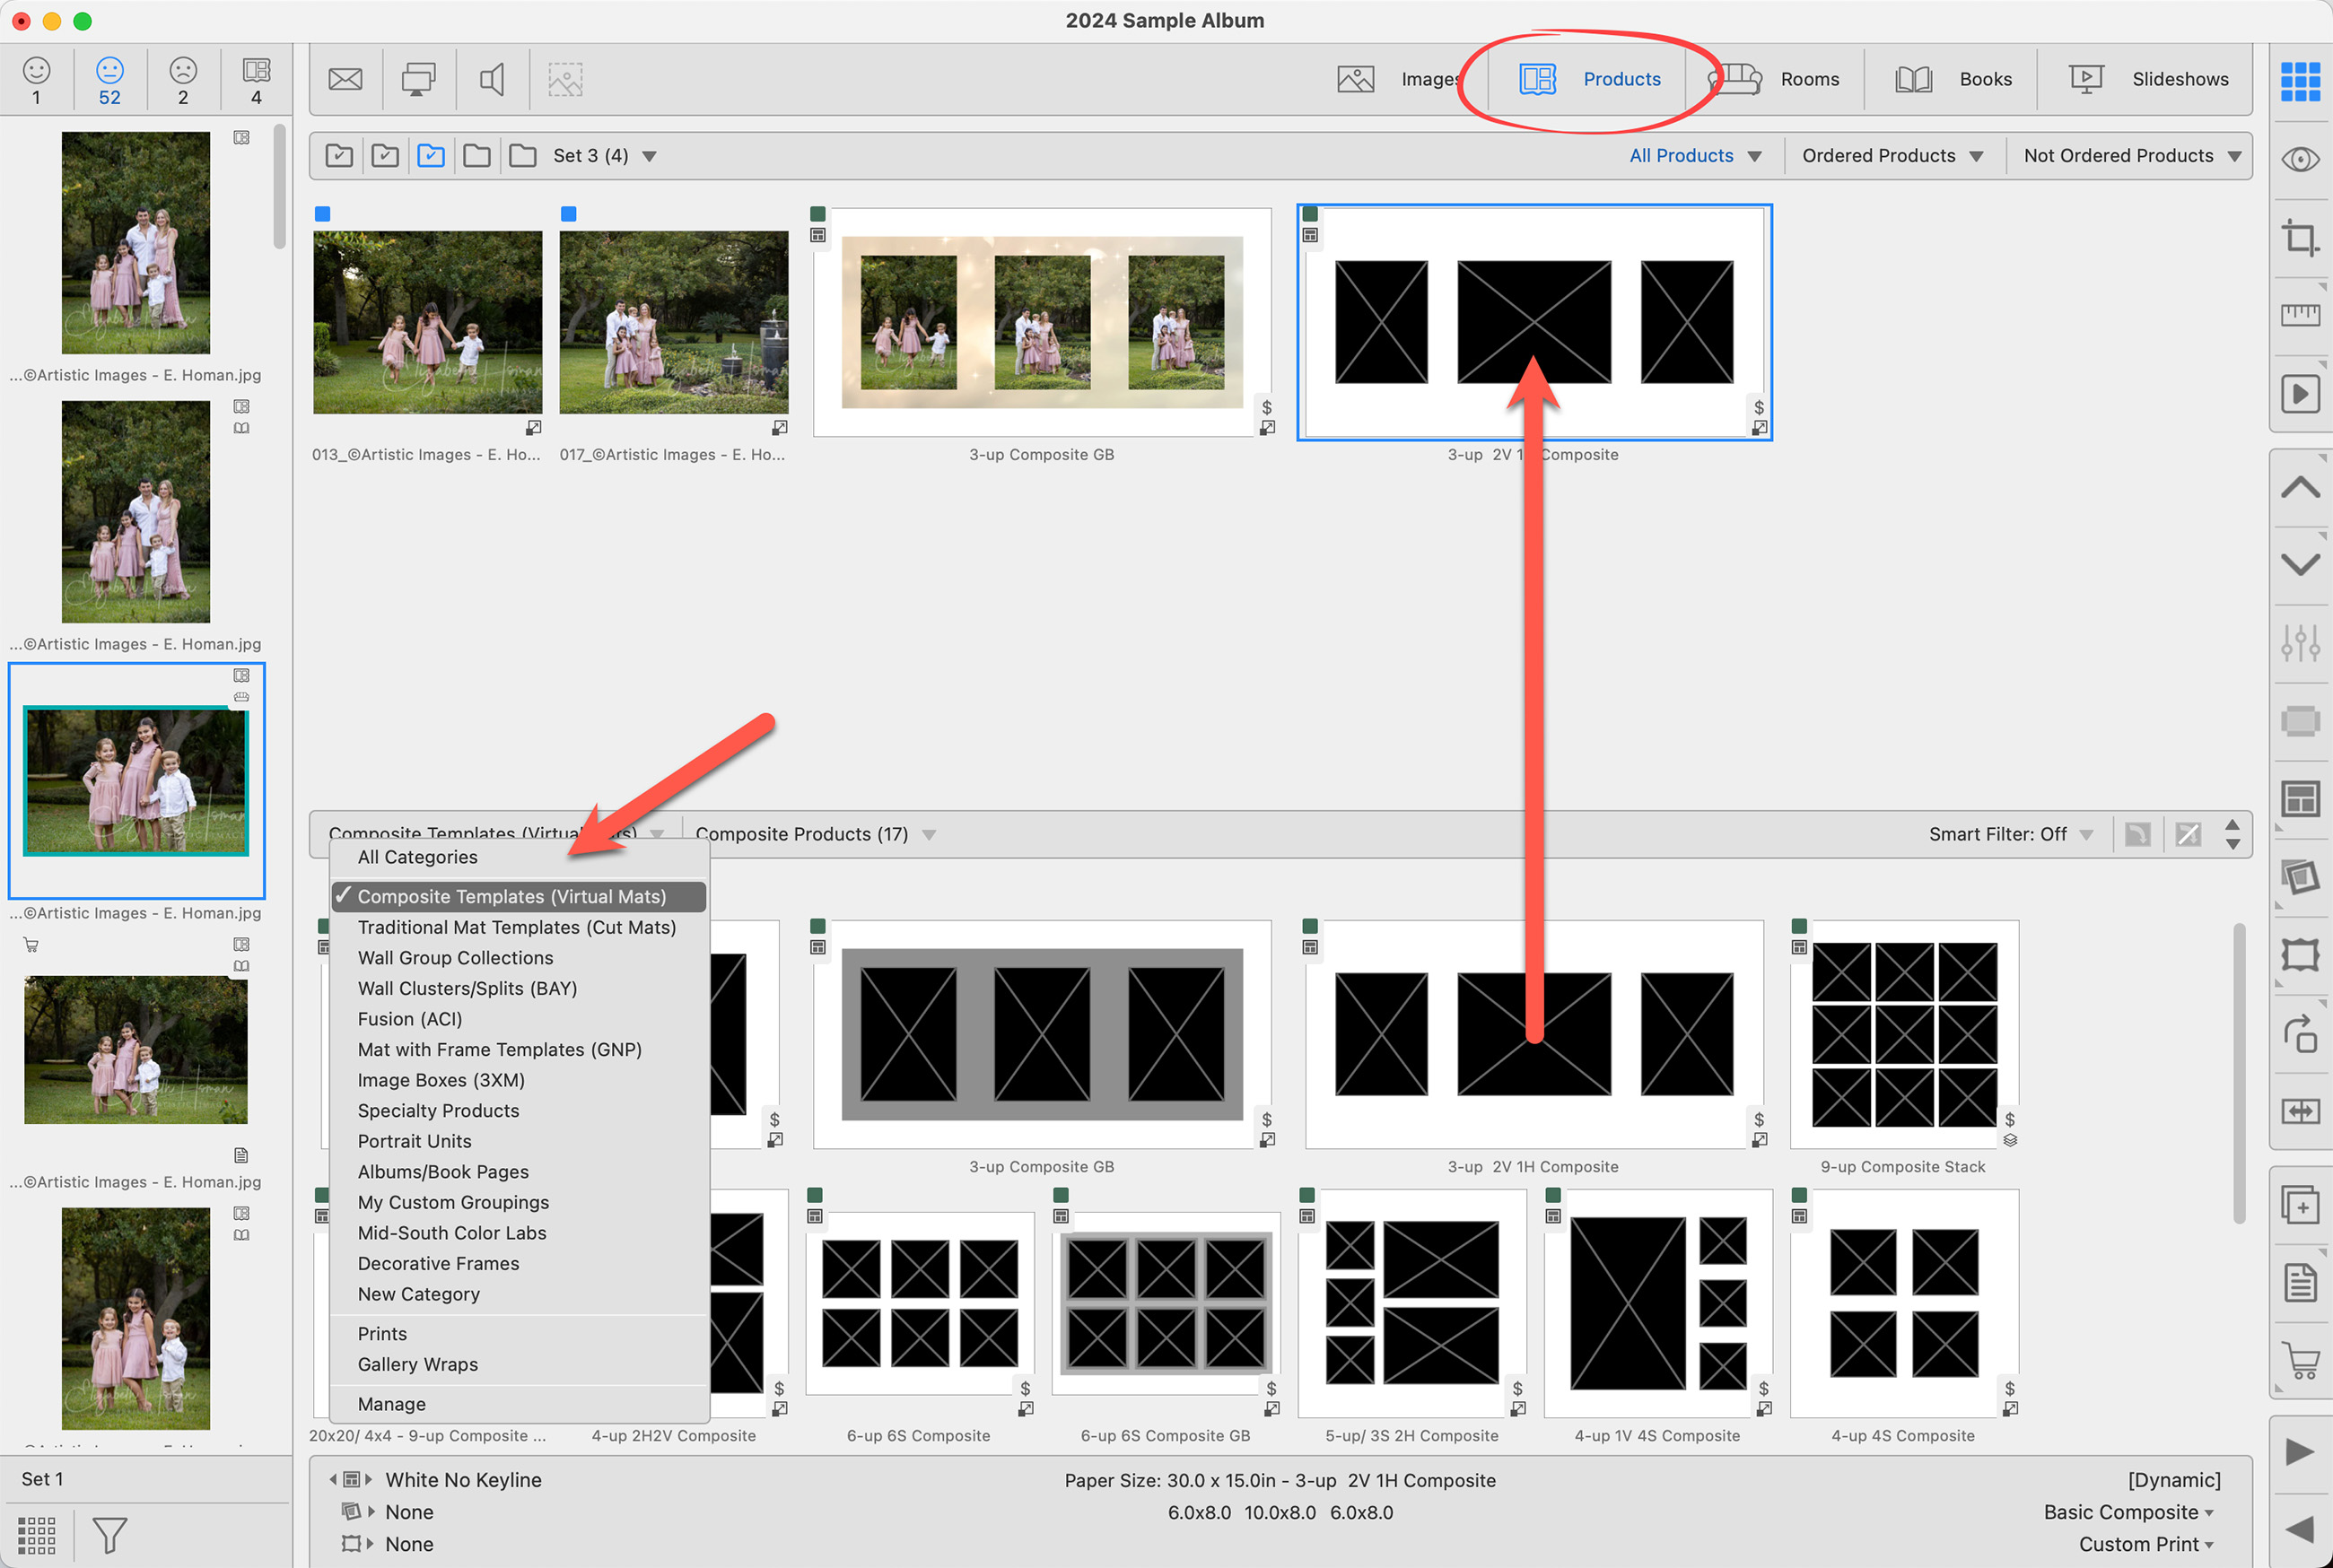
- Navigate to the Product & Pricing Manager.
- Select the "Product Templates" tab.
- Select a folder OR create a new Category and Folder using the Add button.
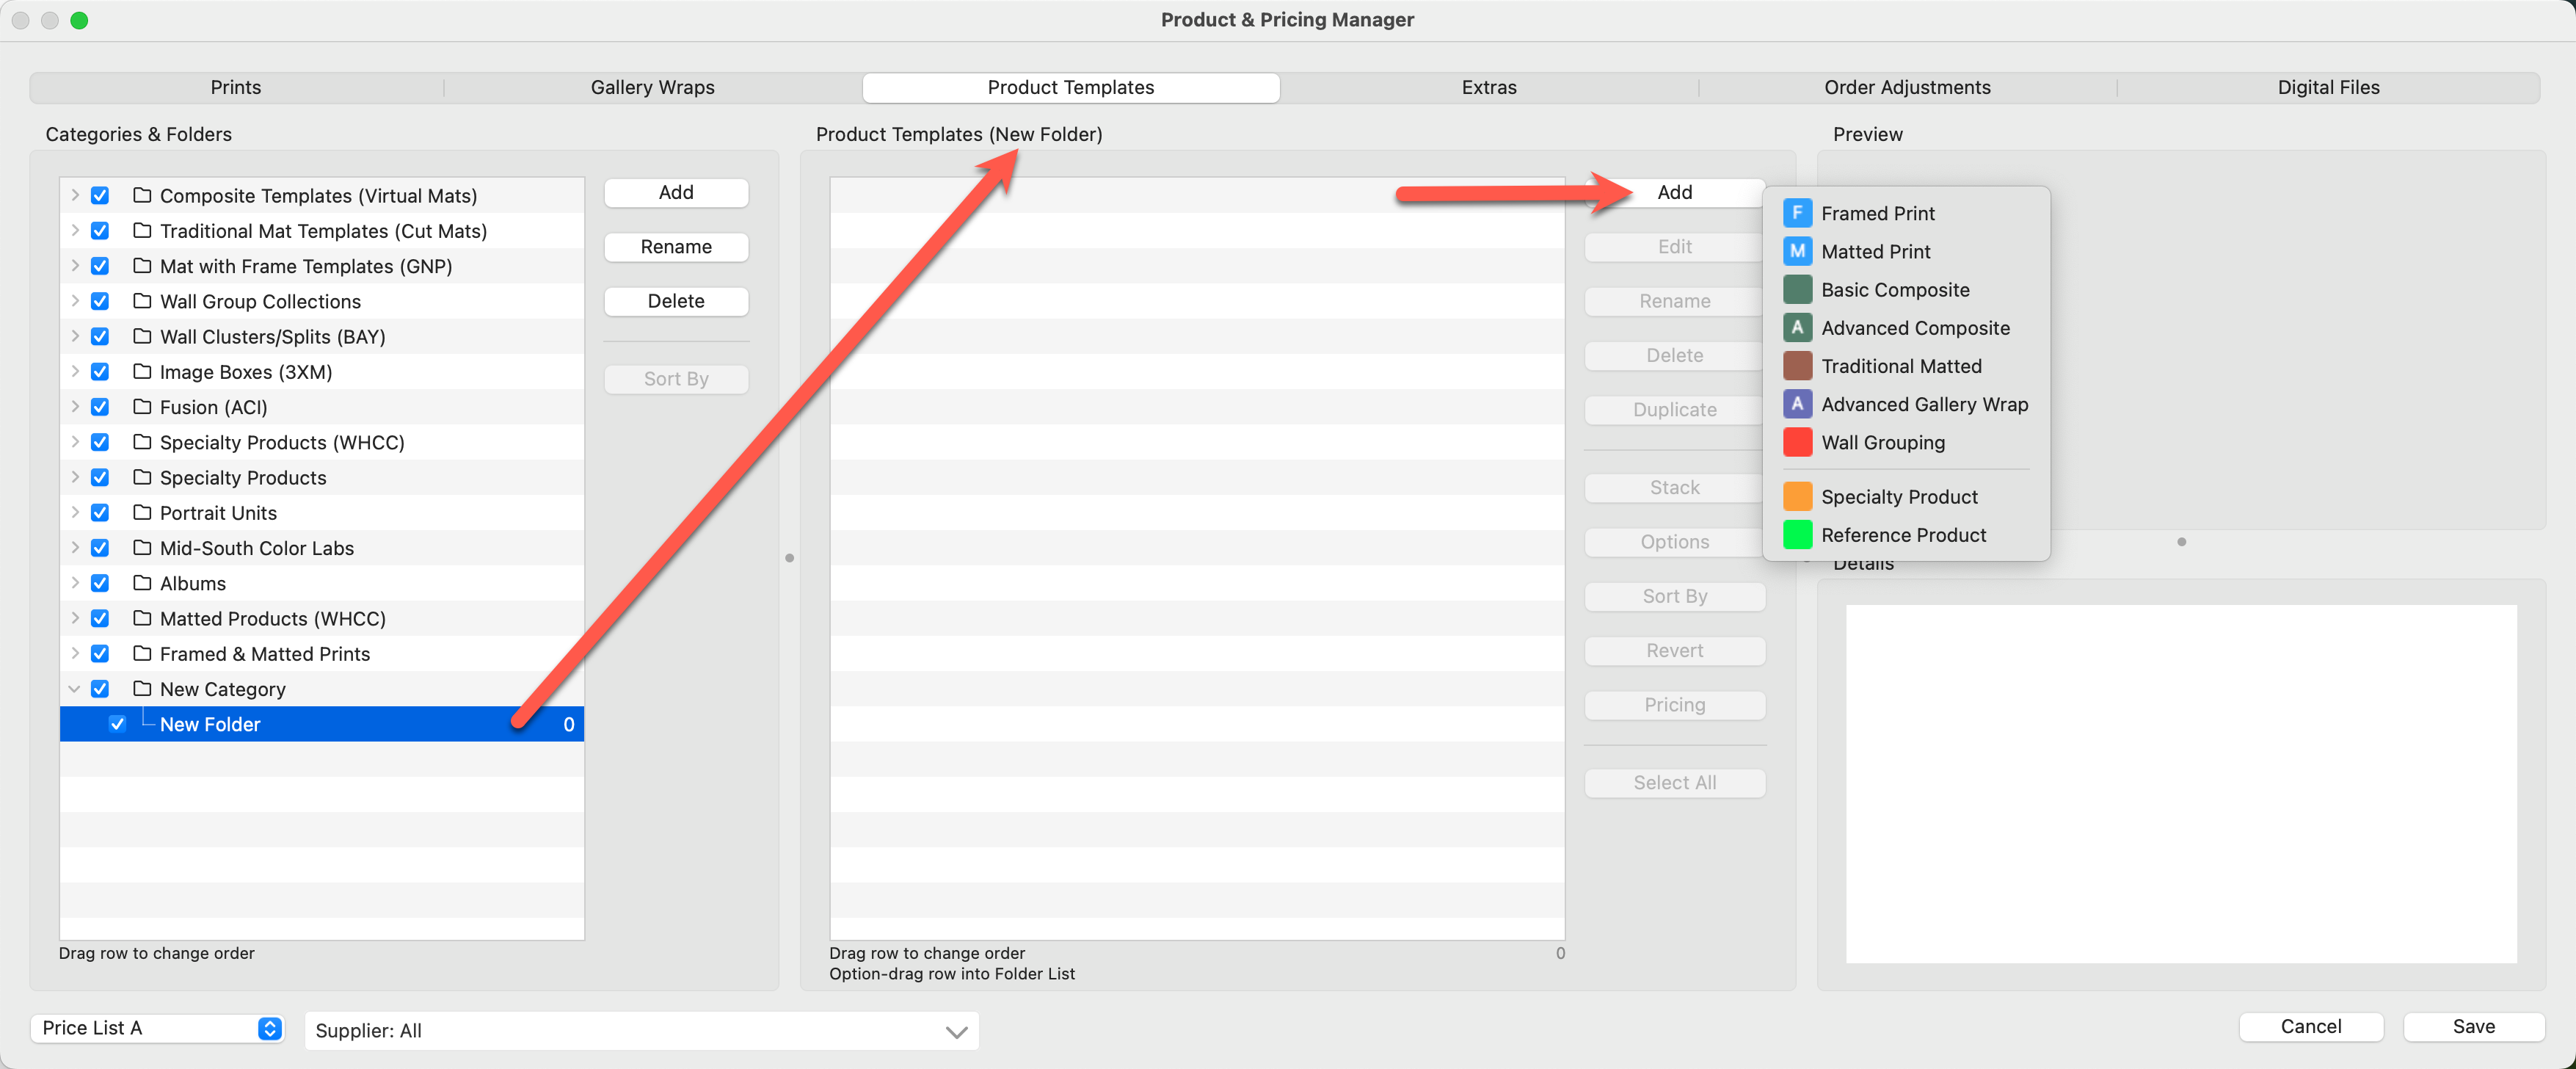
- With a folder selected, move to the next panel (The Product Templates Panel) on the right. All items within your selected folder will appear here.
- Click the Add button.
- Select the Product Type you wish to add.
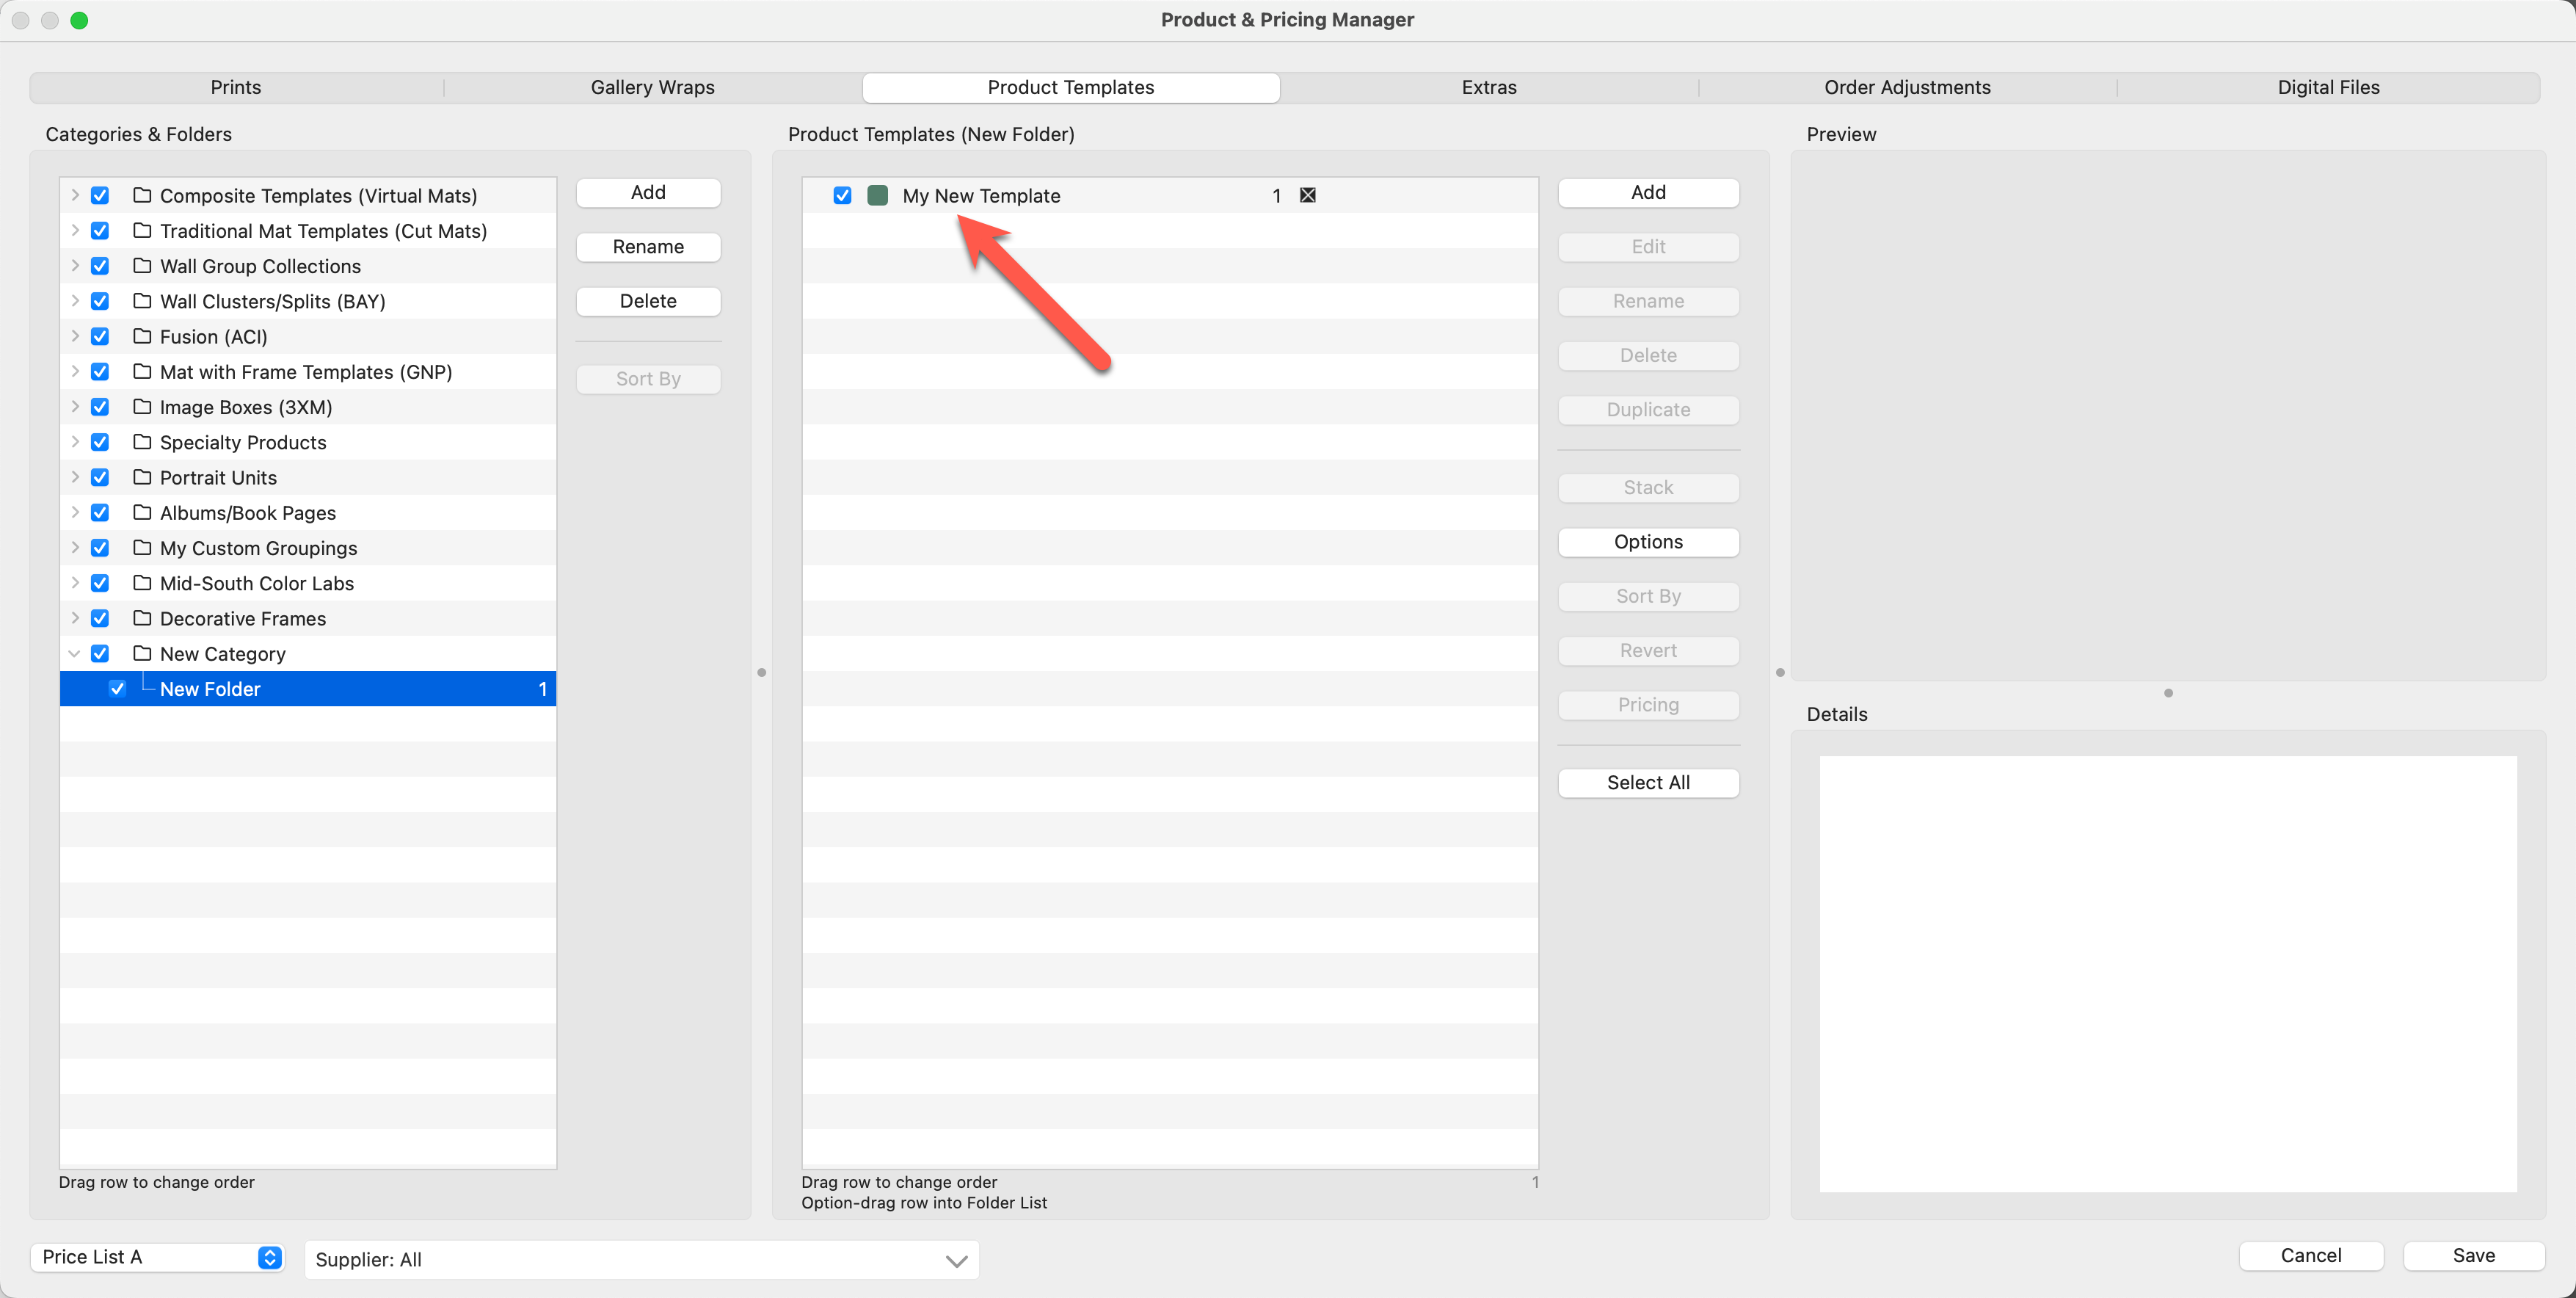
- The Product Editor will launch and you can begin work on your new template.
- Once you save your new template, it will appear in the Product & Pricing Manager.
Sometimes it is helpful to duplicate an existing template that is similar to what you want to create, and then modify it. Click on Duplicate a Product Template to learn more.
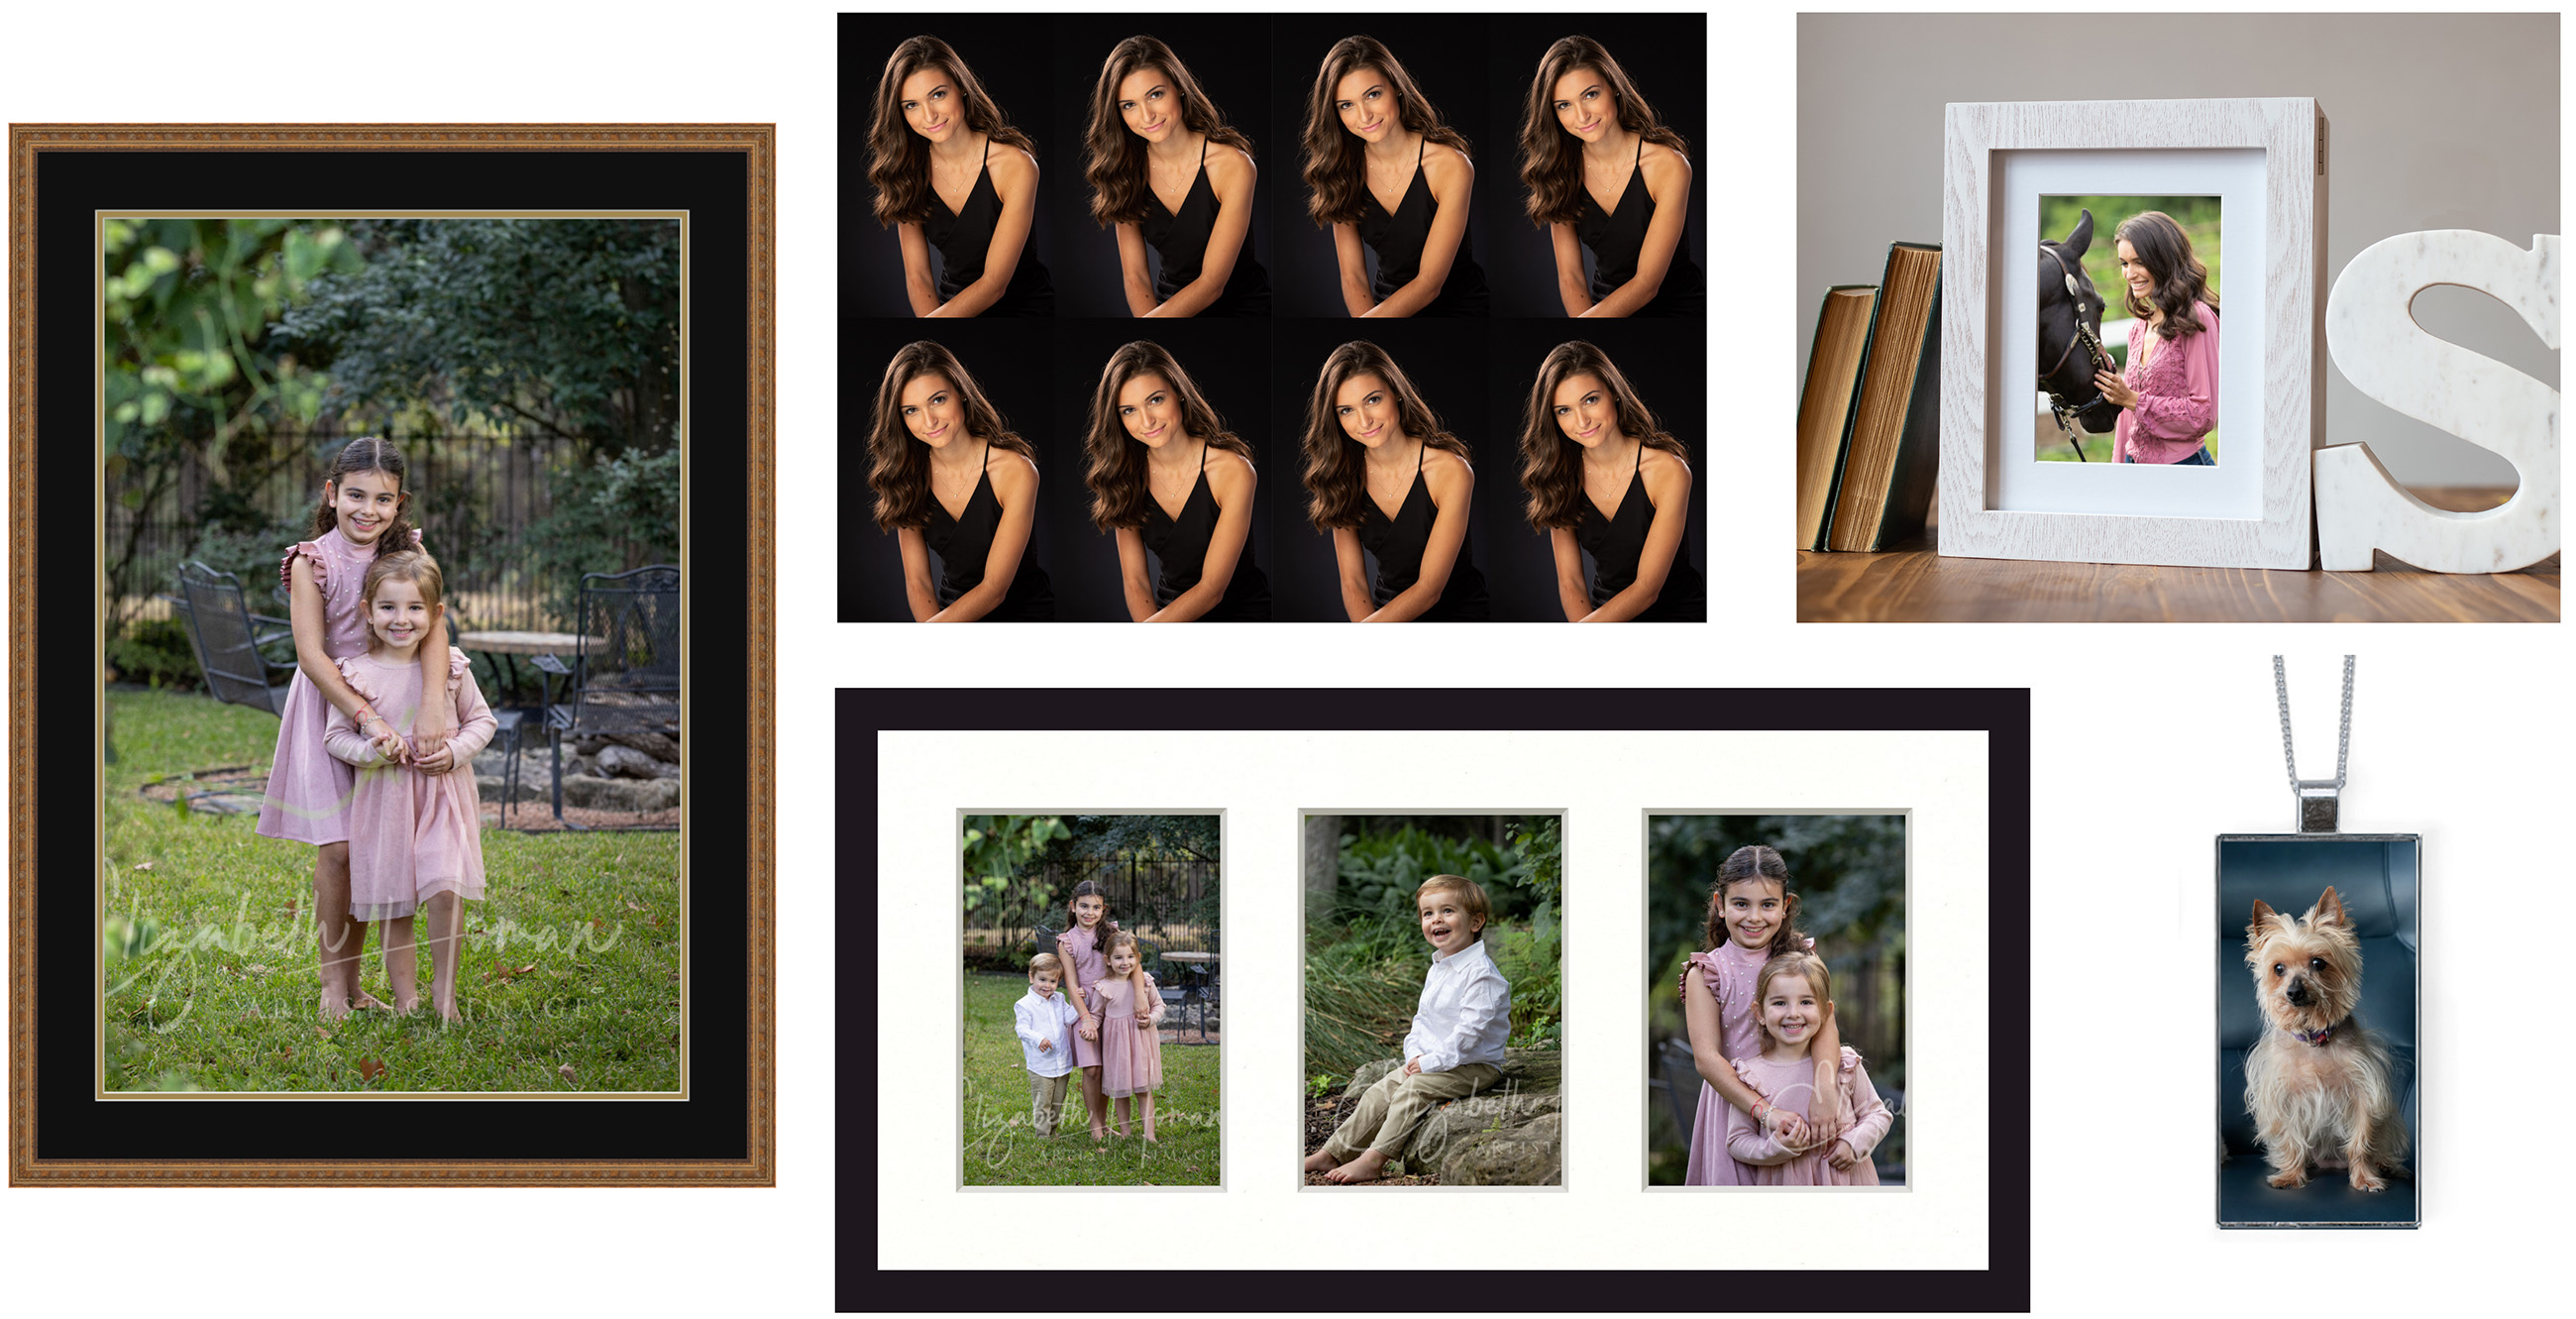
Once created, Product Templates can be accessed and populated with images on the main interface.
- Navigate to Working with Products.
- All available Product Templates are located in the Template Resource Area.
- Locate the template using the Resource Selection Bar and drag it into the working area.
Product Types
A Product is any orderable item in ProSelect.
Products are divided into different categories based on type. Color coding is used to differentiate between different product types. A colored box will appear next to the product when viewing it in the Product & Pricing Manager, the Template Resource Area, when working with products, and when working with books. It will also appear when the product is ordered and produced in Pro Production.
![]() Basic Print - A single image. Although a template is created, it is not required for ordering.
Basic Print - A single image. Although a template is created, it is not required for ordering.
![]() Framed Print - Prints priced to include a mat and a frame.
Framed Print - Prints priced to include a mat and a frame.
![]() Matted Prints - Prints priced to include a mat.
Matted Prints - Prints priced to include a mat.
![]() Basic Composite - Simple multi-image products allowing the use of decorative virtual styles. Also, portrait unit templates and similar (e.g., wallets).
Basic Composite - Simple multi-image products allowing the use of decorative virtual styles. Also, portrait unit templates and similar (e.g., wallets).
![]() Advanced Composite - Complex collages of images requiring PSD overlays, text, Shape Prints, and Press Cards with overlay designs.
Advanced Composite - Complex collages of images requiring PSD overlays, text, Shape Prints, and Press Cards with overlay designs.
![]() Traditional Matted - Single or multiple opening cut mat products.
Traditional Matted - Single or multiple opening cut mat products.
![]() Gallery Wrap - Single image canvas products.
Gallery Wrap - Single image canvas products.
![]() Advanced Gallery Wrap - Single or multiple image canvas products allowing for virtual styles, image tilting, and overlays.
Advanced Gallery Wrap - Single or multiple image canvas products allowing for virtual styles, image tilting, and overlays.
![]() Wall Grouping - A preset collection of Prints and Gallery Wraps. They can include frames and/or mats.
Wall Grouping - A preset collection of Prints and Gallery Wraps. They can include frames and/or mats.
![]() Specialty Products - Jewelry, Ornaments, Shape Prints, License Plates, Overlay Image Frames, and Other Unique Products.
Specialty Products - Jewelry, Ornaments, Shape Prints, License Plates, Overlay Image Frames, and Other Unique Products.
![]() Reference Product - Image Box, Book preview images, illustrative sales slides, and other products for display.
Reference Product - Image Box, Book preview images, illustrative sales slides, and other products for display.
![]() Basic Book/Album Page - Single or multiple image page templates. Add graphics blocks and image opacities.
Basic Book/Album Page - Single or multiple image page templates. Add graphics blocks and image opacities.
![]() Advanced Book/Album Page - Single or multiple image page templates. Add graphics blocks, opacities, overlays, and shapes.
Advanced Book/Album Page - Single or multiple image page templates. Add graphics blocks, opacities, overlays, and shapes.
![]() Traditional Matted Book Page - Single or multiple image page templates using a cut mat.
Traditional Matted Book Page - Single or multiple image page templates using a cut mat.
Product Template Types
When selecting a template for a product, refer to the following attributes chart to ensure the chosen product template aligns with the specific characteristics and requirements of the product.
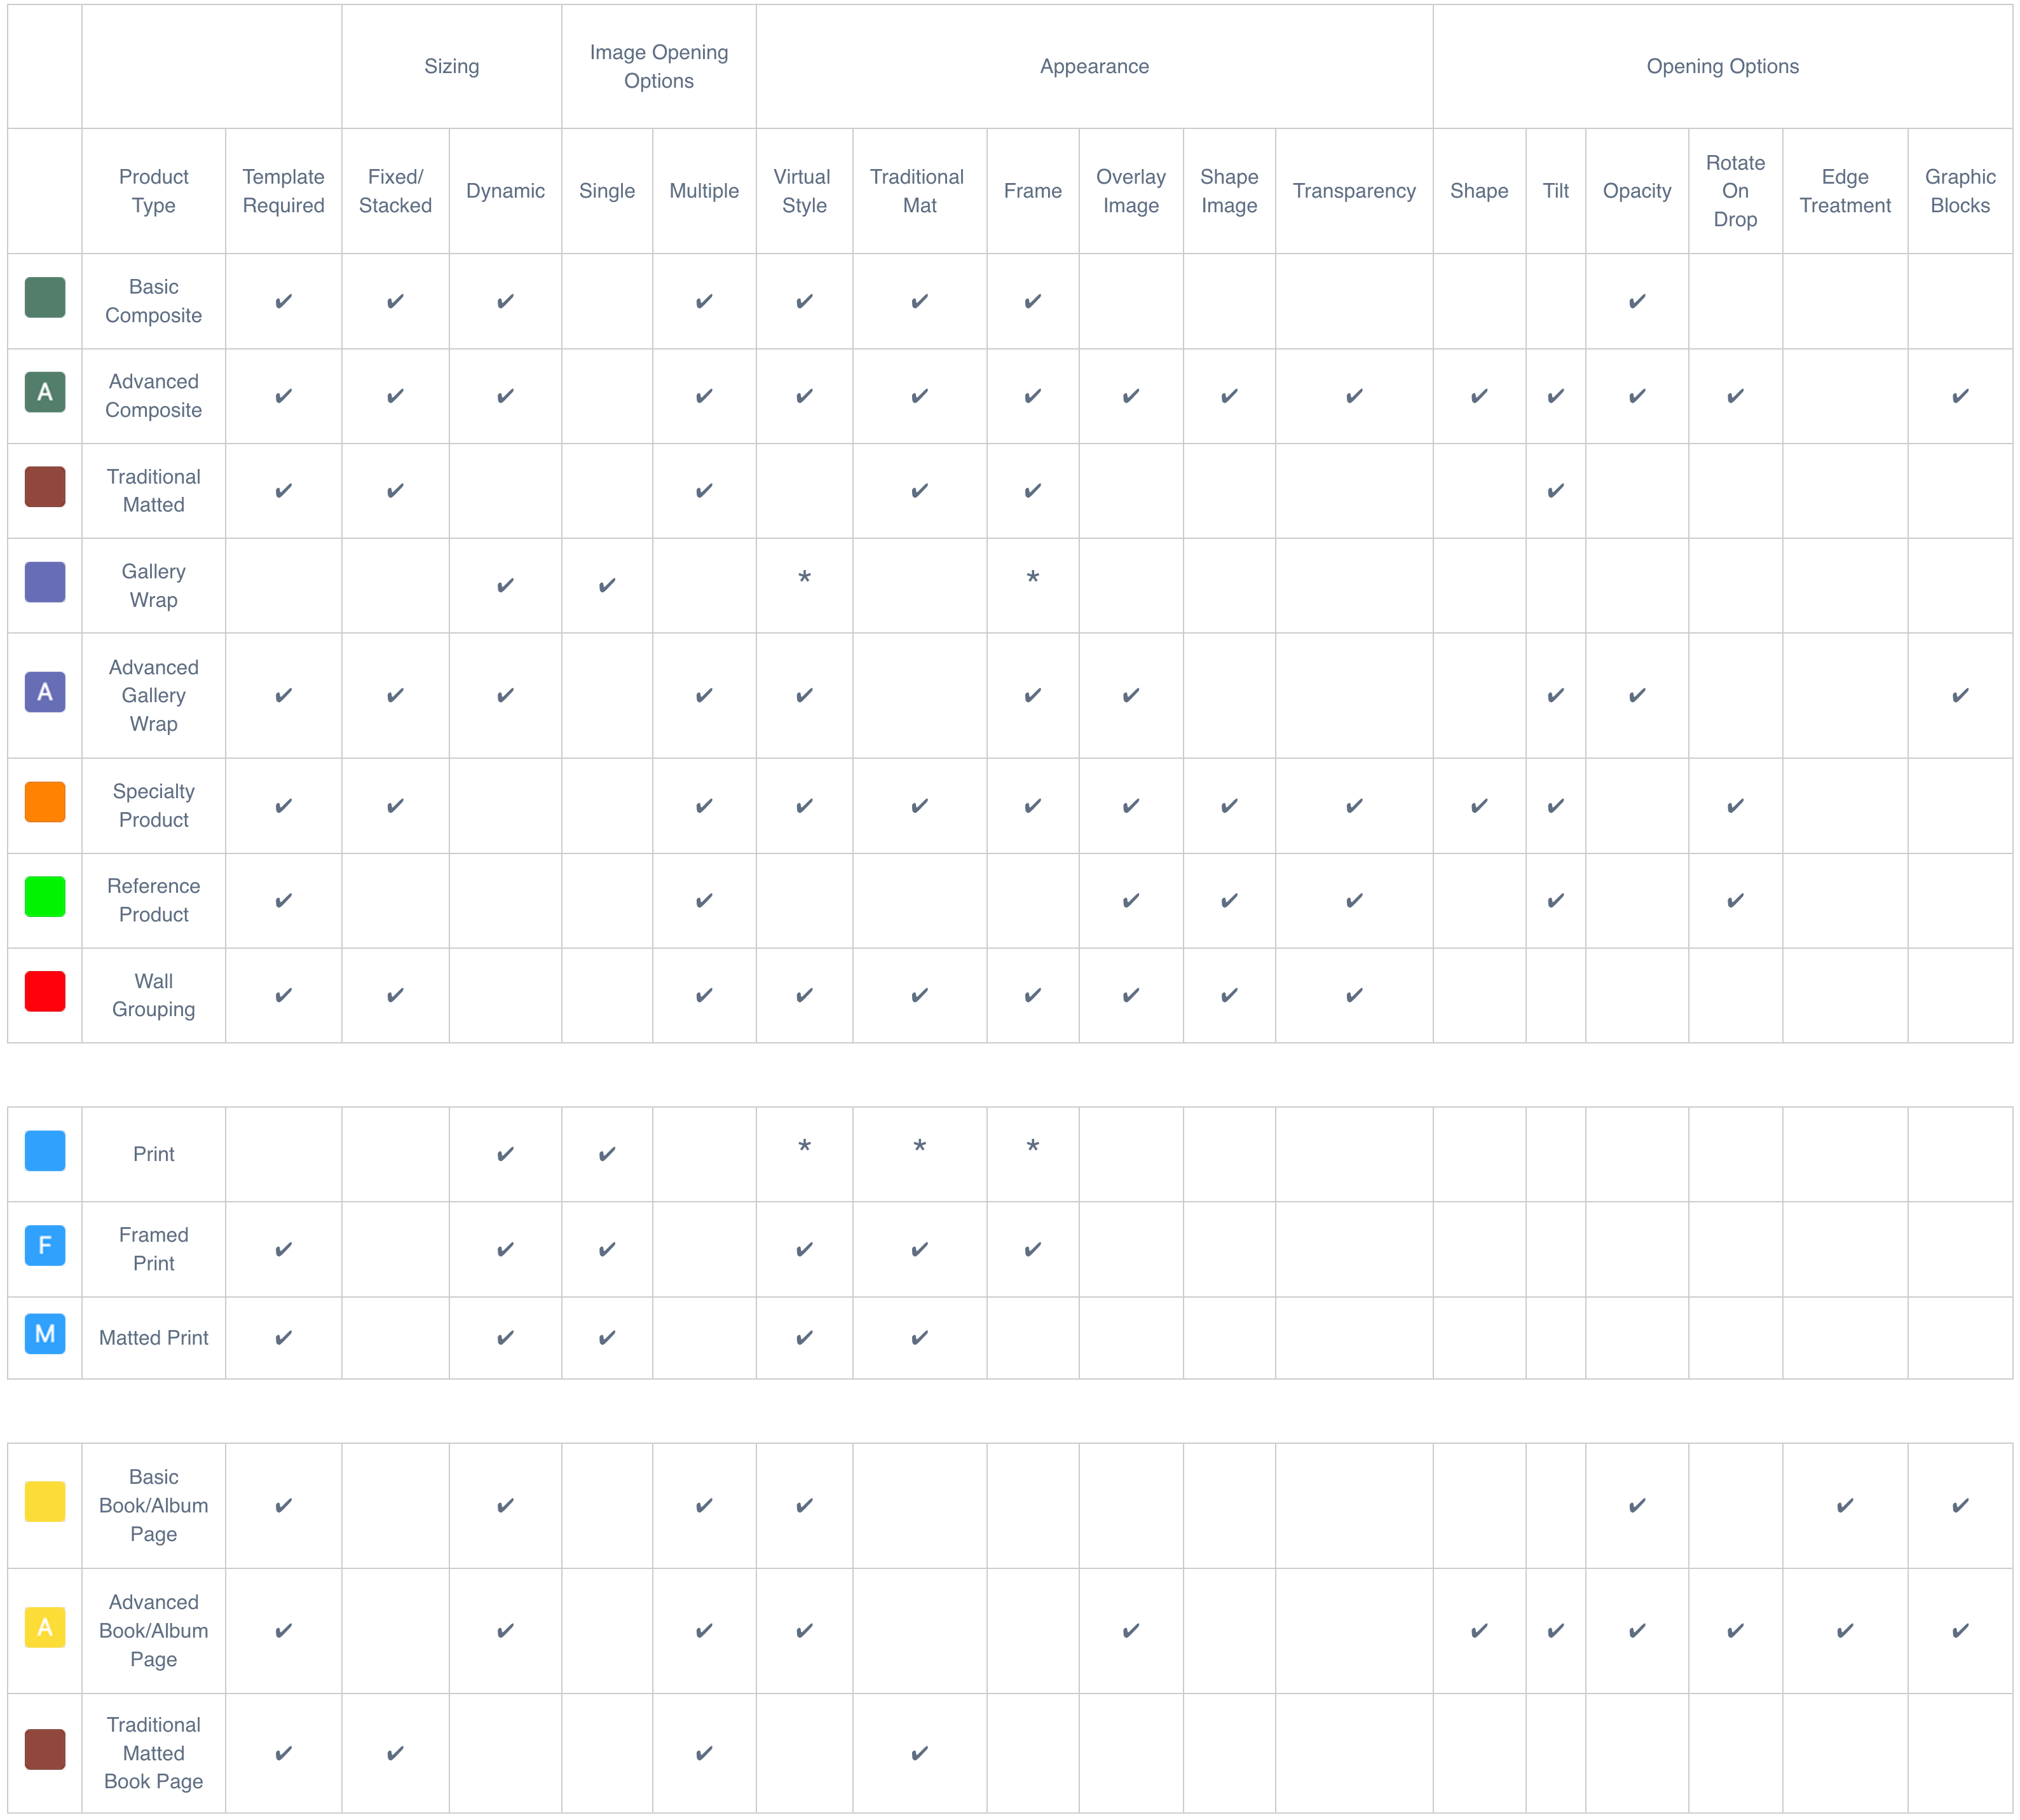
* This particular attribute can be added when Working with Products, but not in the Product Editor.
Overlap
Sometimes, when producing product templates, there may be an overlap between two different template types, both capable of creating the same product with equally effective results. This overlap allows for flexibility in choosing how to best achieve the desired outcome based on your specific preferences or available resources.
A good example is the Geometric D4 ornament from WHCC. The Product Template for the ornament can be created as an Advanced Composite Product ![]() or a Specialty Product
or a Specialty Product ![]() .
.
Attributes required:
- Virtual Style
- Overlay Image
- Shape Image
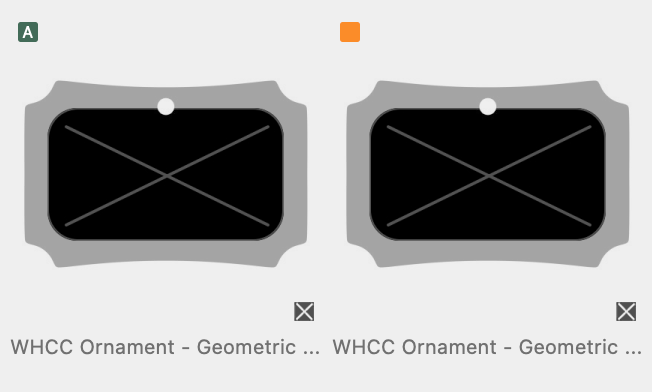
Both template types have the necessary attributes.
To manage and edit your Book/Album Pages, use the Book Page Manager (on the top menu, under Products).
At times, it might be more convenient to create a new product template by duplicating an existing one that is similar to what you need. After duplicating, you can then make your modifications and save it as a new Product Template.
Duplication can also be used to change the Template Product Type. For example, if you have chosen to create a Basic Composite and realize you need to modify certain attributes only supported in Advanced Composites, you can duplicate the template and select the desired product type.
- Navigate to the Product & Pricing Manager by going to the top menu, Products > Product & Pricing Manager.
- In the Product Templates tab, select the product template you wish to duplicate.
- Click the Duplicate tool.
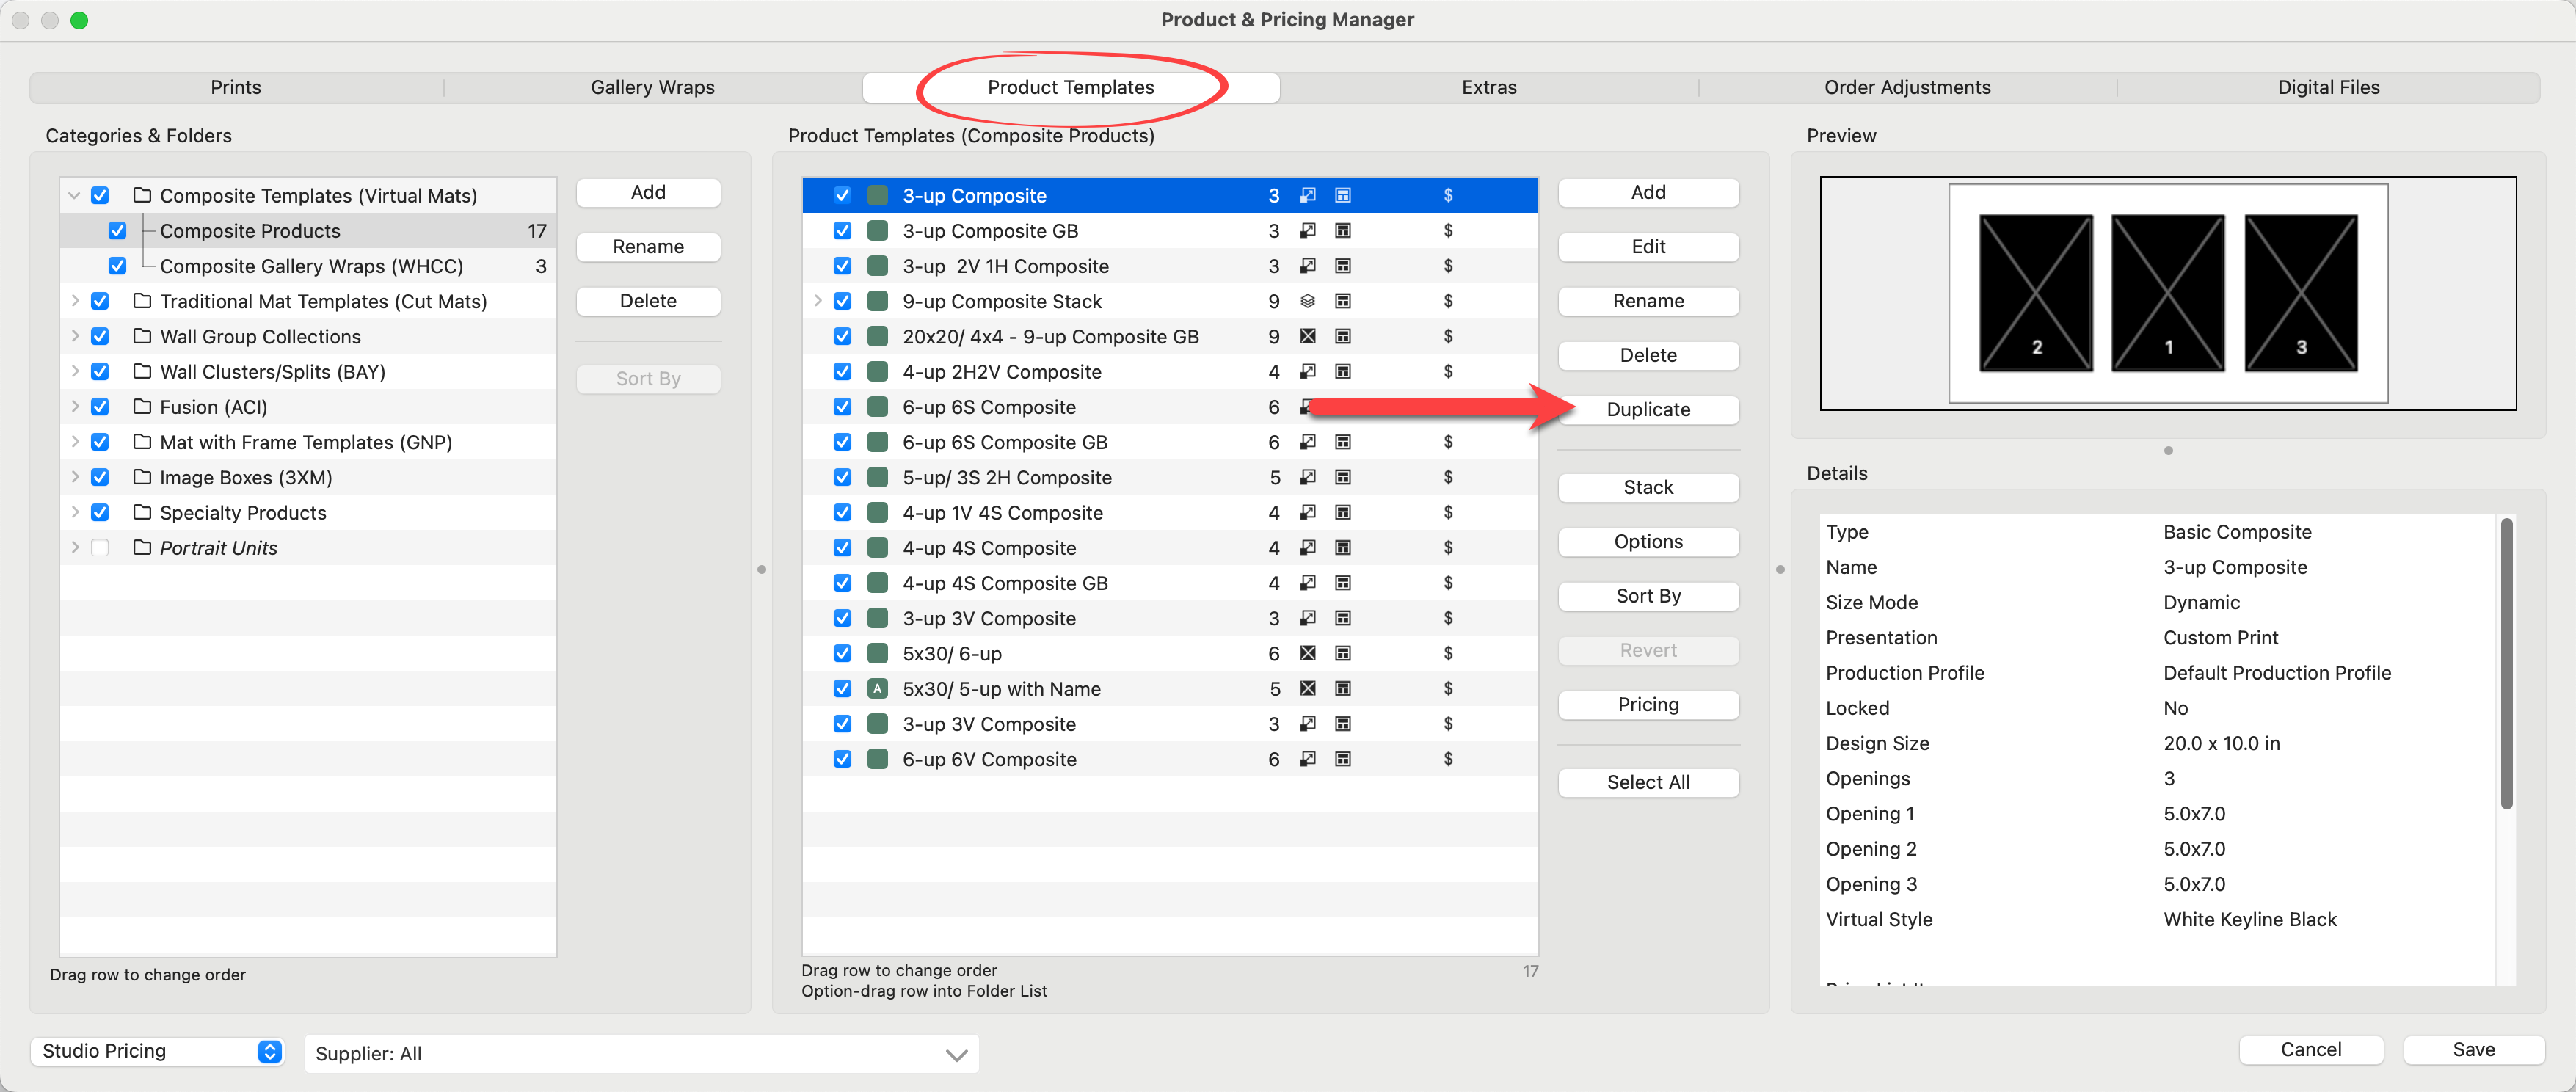
- Optionally attach a Supplier.
- Type in a new name for the template.
- Select a Product Type from the drop-down menu.
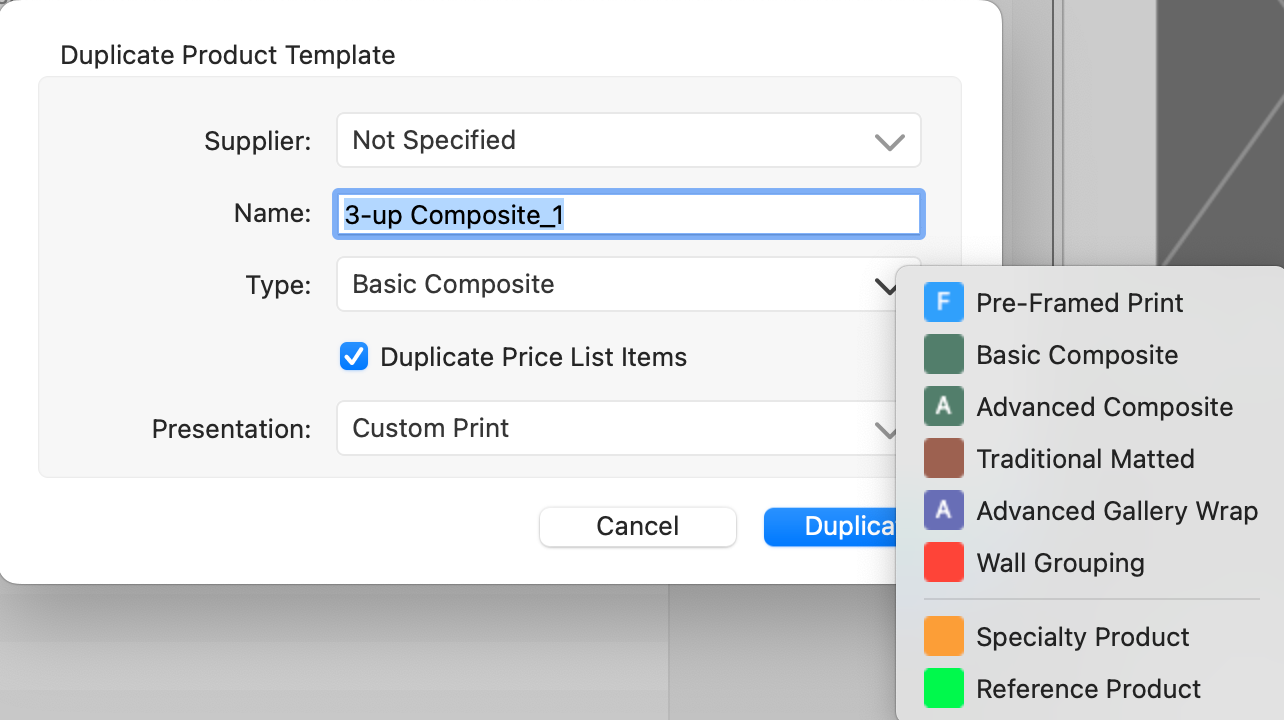
- Check the Duplicate Price List Items box if you wish the new template to be priced the same.
- Select a Presentation Option.
- Click Duplicate.
Dynamically Sized Prints and Gallery Wraps
Dynamic sizing allows prints and gallery wraps, to be shown, ordered, and produced in various standard or customized sizes.
In Room view and Actual Size view, prints and gallery wraps (face size) are displayed in sizes based on your paper sizes. The order of the sizes in the Paper Sizes window is crucial as it determines the order in which the sizes are displayed. The default ProSelect setup categorizes sizes into folders based on similar size ratios (Standard, Square, and Pano). This means that in Room view, you can easily navigate through paper sizes, and the image crop dynamically adjusts to the various ratios.
If an image has a locked crop, the sizing will be anchored to the long dimension of the paper size, and the short dimension will be based on the aspect ratio of the image crop.
- In ProSelect's main display, use the Previous/Next Size tools

 to navigate through the available sizes.
 - Right-click on the Previous or Next size tool to reveal your paper sizes folders. You can move through the different folders from here.
- If a size isn’t showing, make sure it has a price attached to the presentation option you’re currently using.
To display the correct sizes when using dynamic templates, you must set up pricing for each size under every presentation option you plan to offer. If a size isn’t priced under the current presentation option, it won’t appear when browsing through sizes in the main interface.
Dynamically Sized Product Templates
Dynamic-sized product templates are handled slightly differently. When product templates are built, they are created with an absolute aspect ratio. If a template is built with a design size of 16x20, when that product is presented in a room, it will only be shown based on paper sizes that fit that aspect ratio (8x10, 16x20, 24x30, 40x50).
- In ProSelect's main display, use the Previous/Next Size tools to navigate through the available sizes created for the product.
- Right-click on the Previous/Next Size tools to view all the available sizes matching the template's aspect ratio.
- If a size isn’t showing, make sure it has a price attached to the presentation option you’re currently using.
Fixed Size is exactly what it implies. A product template is created to be specific to the Design Size only, and only that particular size will be available for ordering.
When a fixed-size template is created, there is no requirement for a corresponding paper size. The Design Size will serve as the final file size during production.
Stacked sizing allows users to load and populate multiple fixed-sized products simultaneously. This feature is particularly useful when offering products in different sizes with varying aspect ratios. Wall groupings, for example, work best when stacked, as they can consist of small, medium, and large sizes. Stacked sizing is ideal for wall groupings that contain multiple images and transition from one size to another, such as going from a large (24x30) to a medium (20x24), where the aspect ratios differ slightly.
Click on Using Stacked Templates to learn more.