Managing Supplier Collections
If you're wondering why you can't change a product in a Supplier Collection, it's because most parts of these collections are intentionally locked to maintain their integrity. Supplier Collections are set up based on the specifications provided by the supplier, so locking them helps ensure accuracy and consistency when ordering. You can, however, adjust certain things—like renaming products, changing prices, or turning specific items on or off.
In most cases, duplicating products from a Supplier Collection isn’t needed because ProSelect already allows you to customize key elements—such as product names, pricing, and availability—without altering the original item. Duplication should only be used when you need to make major changes to a product’s template or structure, knowing that the new version won’t receive future updates from the supplier.
ProSelect utilizes different management areas for various types of collections. For instance, prints are managed through the Product & Pricing Manager, whereas frames are handled within the Manage Frames window. This organization ensures that each collection type can be specifically tailored and maintained appropriately.
After downloading a Supplier Collection in ProSelect, you must also install it to make it available in your workflow. Once installed, the collection will automatically be placed in the appropriate section of the software, depending on the product type:
- Prints, Gallery Wraps, Wall Groupings, Composite and Matted Products, Specialty Products: These appear in the Product & Pricing Manager.
- Books and Albums: These are added to the Book Designs Manager.
- Frames: These go into the Frames Manager.
- Traditional Mats: These are found in the Mat & Style Designer.
To change the name of a product in a Supplier Collection, simply use the Rename button in the Product & Pricing Manager. This allows you to give the product a custom name that better fits your studio’s branding or makes it easier to identify during sales sessions. Renaming a product does not affect its connection to the Supplier Collection or impact how it’s ordered—only how it appears within ProSelect.
- Go to the top menu, Products > Product & Pricing Manager.
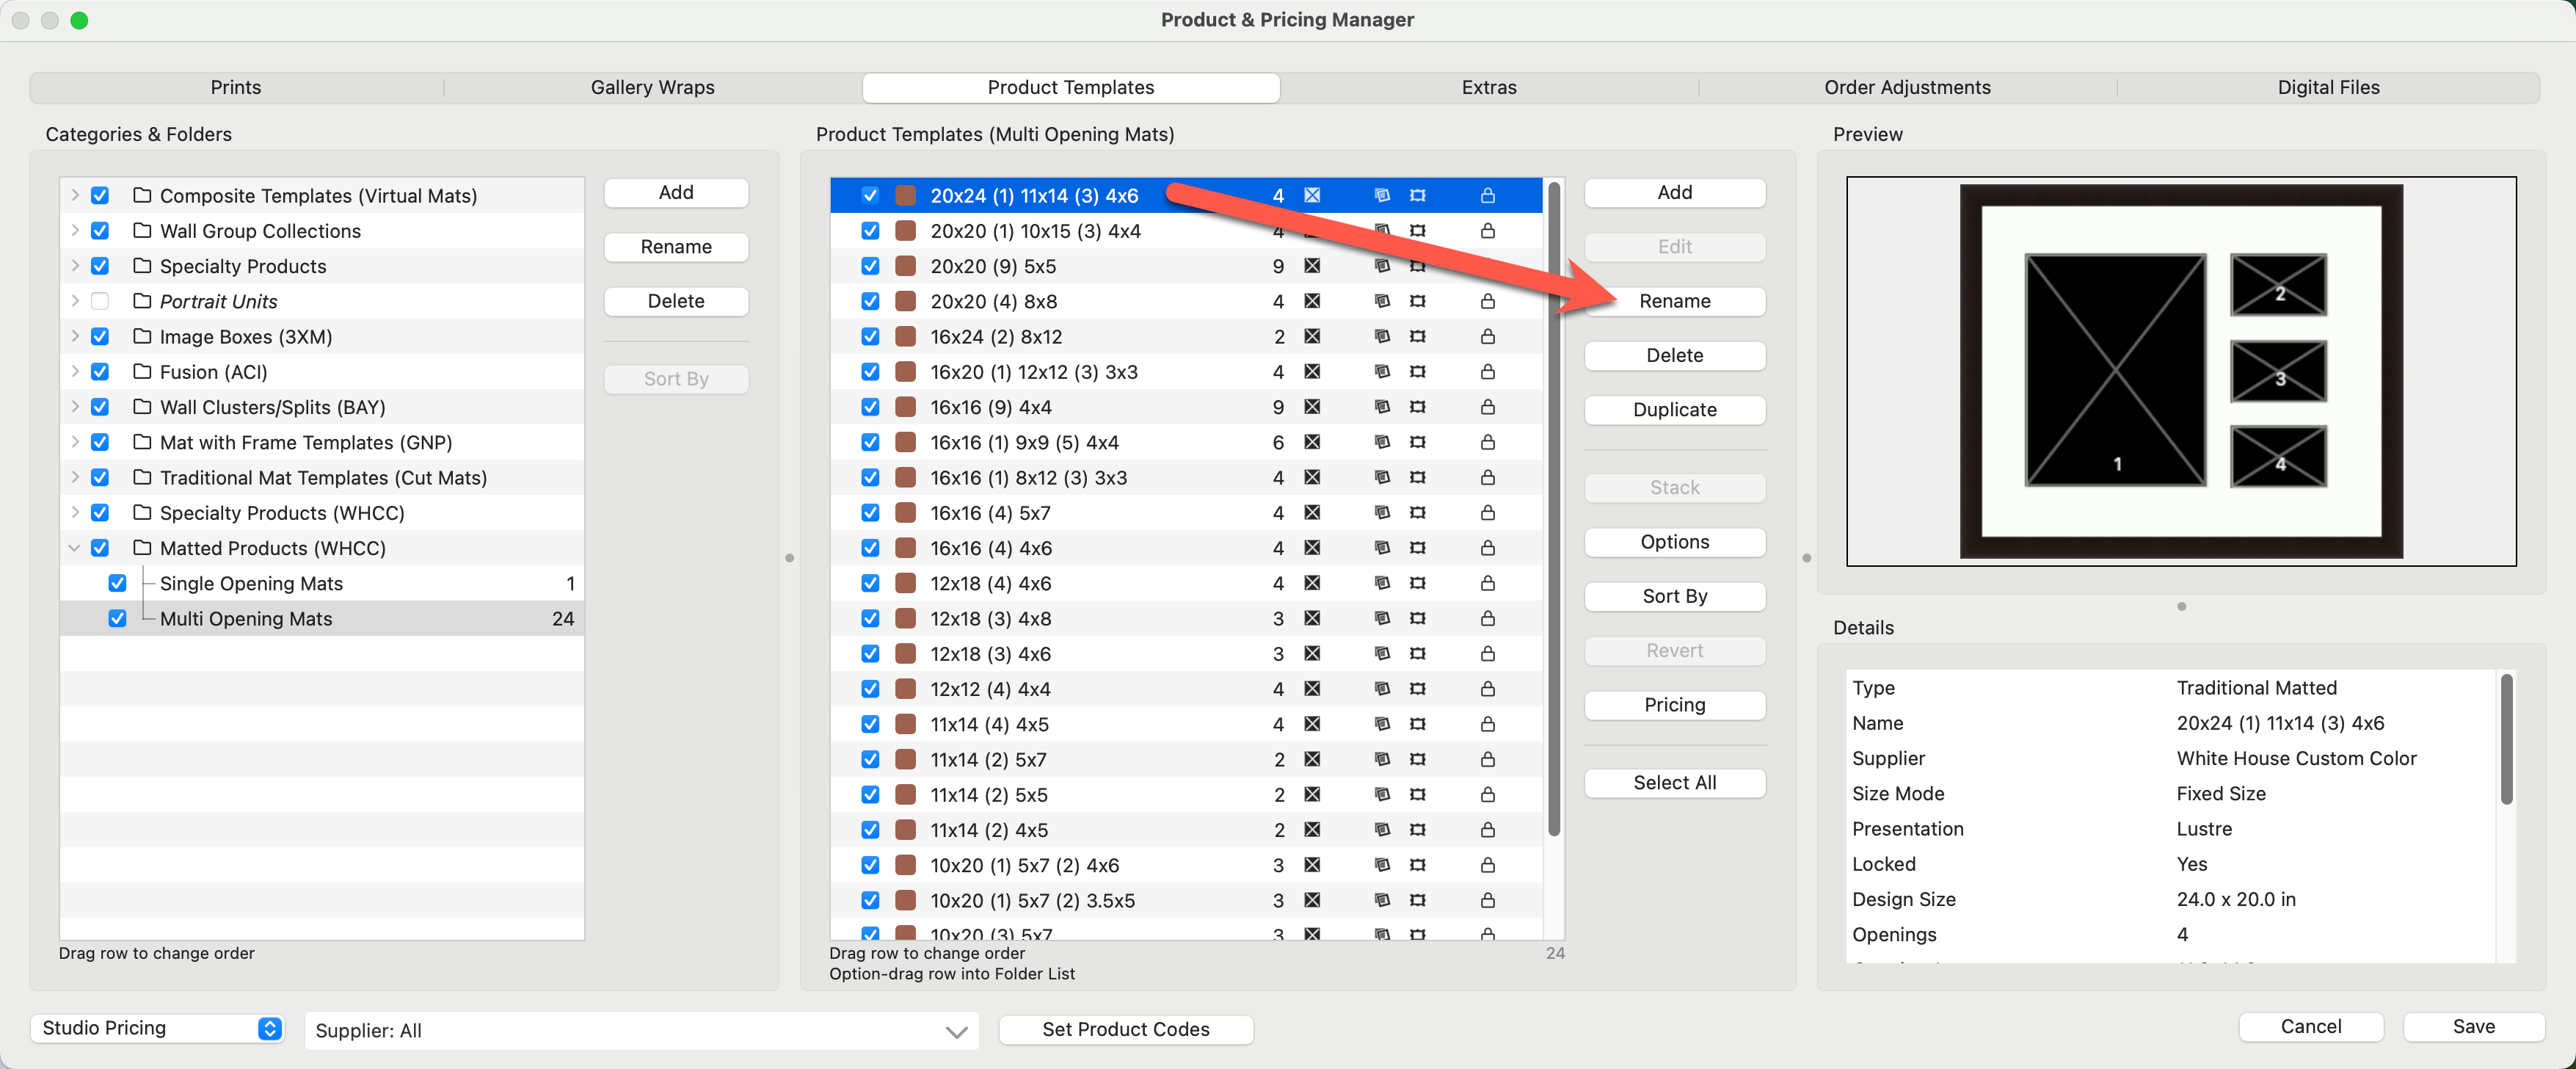
- Click on the "Product Templates" tab.
- Locate and select the product you want to rename.
- Click on the Rename button.
- Type in a new name for the product.
- Click the Save button.
If the template you're renaming is a stacked template, ProSelect gives you the option to rename both the root-level stack and the individual templates within it. You can choose to rename just the main stack, individual templates, or both—depending on how you want them displayed during sales sessions.
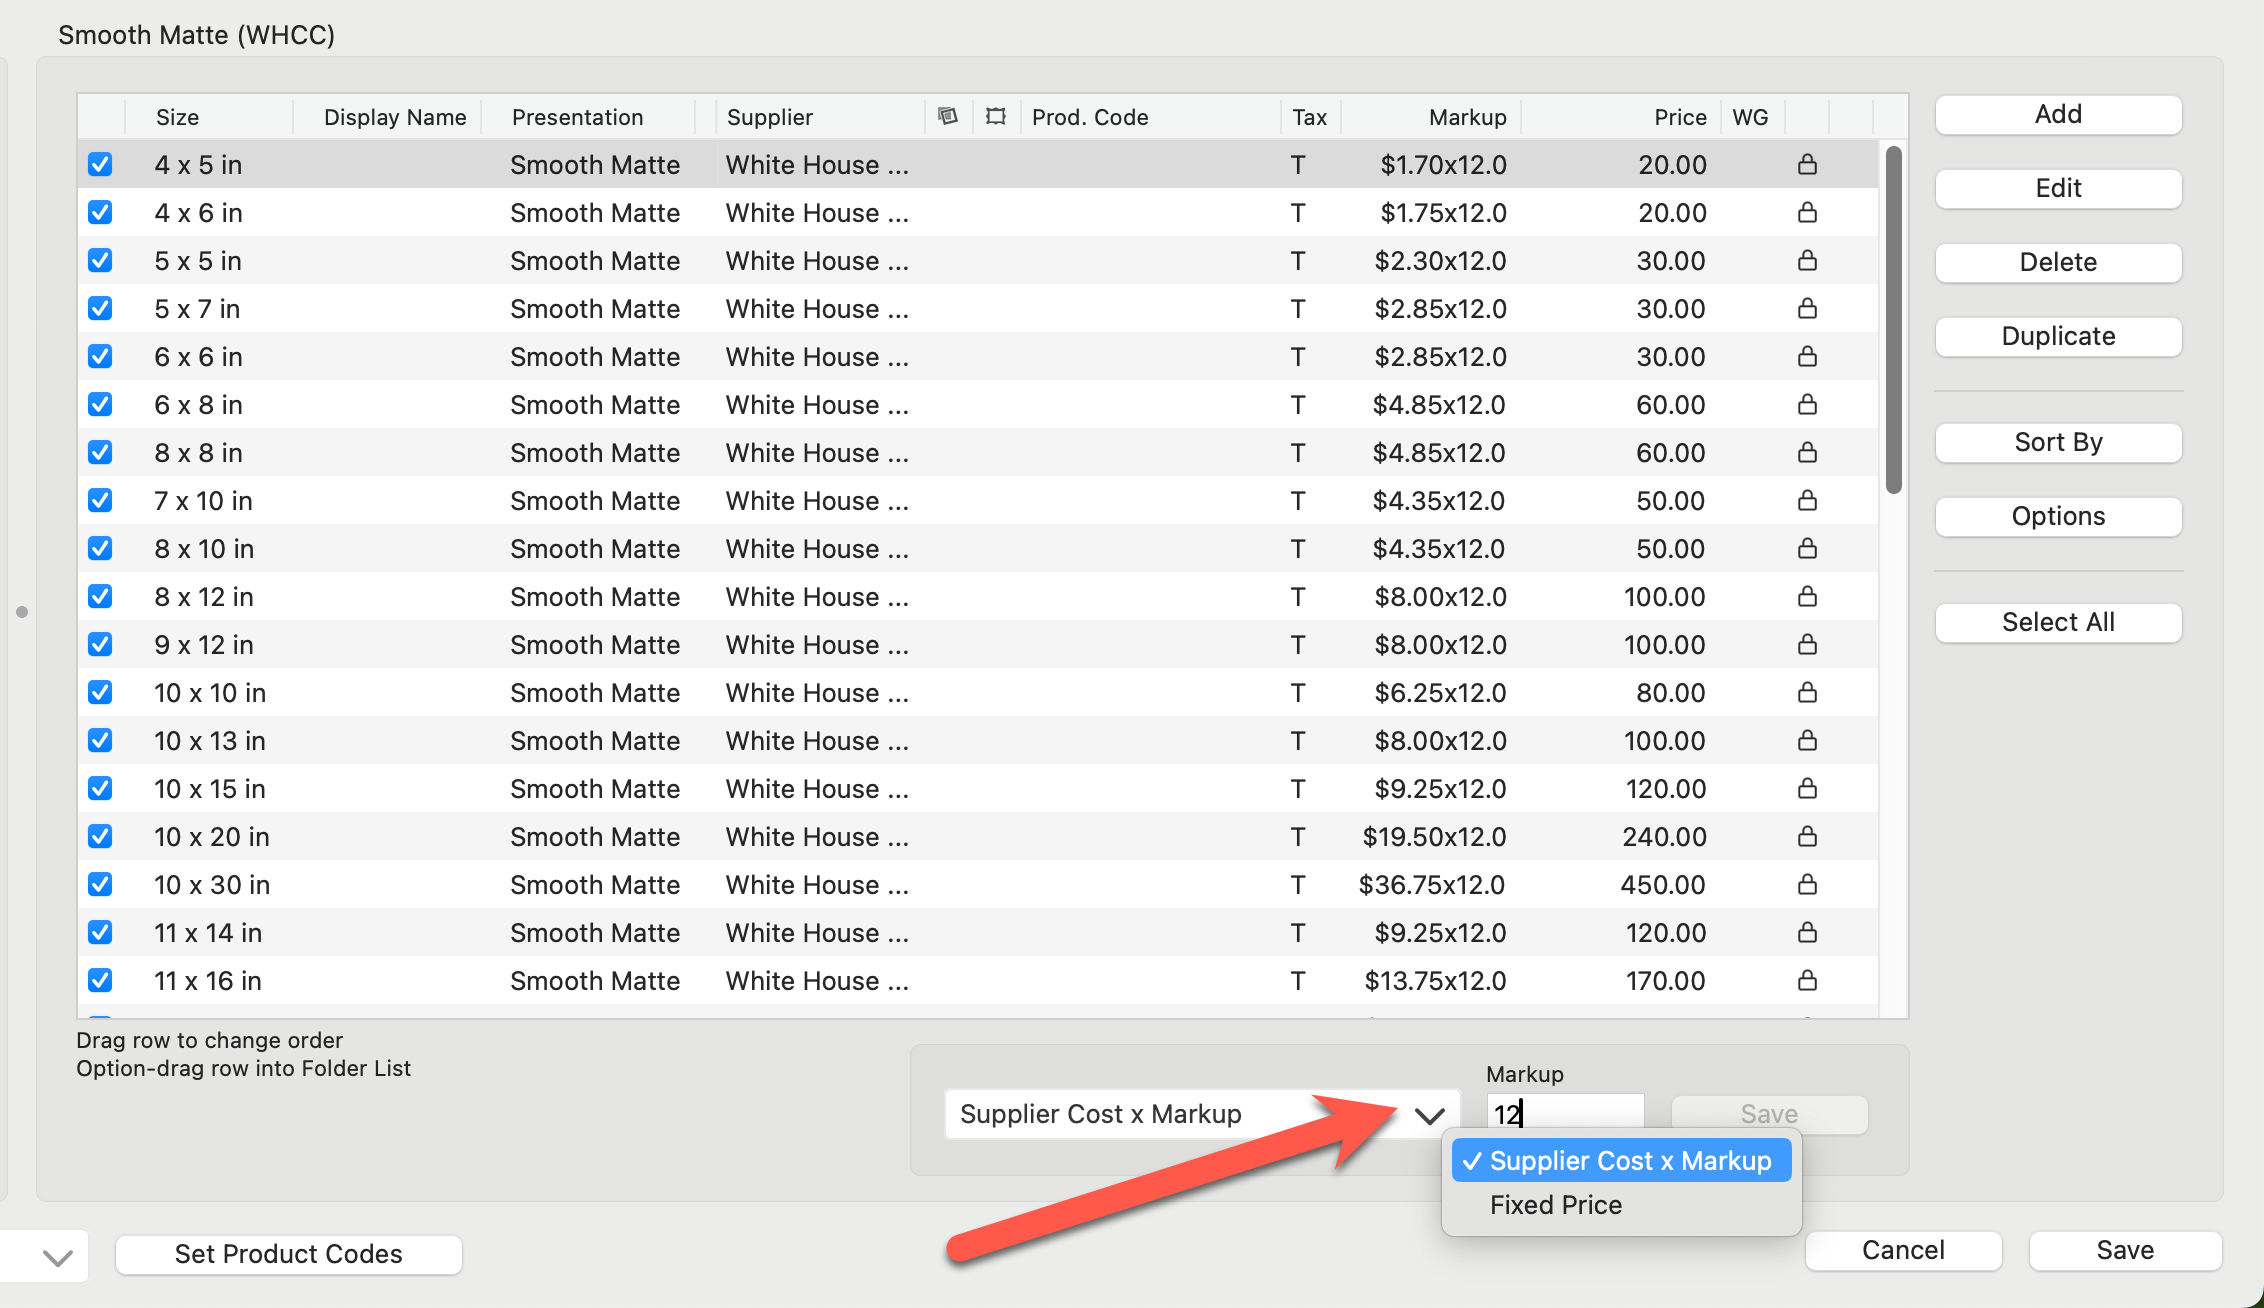
When installing Supplier Collections in ProSelect, you are prompted to select a Pricing Method - either Fixed Price or Supplier cost x Markup. After installation, you can set or adjust the selling prices of your prints. The pricing method can be changed at any time, regardless of the initial choice made during installation. To toggle between pricing methods, use the drop-down arrow in the Pricing Method box (below the Pricing panel).
Price Using Supplier Cost x Markup
ProSelect adds a predetermined markup when this pricing method is selected. While the Supplier Cost cannot be adjusted, the markup can.
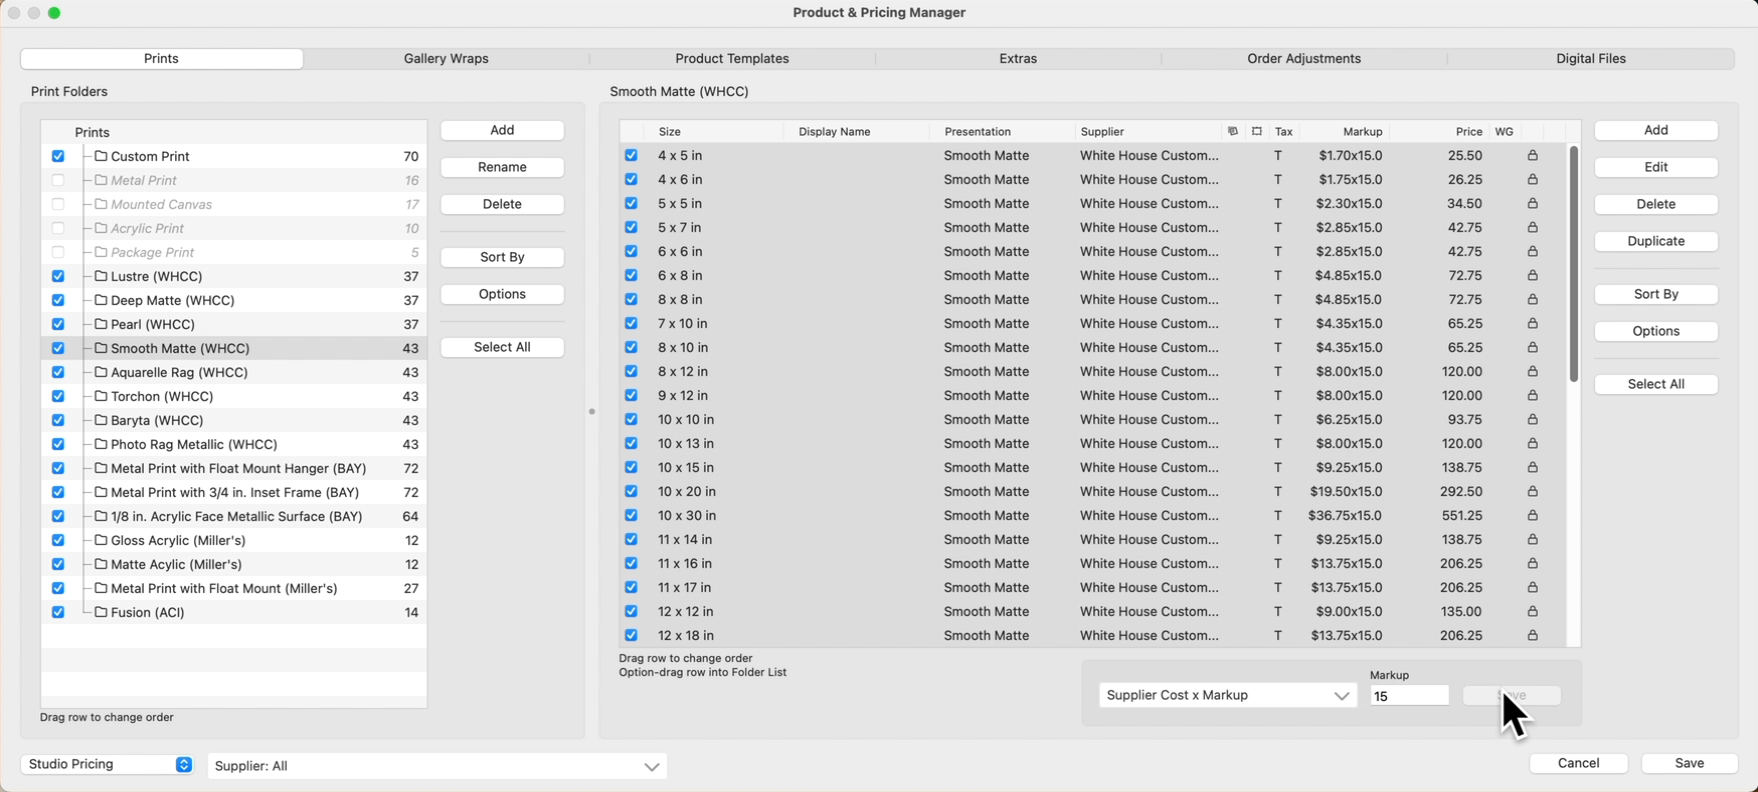
- Open the Product & Pricing Manager.
- Select the Folder you wish to work with.
- Use the Select All button to change the markup value of ALL the prints within the folder.
- Change the markup value in the "Markup" box below the Pricing panel.
- Click Save.
Price Using a Fixed Price
In order to use the fixed pricing method, each product size must be individually priced. There are 3 ways of doing this.
- Option 1: Manually type prices into the Fixed pricing box. Follow the steps for Adding a Price in the Pricing Panel.
- Option 2: Select a line item and edit each item individually. By using the Edit button, you can view a reference to the Supplier Cost. This could be helpful when setting your own selling price. Using this option will show you your "Profit Margin."
- Option 3: Generate a spreadsheet and update the prices. Exporting your prices to a spreadsheet, updating them, and importing them back into ProSelect can save you time, especially if there are a lot of products to price.
When installing Supplier Collections in ProSelect, you are prompted to select a Pricing Method - either Fixed Price or Supplier cost x Markup. After installation, you can set or adjust the selling prices of your gallery wraps. The pricing method can be changed at any time, regardless of the initial choice made during installation. To toggle between pricing methods, use the drop-down arrow in the Pricing Method box (below the Pricing panel).
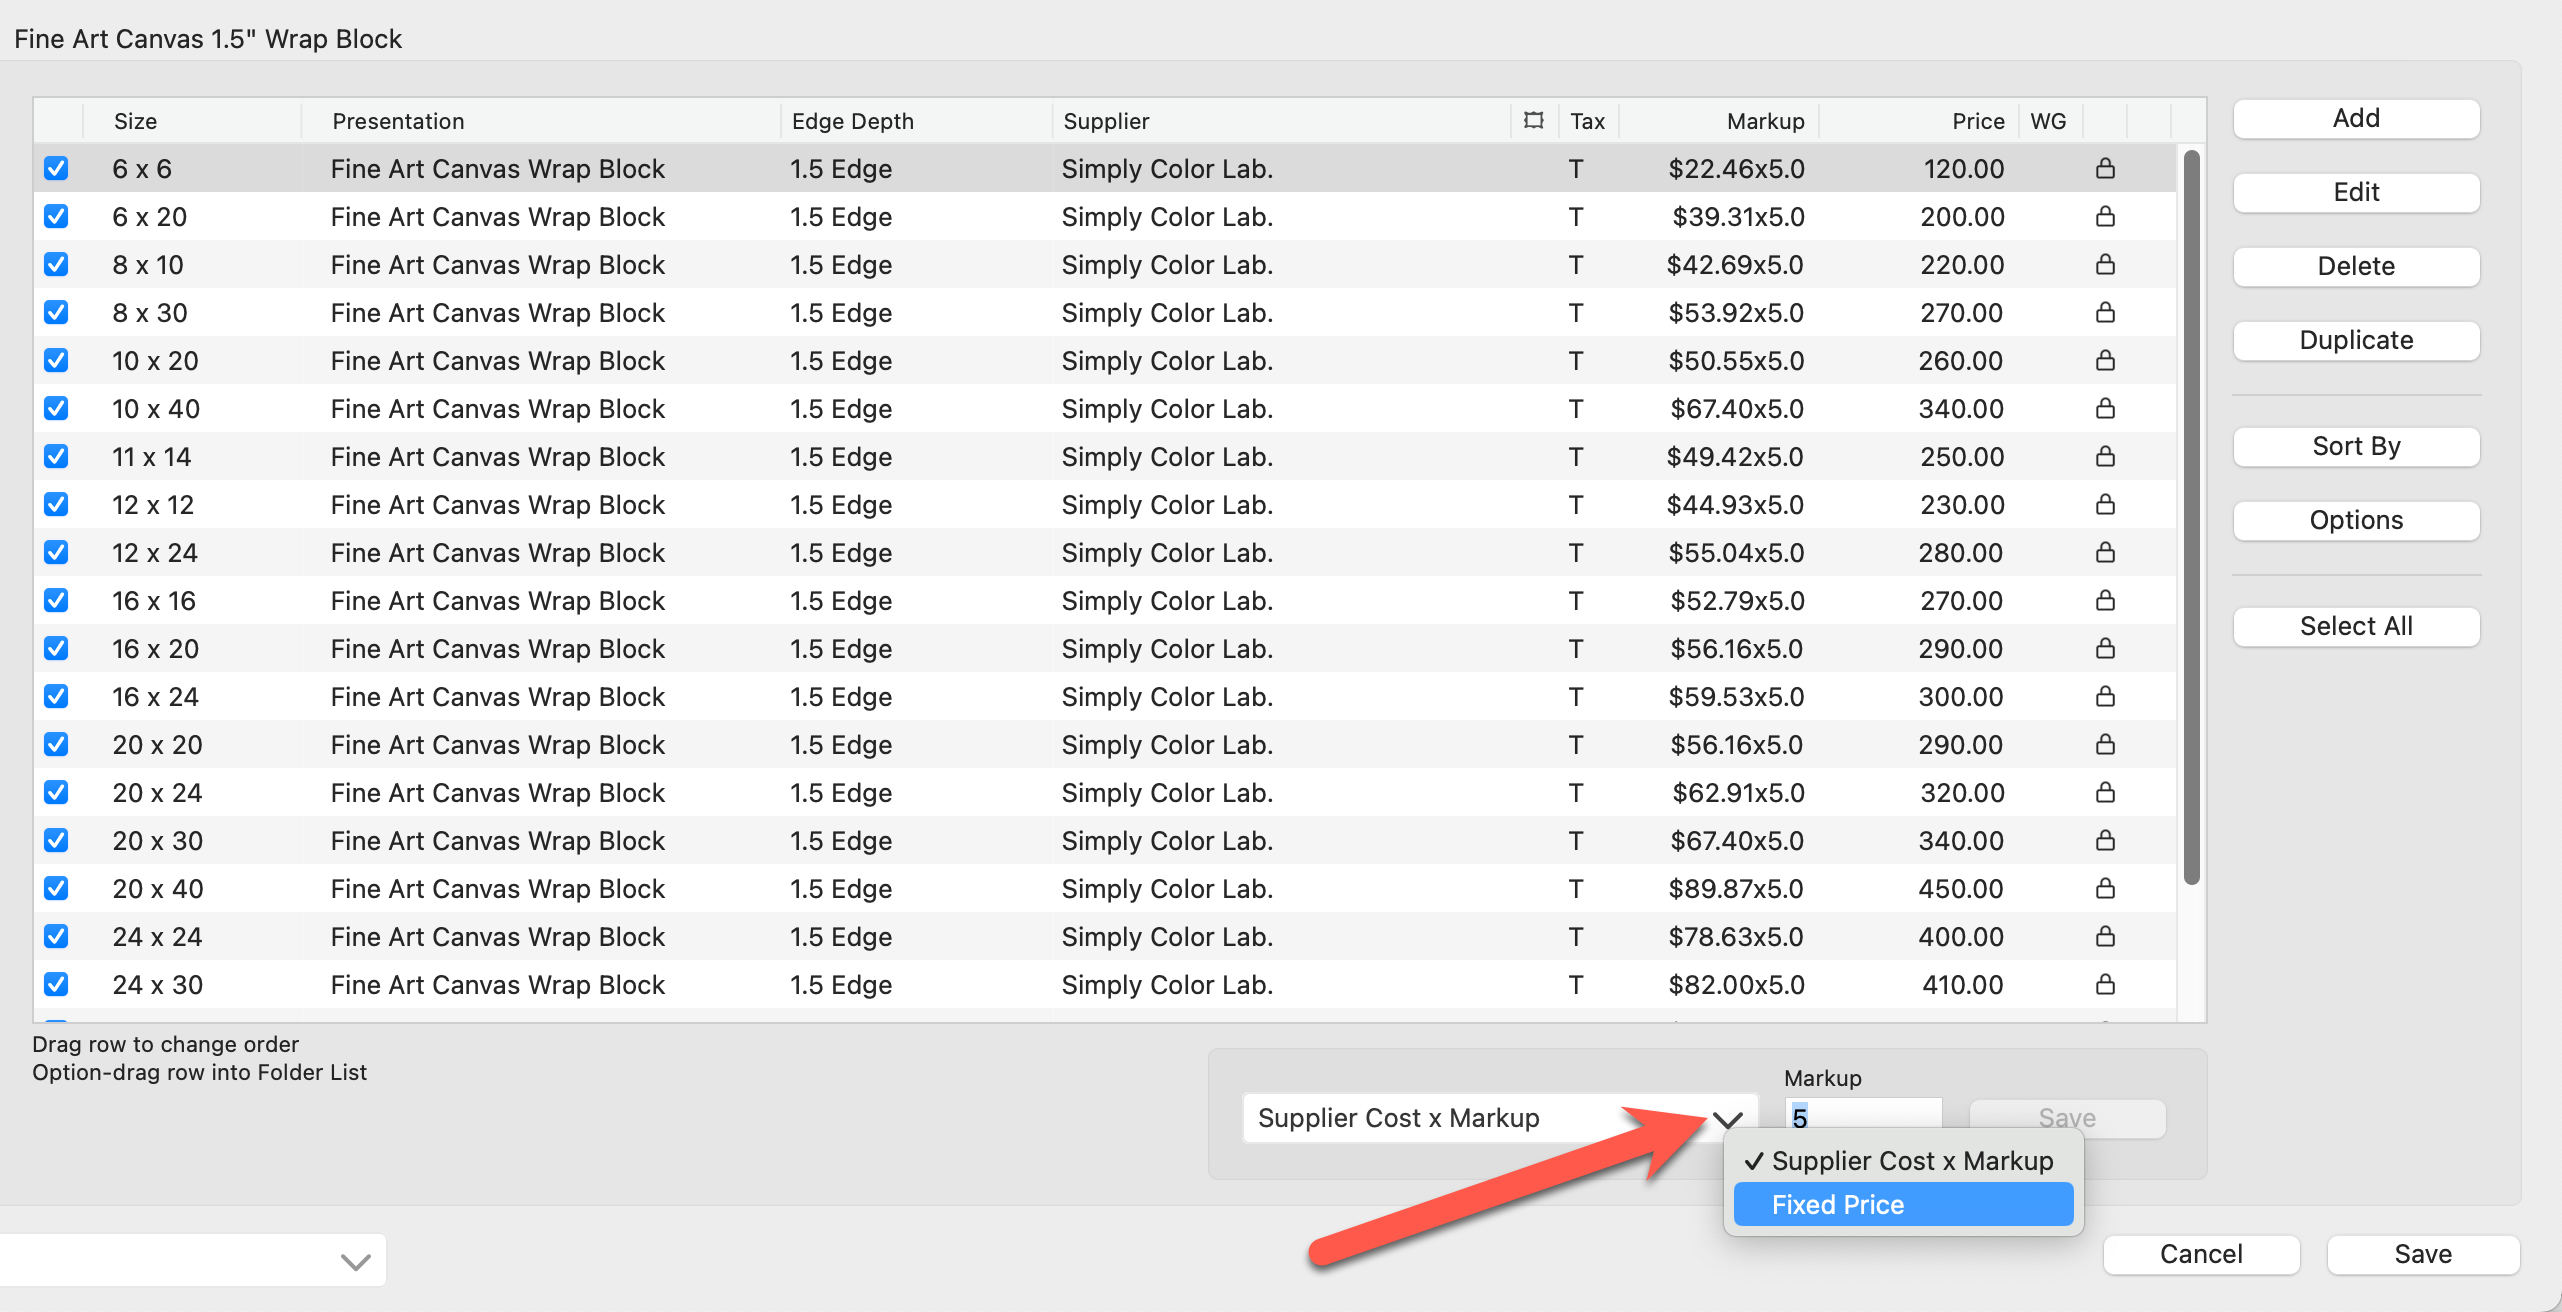
Price Using Supplier Cost x Markup
ProSelect adds a predetermined markup when this pricing method is selected. While the Supplier Cost cannot be adjusted, the markup can.
- Open the Product & Pricing Manager.
- Select the Gallery Wraps tab.
- Select the Folder you wish to work with.
- Use the Select All button to change the markup value of ALL the gallery wraps within the folder.
- Change the markup value in the "Markup" box below the Pricing panel.
- Click Save.

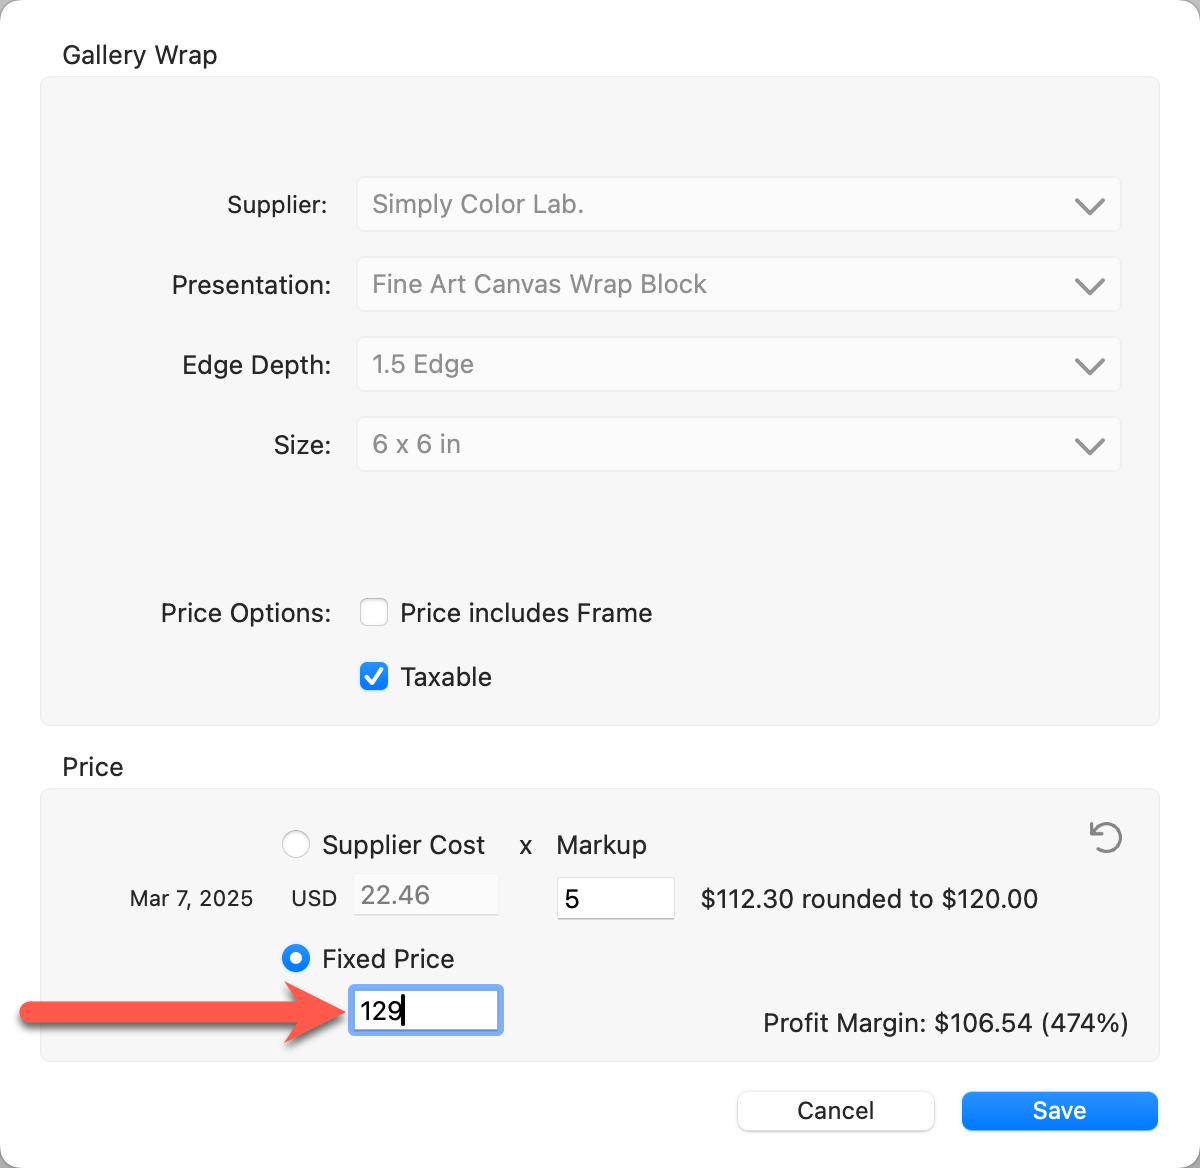
Price Using a Fixed Price
In order to use the fixed pricing method, each gallery wrap must be individually priced. There are 3 ways of doing this.
- Option 1: Manually type prices into the Fixed pricing box. Follow the steps for Adding a Price in the Pricing Panel.
- Option 2: Select a line item and edit each item individually. By using the Edit button, you can view a reference to the Supplier Cost. This could be helpful when setting your own selling price. Using this option will show you your "Profit Margin."
- Option 3: Generate a spreadsheet and update the prices. Exporting your prices to a spreadsheet, updating them, and importing them back into ProSelect can save you time, especially if there are a lot of products to price.
When installing Supplier Collections in ProSelect, you are prompted to select a Pricing Method - either Fixed Price or Supplier cost x Markup. After installation, you can set or adjust the selling prices of your products. The pricing method can be changed at any time, regardless of the initial choice made during installation.
- Open the Product & Pricing Manager.
- Select the Product Templates tab.
- Select the Category and Folder you wish to work with.
- Select the product you wish to price, and click the Pricing button.
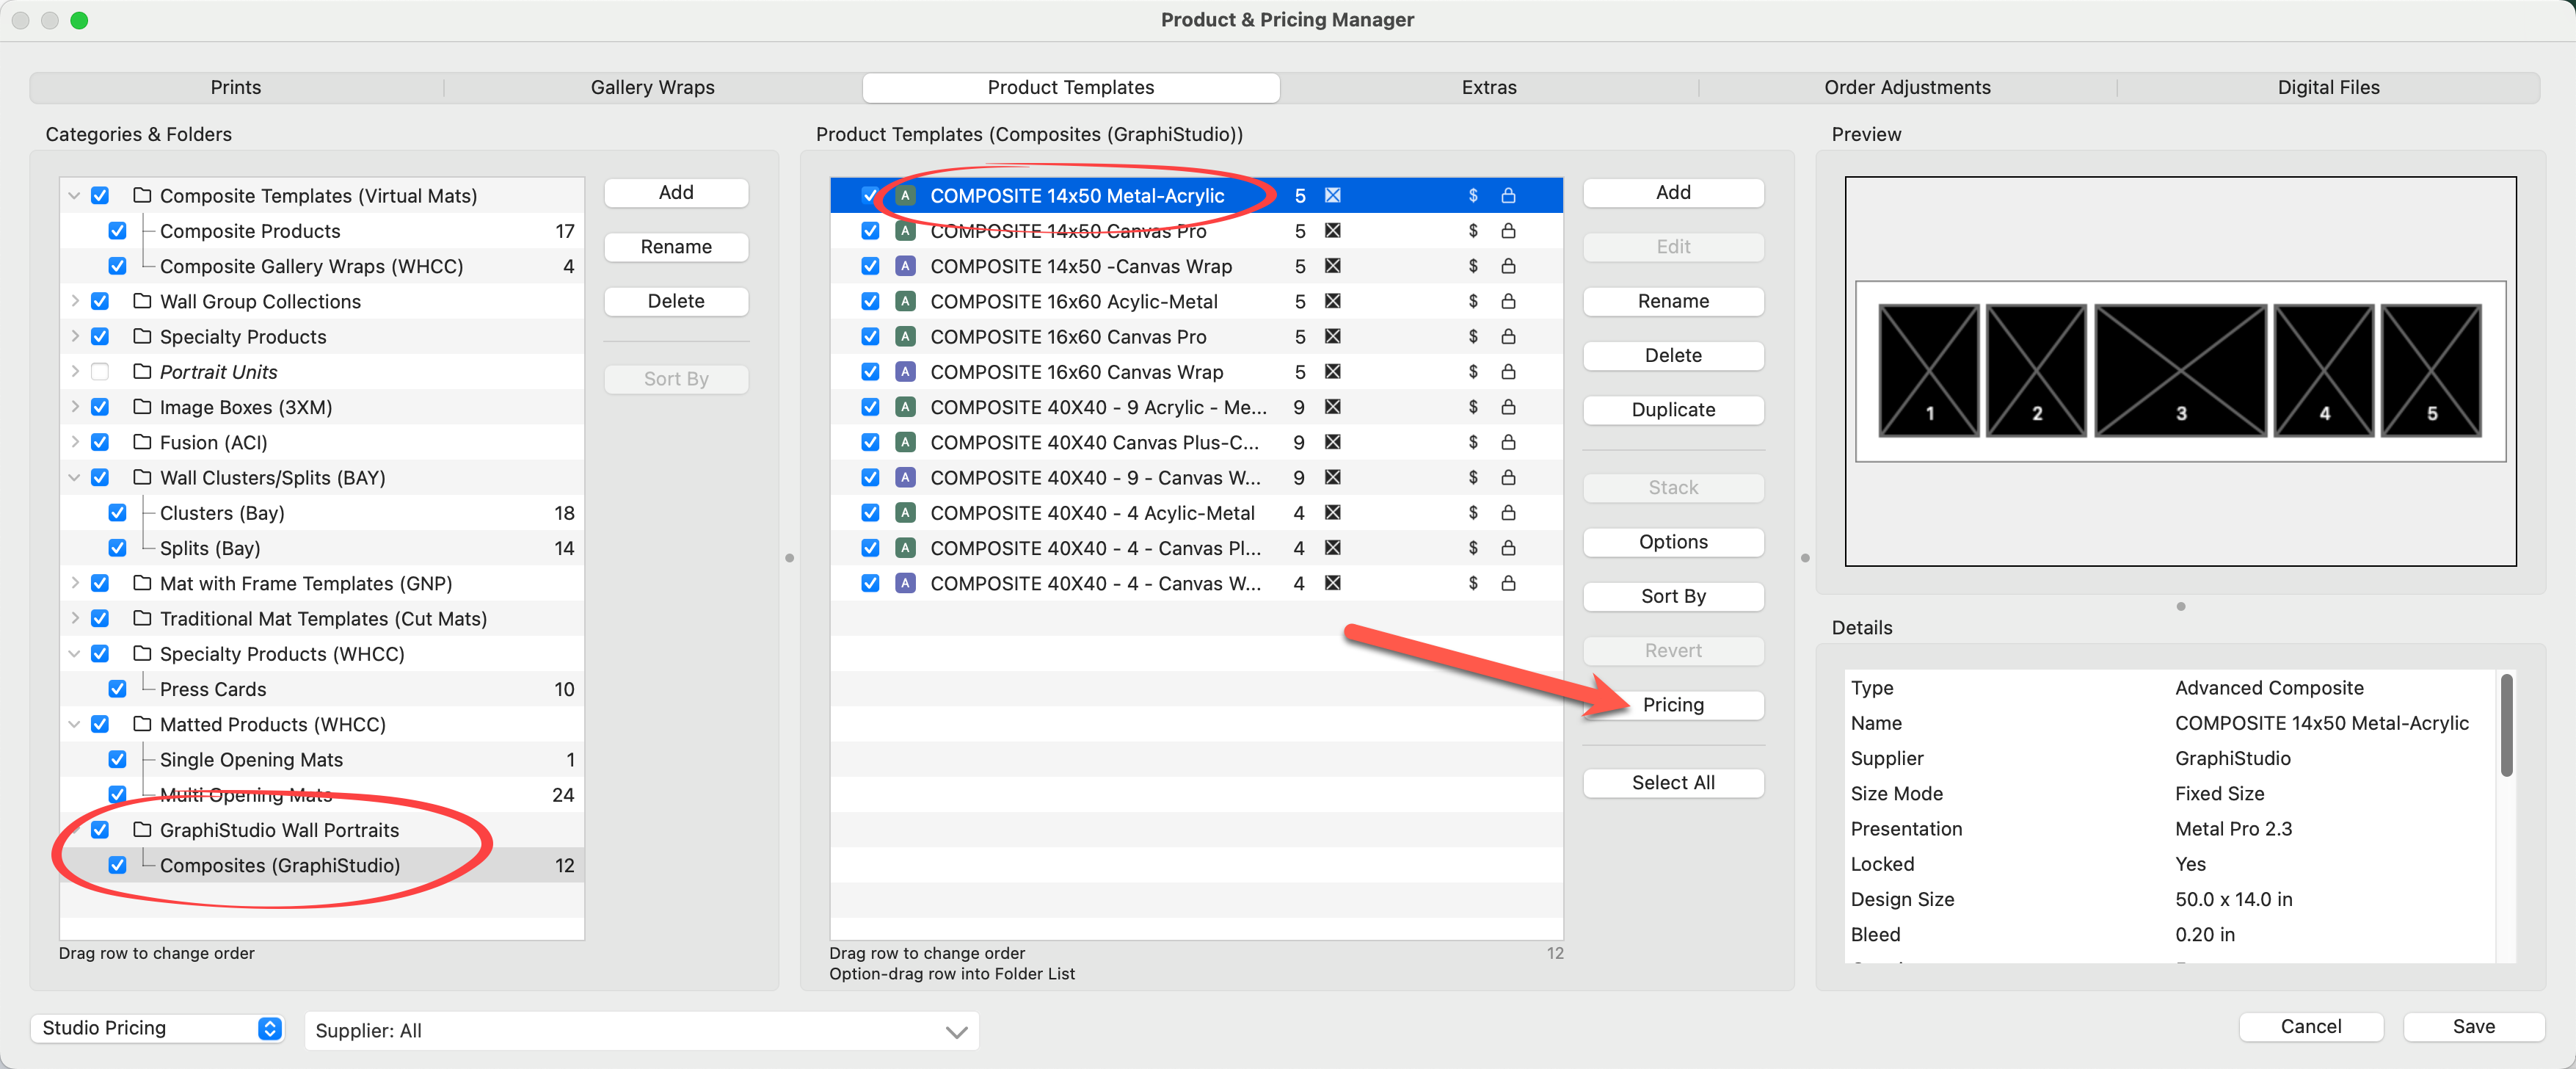
- The pricing options available will vary depending on the type of product selected.
- The Pricing dialog allows you to edit price list items already listed as well as add new ones. Many products come in different finishes and configurations. All of the options will be listed here.
 Quick Tip
If the product you are attempting to price does not list any price list items, click here for more information.
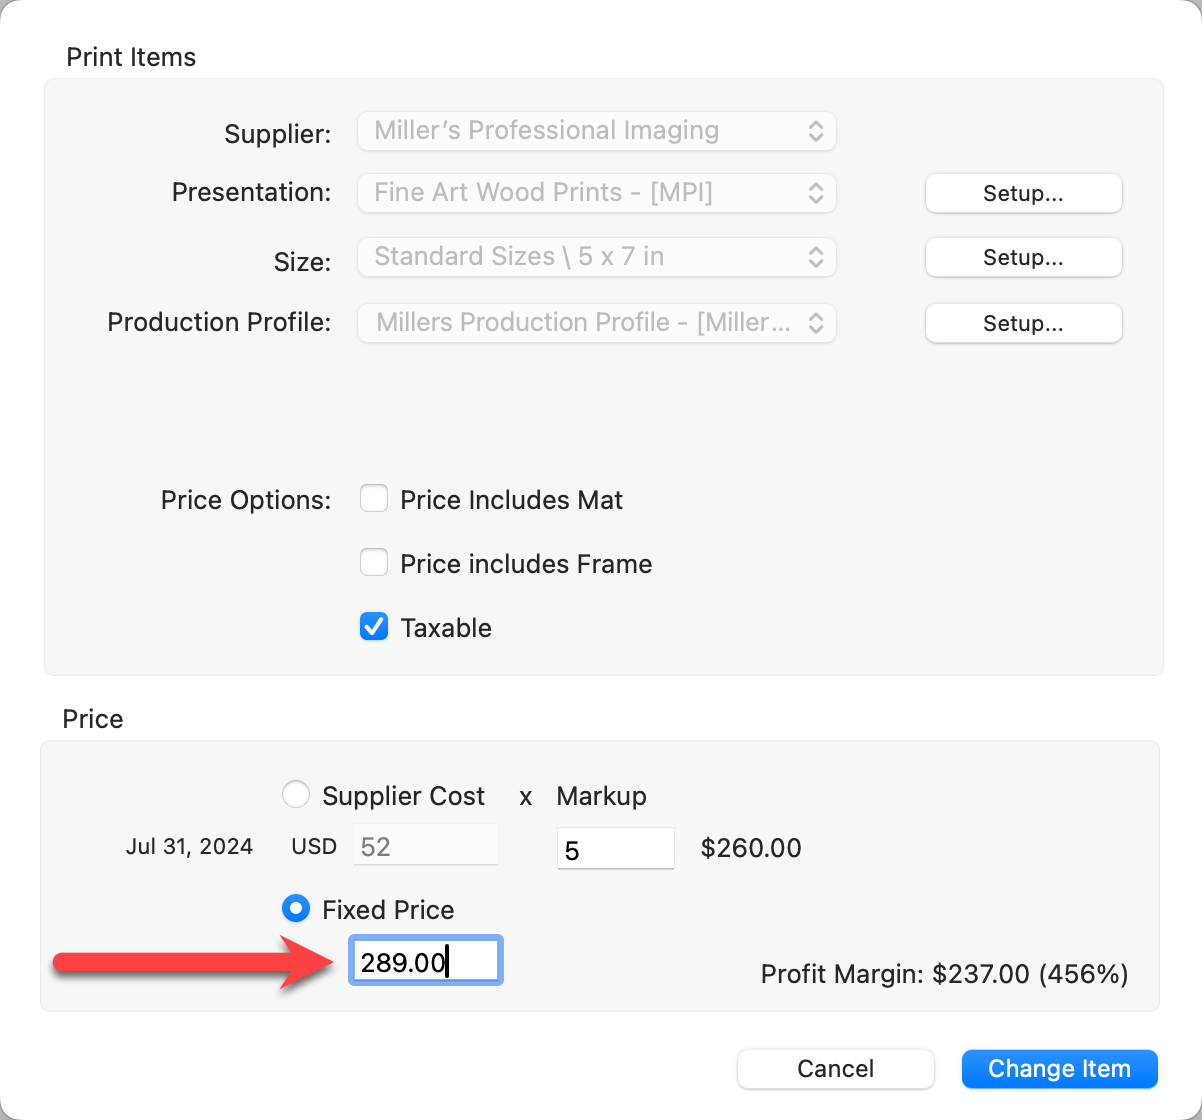
- Select a price list item and click Edit to modify the price.
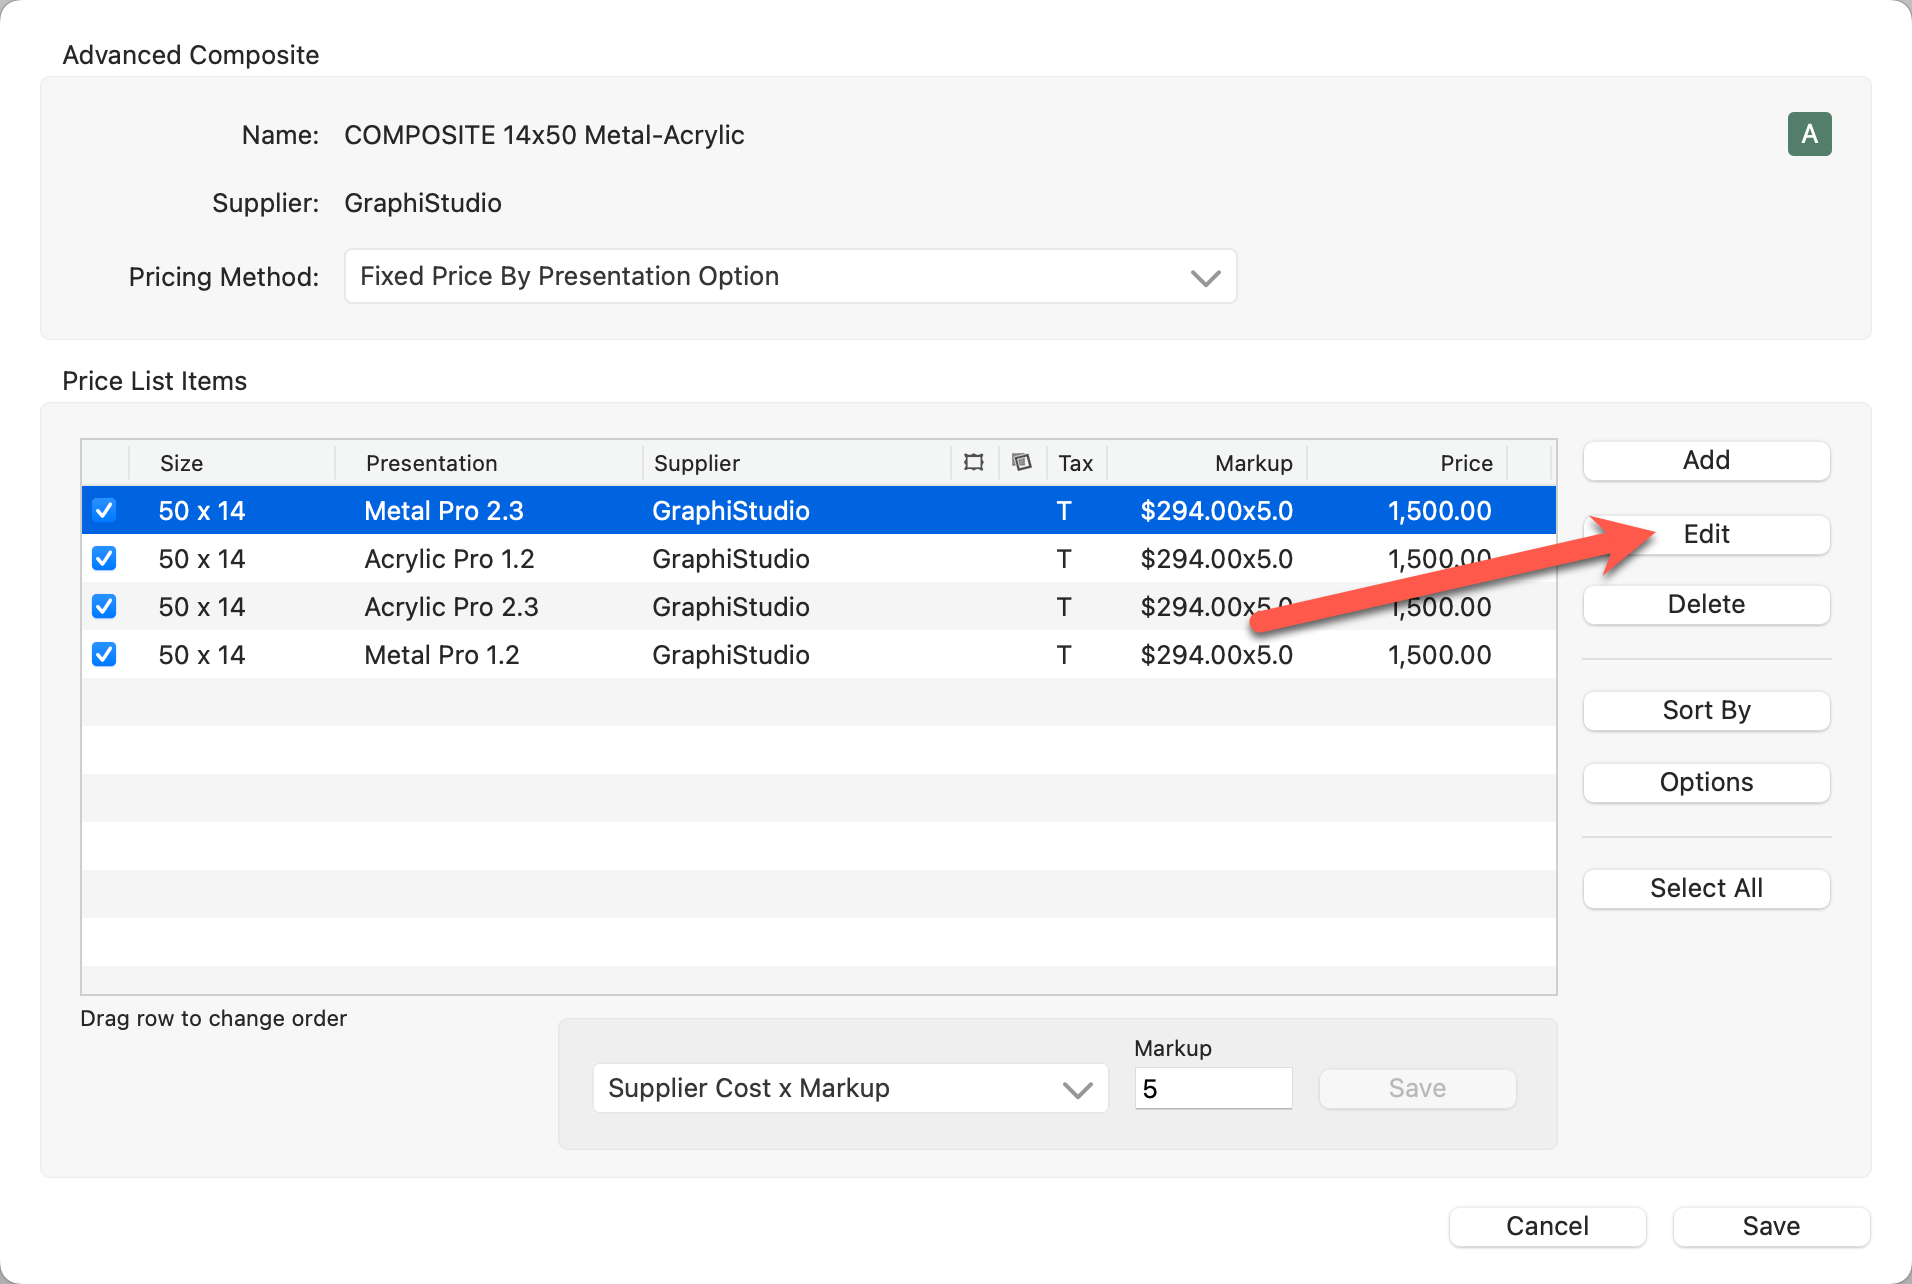
- You can use the Add button to add a new price list item.
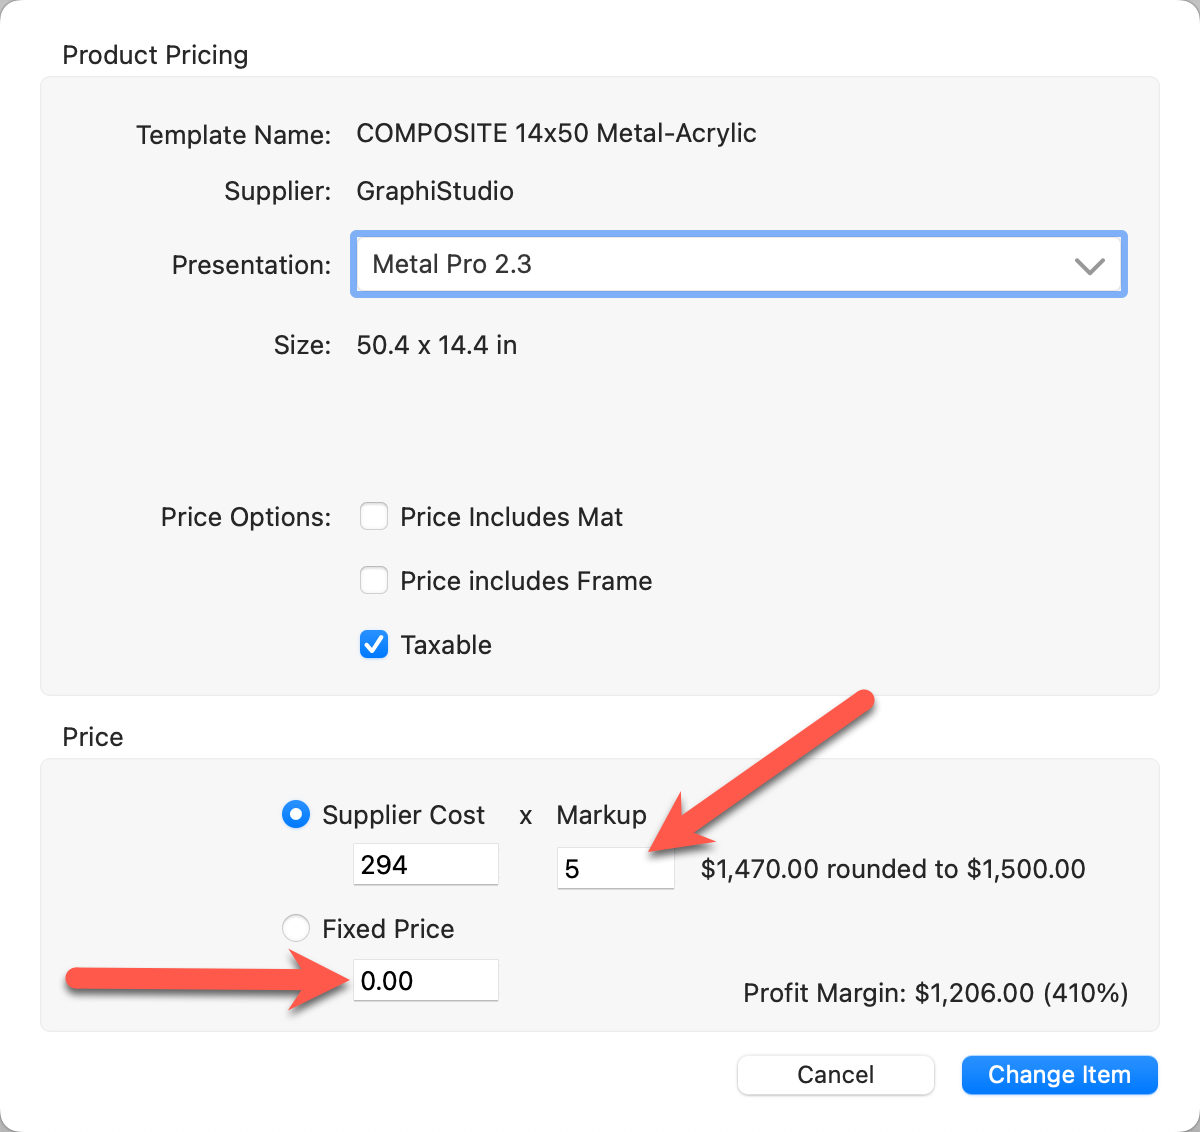
- If you are using "Supplier Cost x Markup" make a change to the markup value here. Alternatively, if you prefer "Fixed Price," select that option and type a price into the pricing box.
- Click Change Item.
- Follow these steps to price each price list item in the collection.
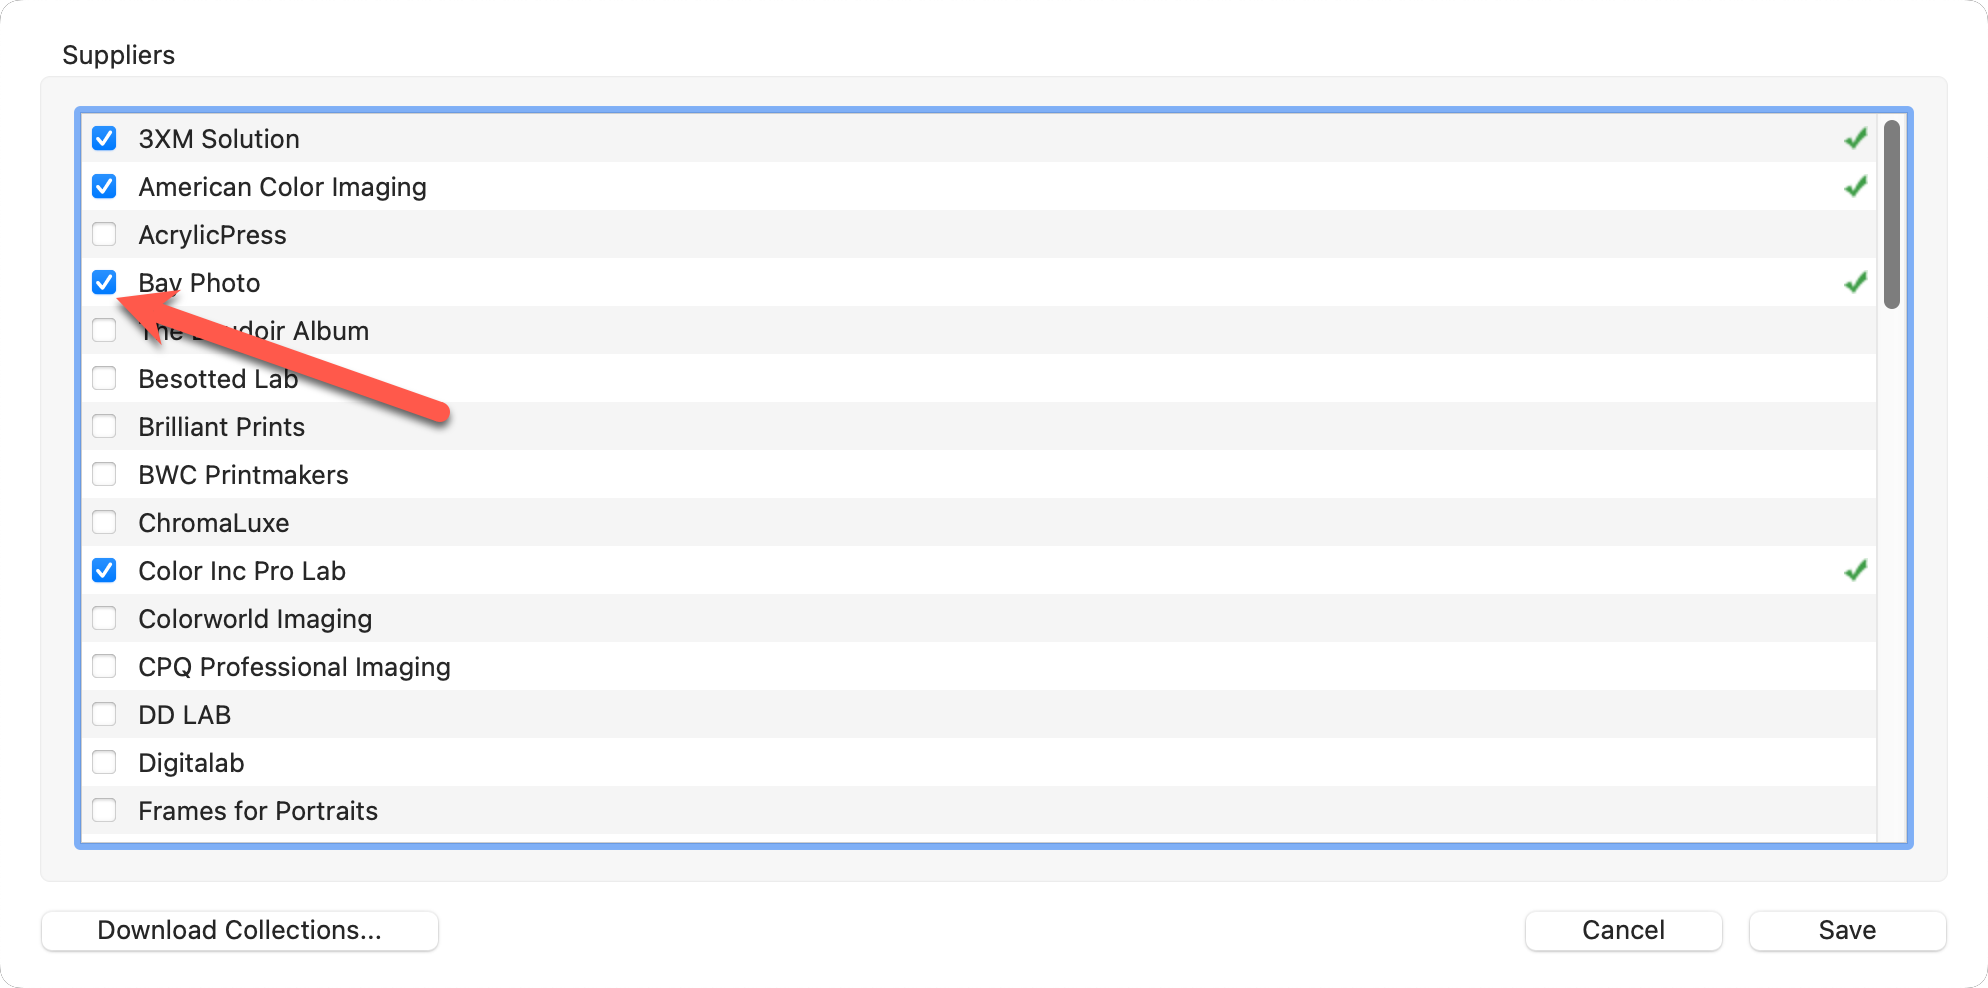
You can manage which suppliers are active in ProSelect by using the supplier checkboxes in the Suppliers list.
- Go to the top menu, Products > Suppliers.
- In the supplier list, locate the checkbox next to the supplier's name.
- Check the box to enable the supplier.
- Uncheck the box to disable the supplier.
Disabling a supplier will hide all products offered by that supplier throughout ProSelect, including during product selection, design, and ordering processes. This allows you to simplify your product list and only show the suppliers you actively use.
Important Note - Cleaning Up the Supplier Folder List
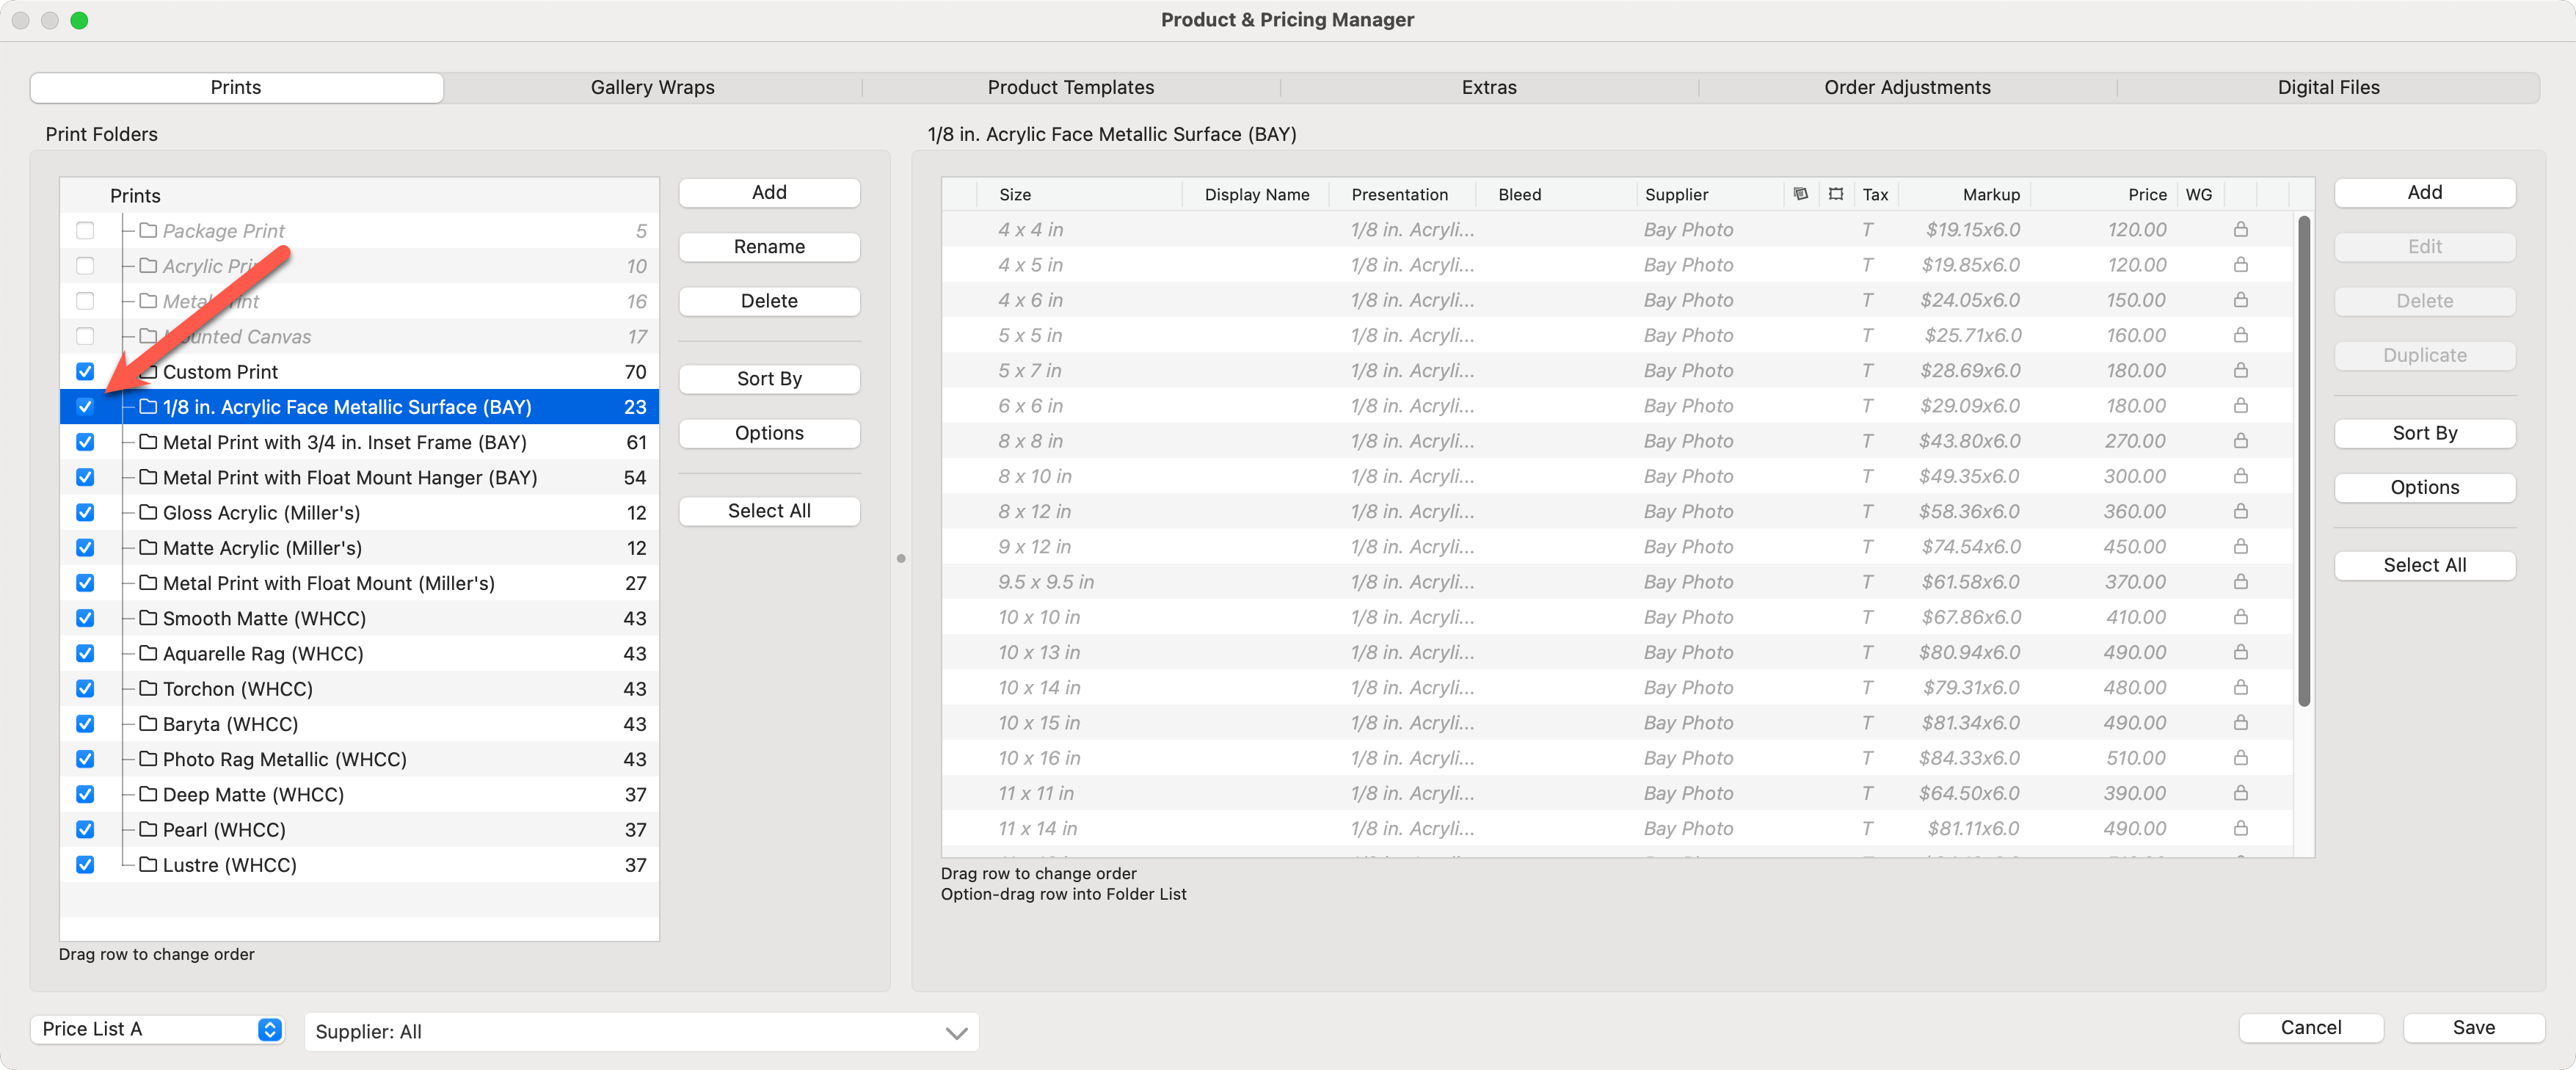
Even after turning off a supplier, their folder may still appear in your product lists. This is by design. Disabling a supplier only disables their products, not their folder visibility. You can choose to hide these folders by unchecking them in the Product & Pricing Manager.
- For Example, Bay Photo has been "Turned Off."
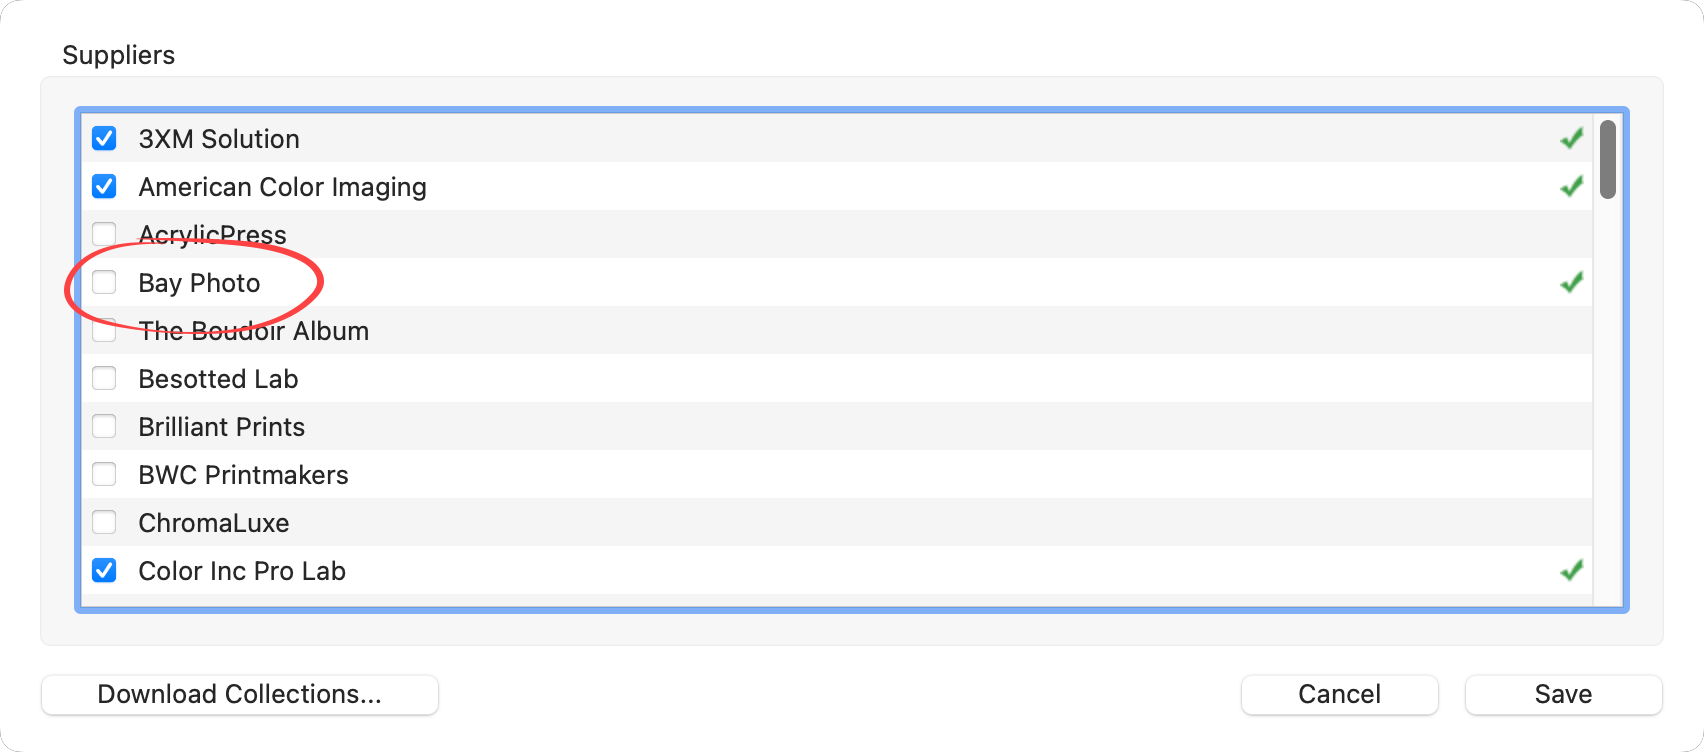
- All Bay Photo products have been disabled and will not be available in the main interface of ProSelect. However, the Bay Photo print folders are still visible (the prints are grayed out). Choose to uncheck these folders if desired. Doing so will not affect the availability of the prints. It will serve as a visual reference only.
Once a Collection is downloaded in ProSelect, you can streamline your selling process by disabling products you don't intend to offer. This is conveniently managed through checkboxes located on the left-hand side of the interface. By default, all products are turned "on" when a Collection is imported. Simply uncheck the box next to a product or an entire group to turn it "off," effectively removing it from your active sales cycle. Specific sizes within a product group can also be disabled individually. If you decide to offer these products later, you can easily reactivate them by rechecking the boxes.
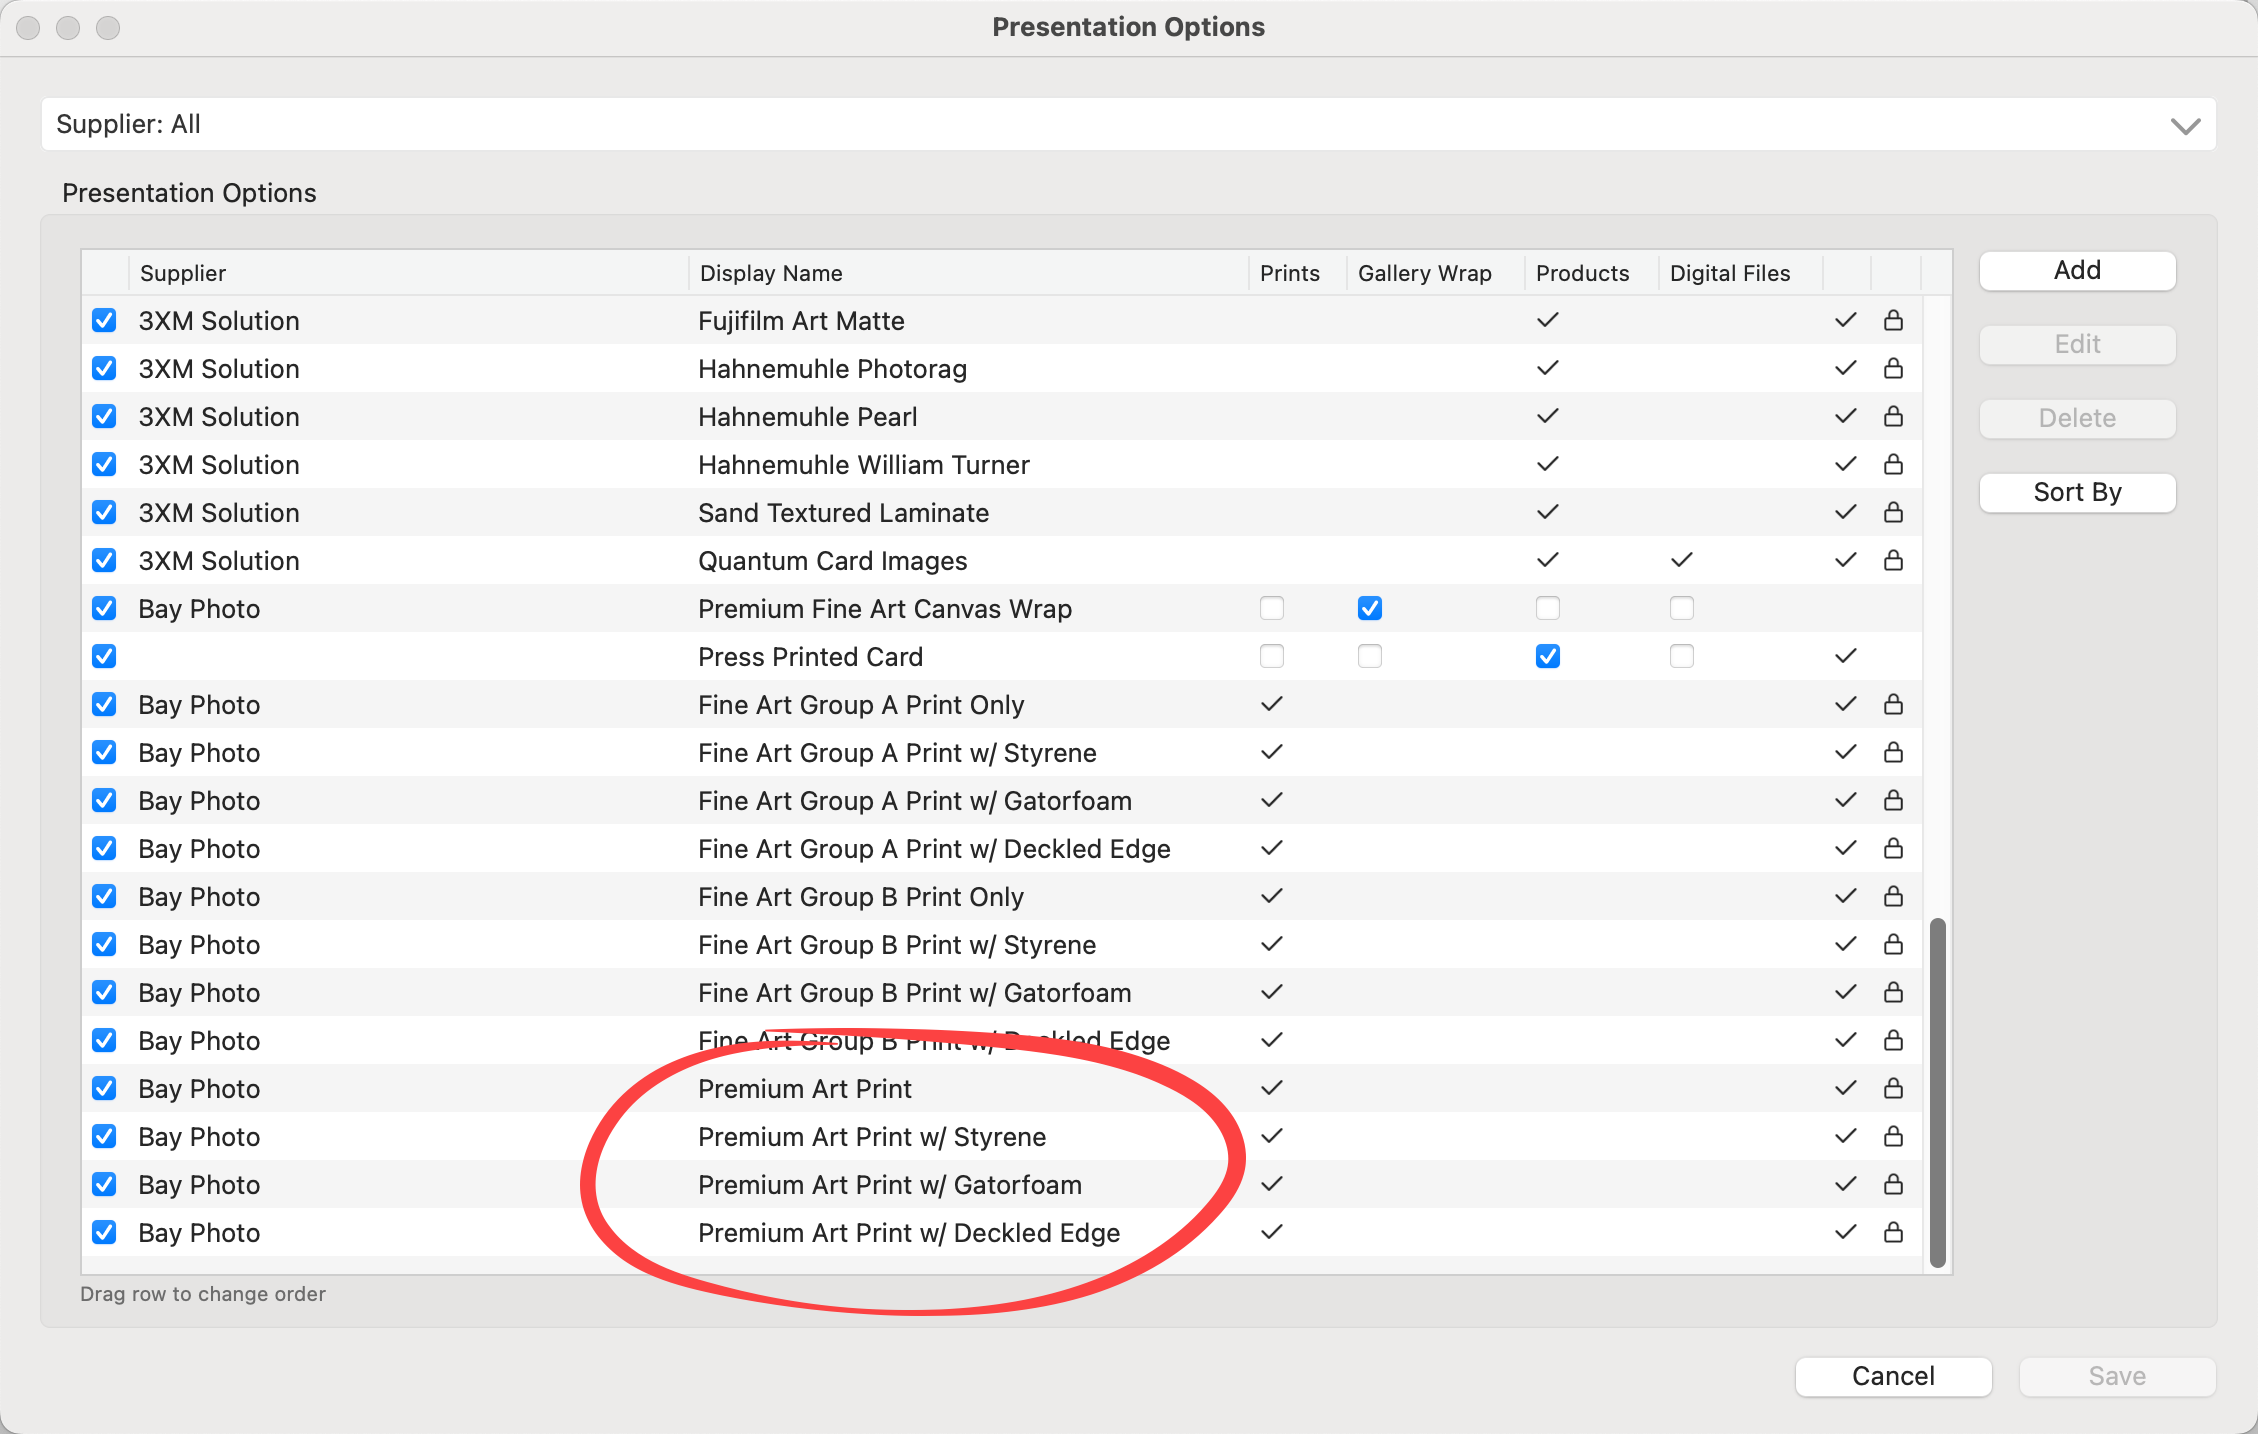
The presentation options assigned in collections reflect the names used in suppliers' catalogs. ProSelect allows for customizable display names so you can align prints and product names with your studio's branding. Display Names are created in the Presentation Options dialog. Once a Display Name is created here, it will be visible everywhere the Presentation Option appears in ProSelect.
- On the top menu, go to Products > Presentation Options.
- Scroll down the list of Presentation Options until you find the item you wish to add a Display Name for.
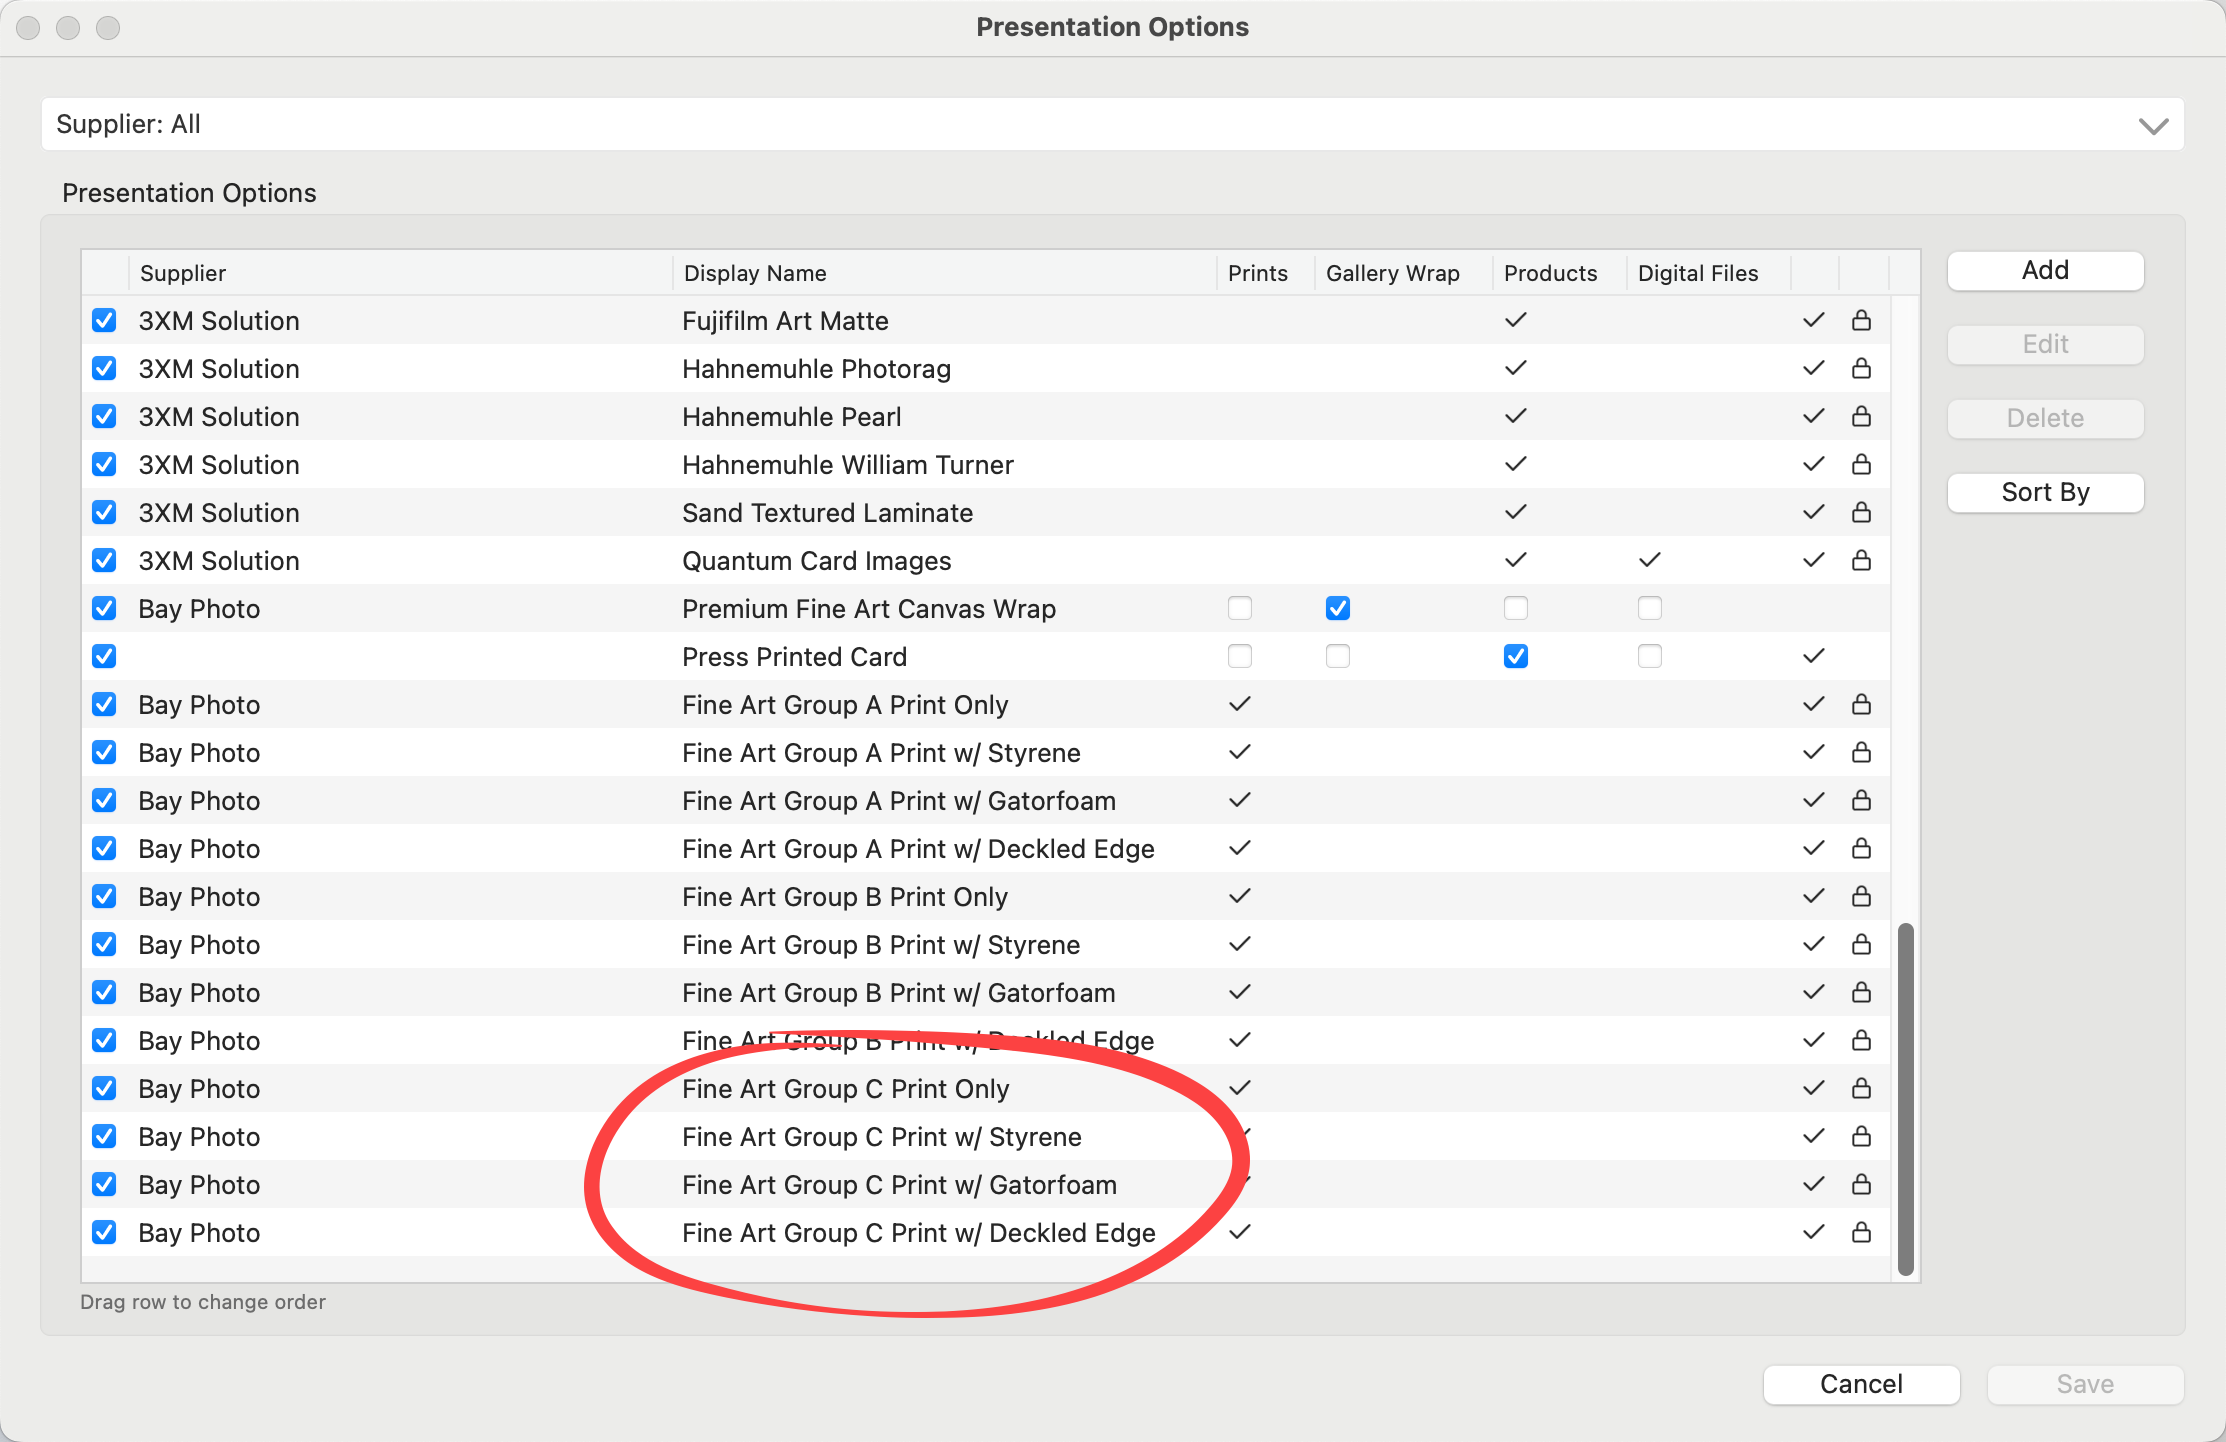
- Select the Presentation Option and click on the Edit button.
- Type in a Display Name.
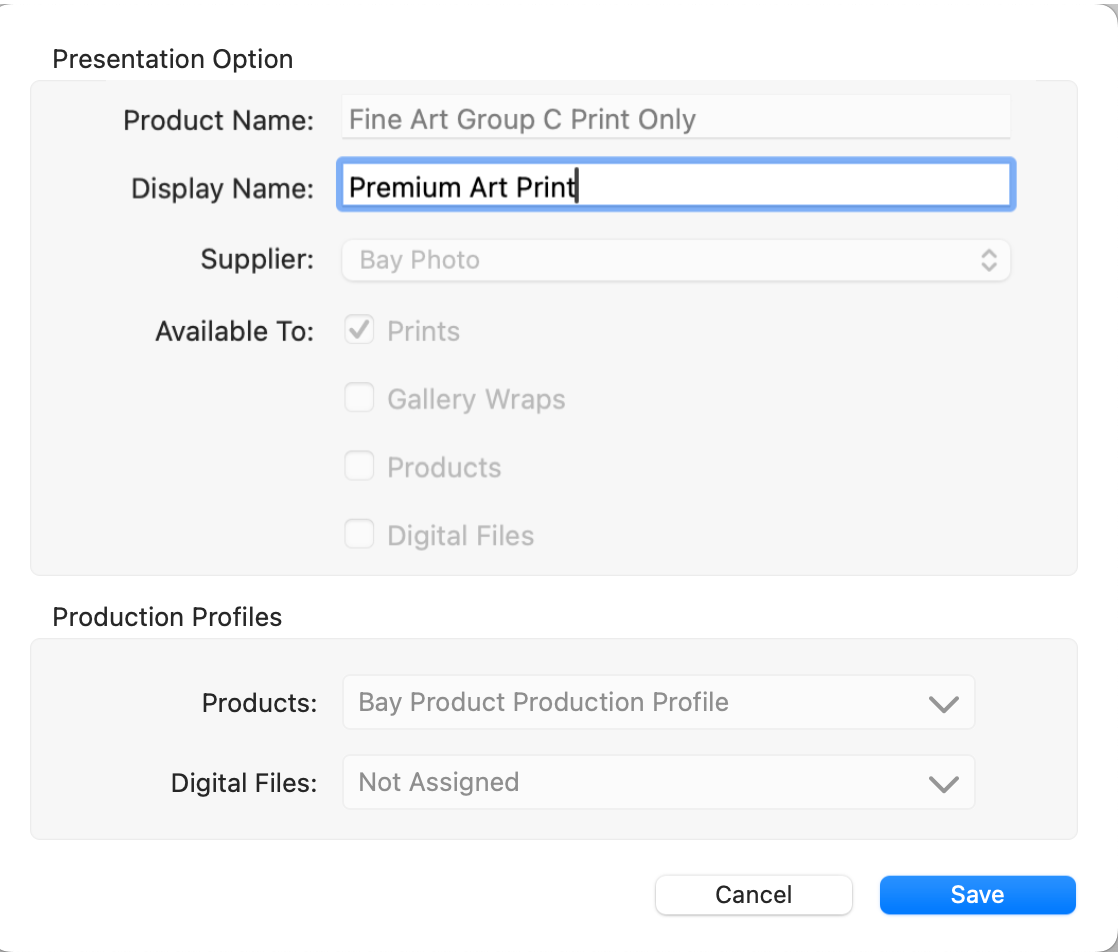
- Click Save.
- Repeat for any other Presentation Options.
- Click Save.
To remove a display name, simply edit the Presentation Option and delete the display name. If the display name box is blank, the Presentation Option will revert to its original name.
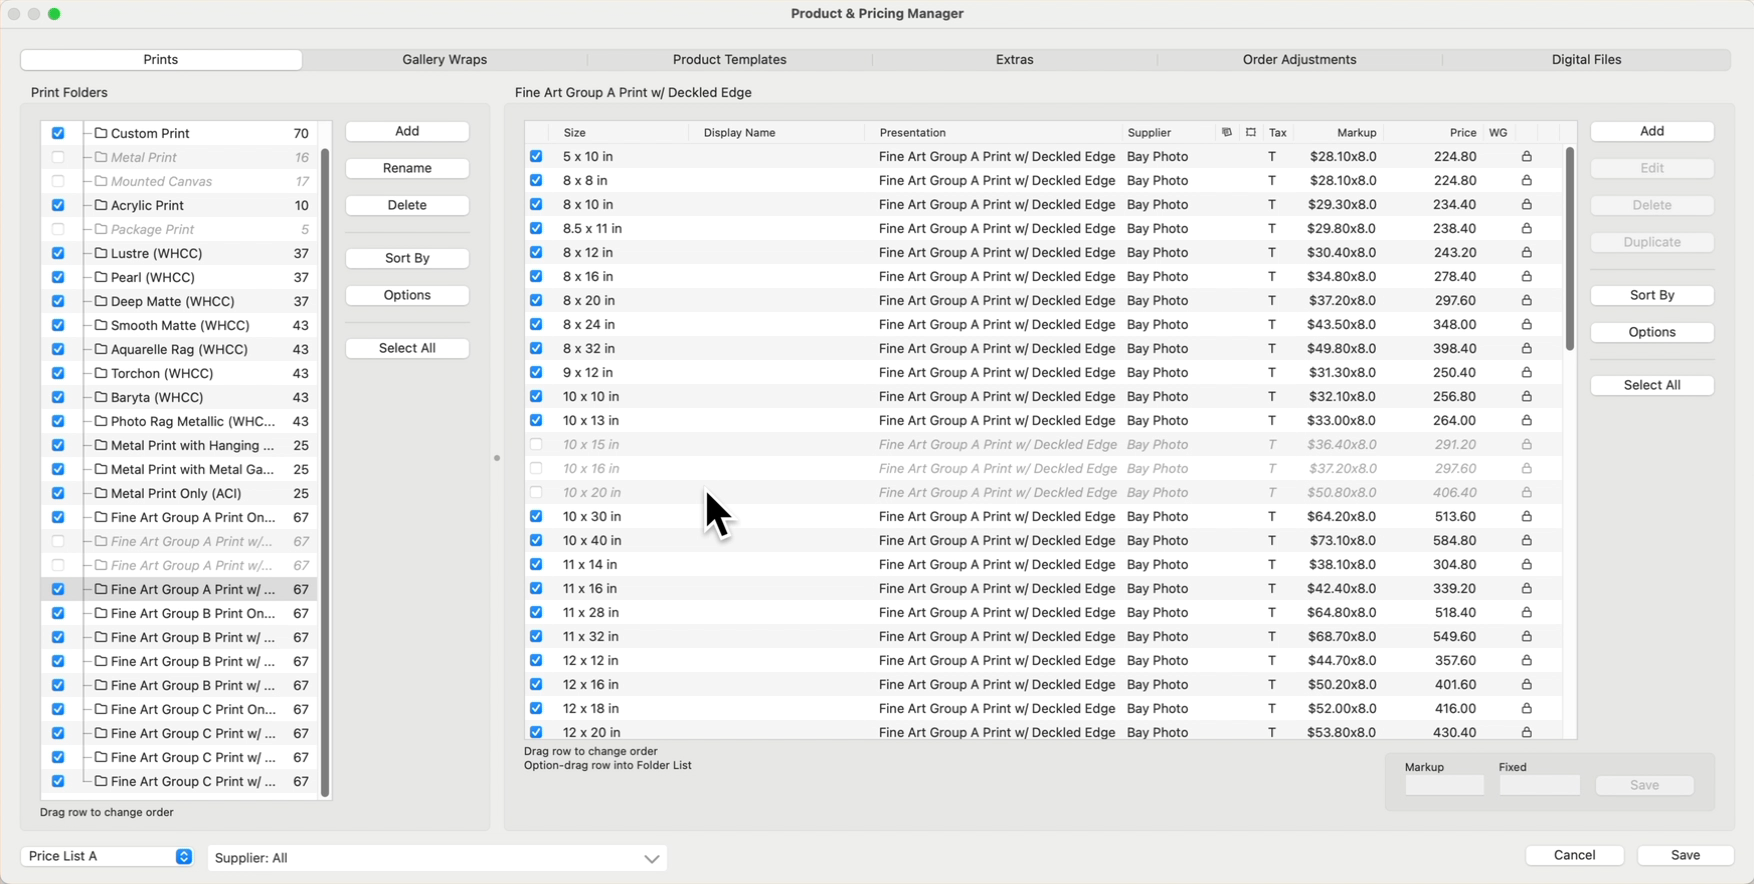
Be advised that adding new sizes for prints and product templates is allowed, but there is no guarantee the Supplier can manufacture the added size. It's important to note that any new sizes added are not part of the original collection. The new product will not receive updates when the Supplier Collection is updated.
Adding More Print Sizes
- Open the Product & Pricing Manager.
- Select the print folder you wish to modify.
- Click on the Add button next to the print panel.
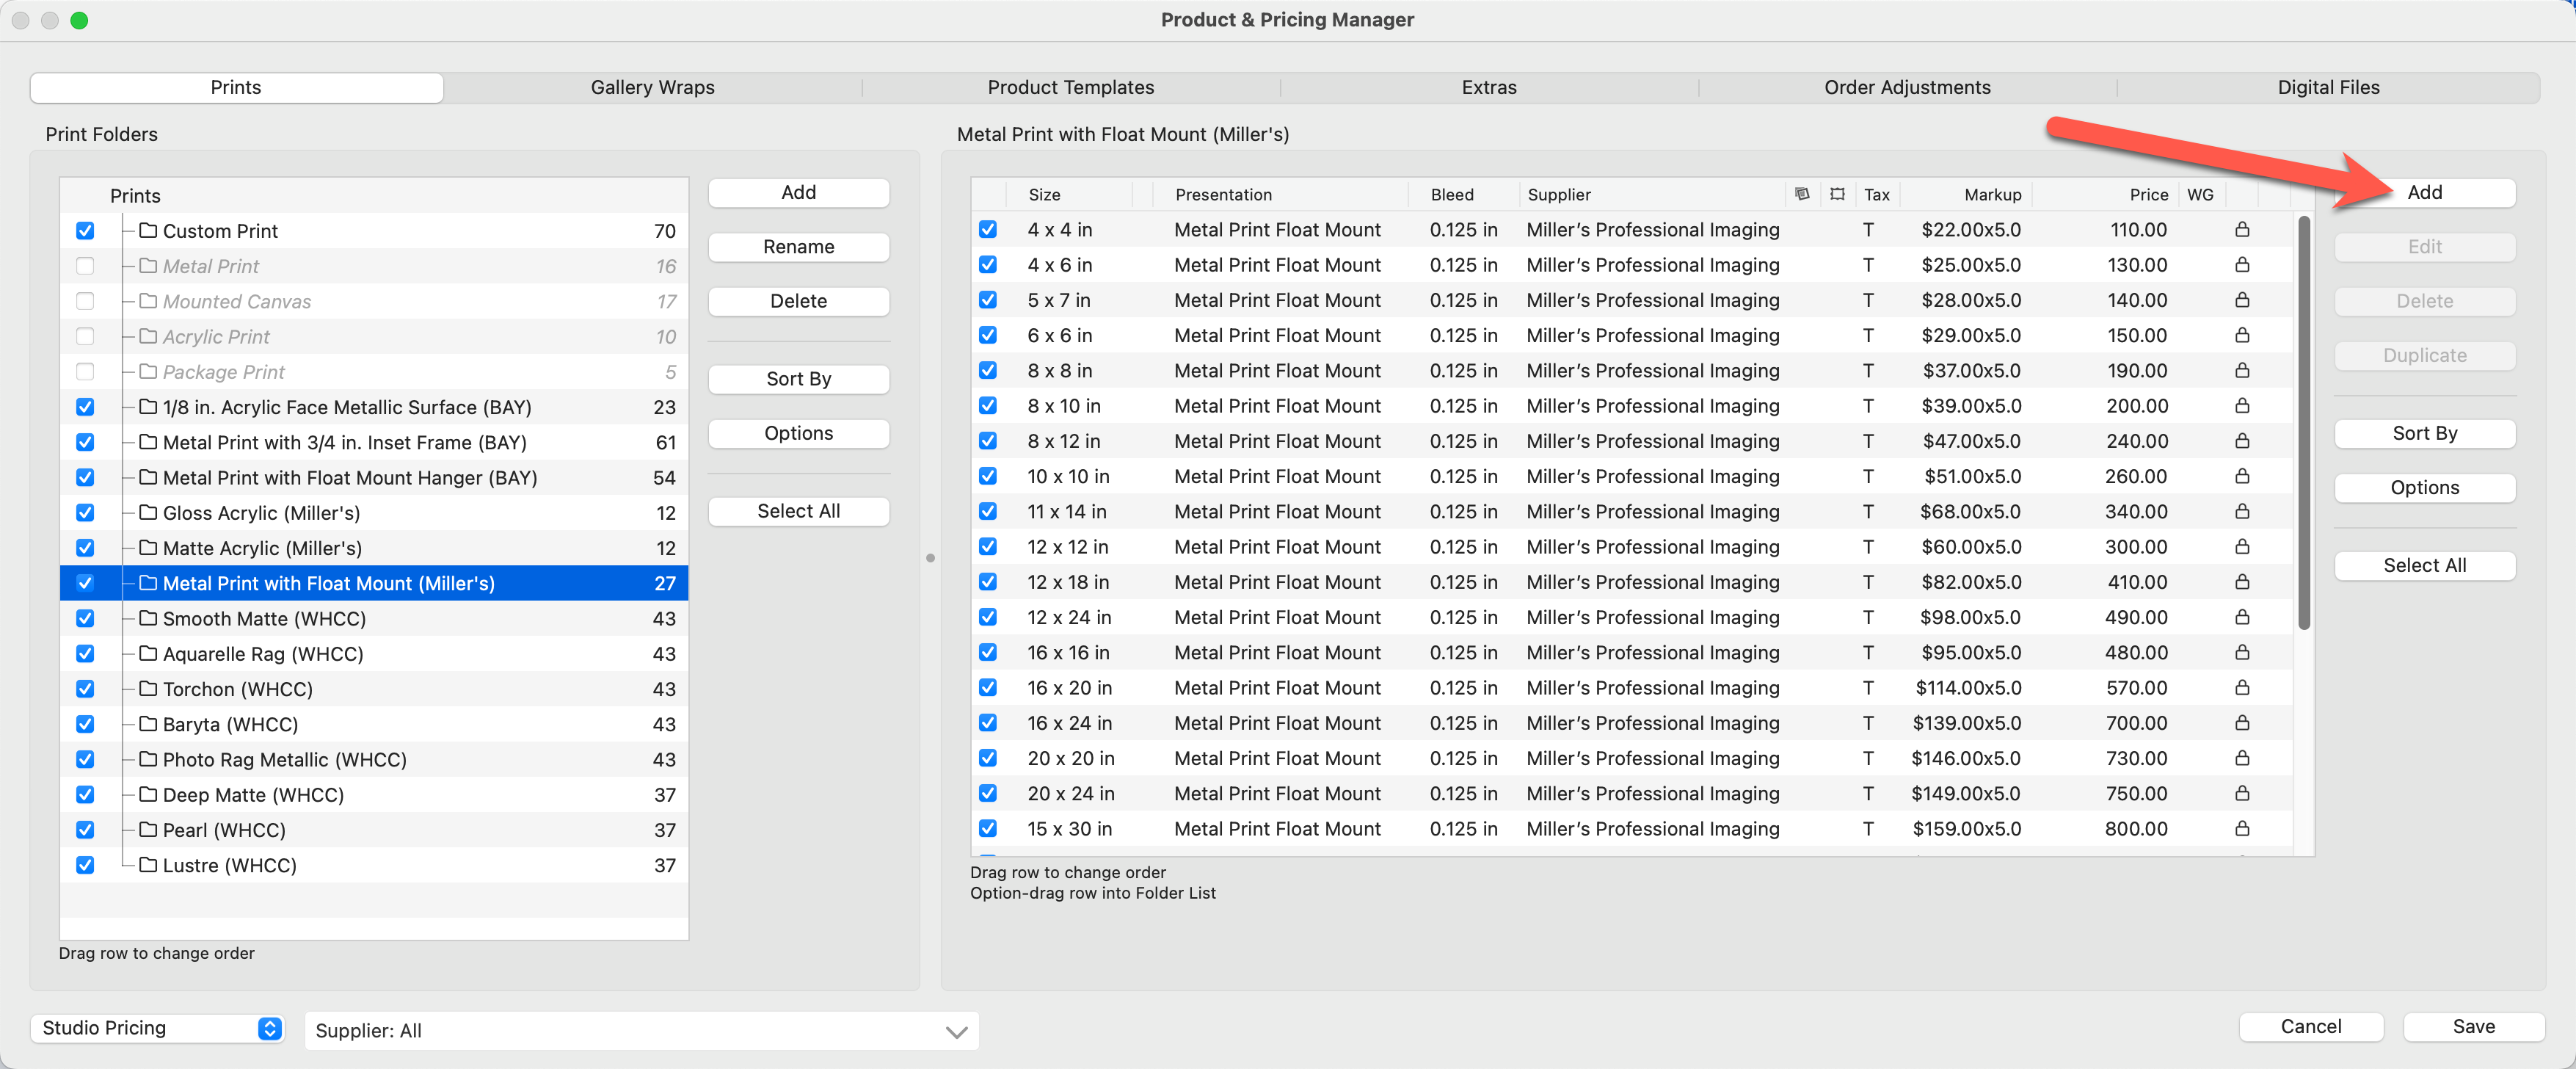
- Select the Supplier from the drop-down list as well as the Presentation Option for the print.
- Add the size(s) by checking the size boxes. A grayed-out size indicates that the size already appears in the collection.
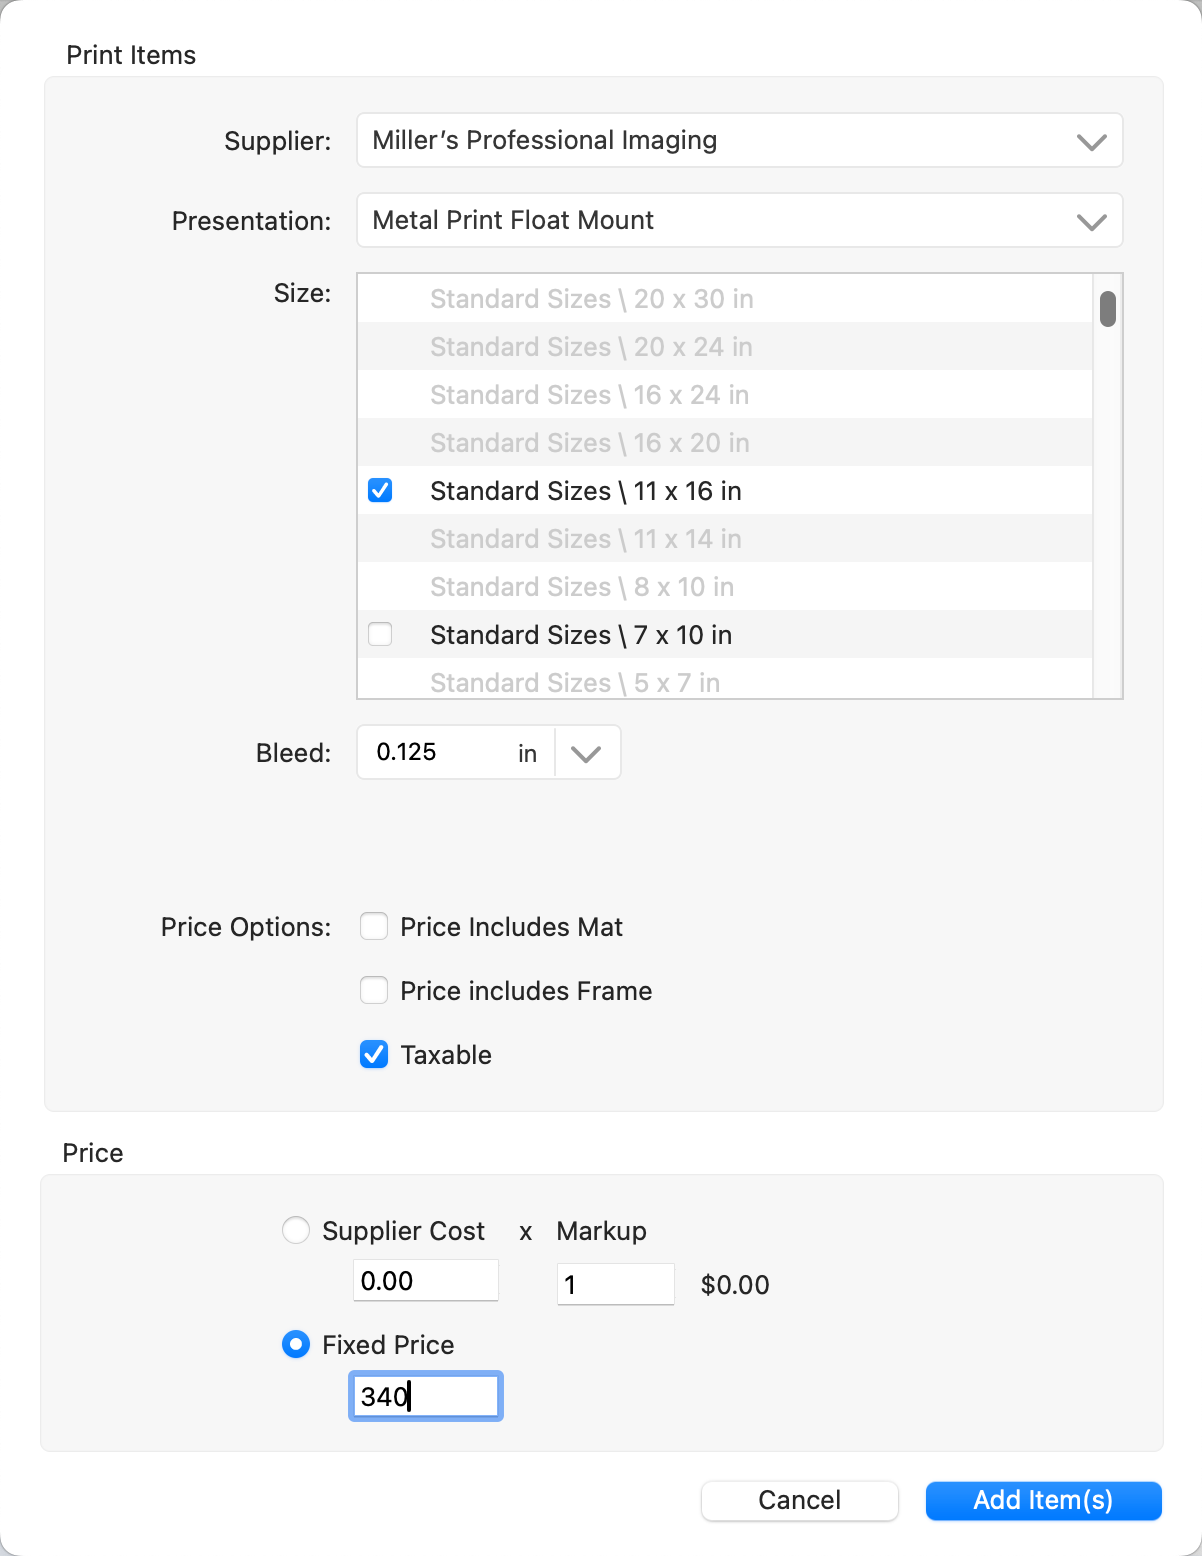
- Click the "Add Items" button to add the prints.
- Price them accordingly.
If you need to modify a product template, you must first duplicate it. However, it's important to note that once a template from a Supplier Collection is duplicated and modified, the new product created from this template is no longer part of the original collection. The new product will not receive updates when the Supplier Collection is updated.
Duplicate and Modify a Product Template
- Open the Product & Pricing Manager.
- Select the product template you wish to modify.
- Click on the Duplicate button.
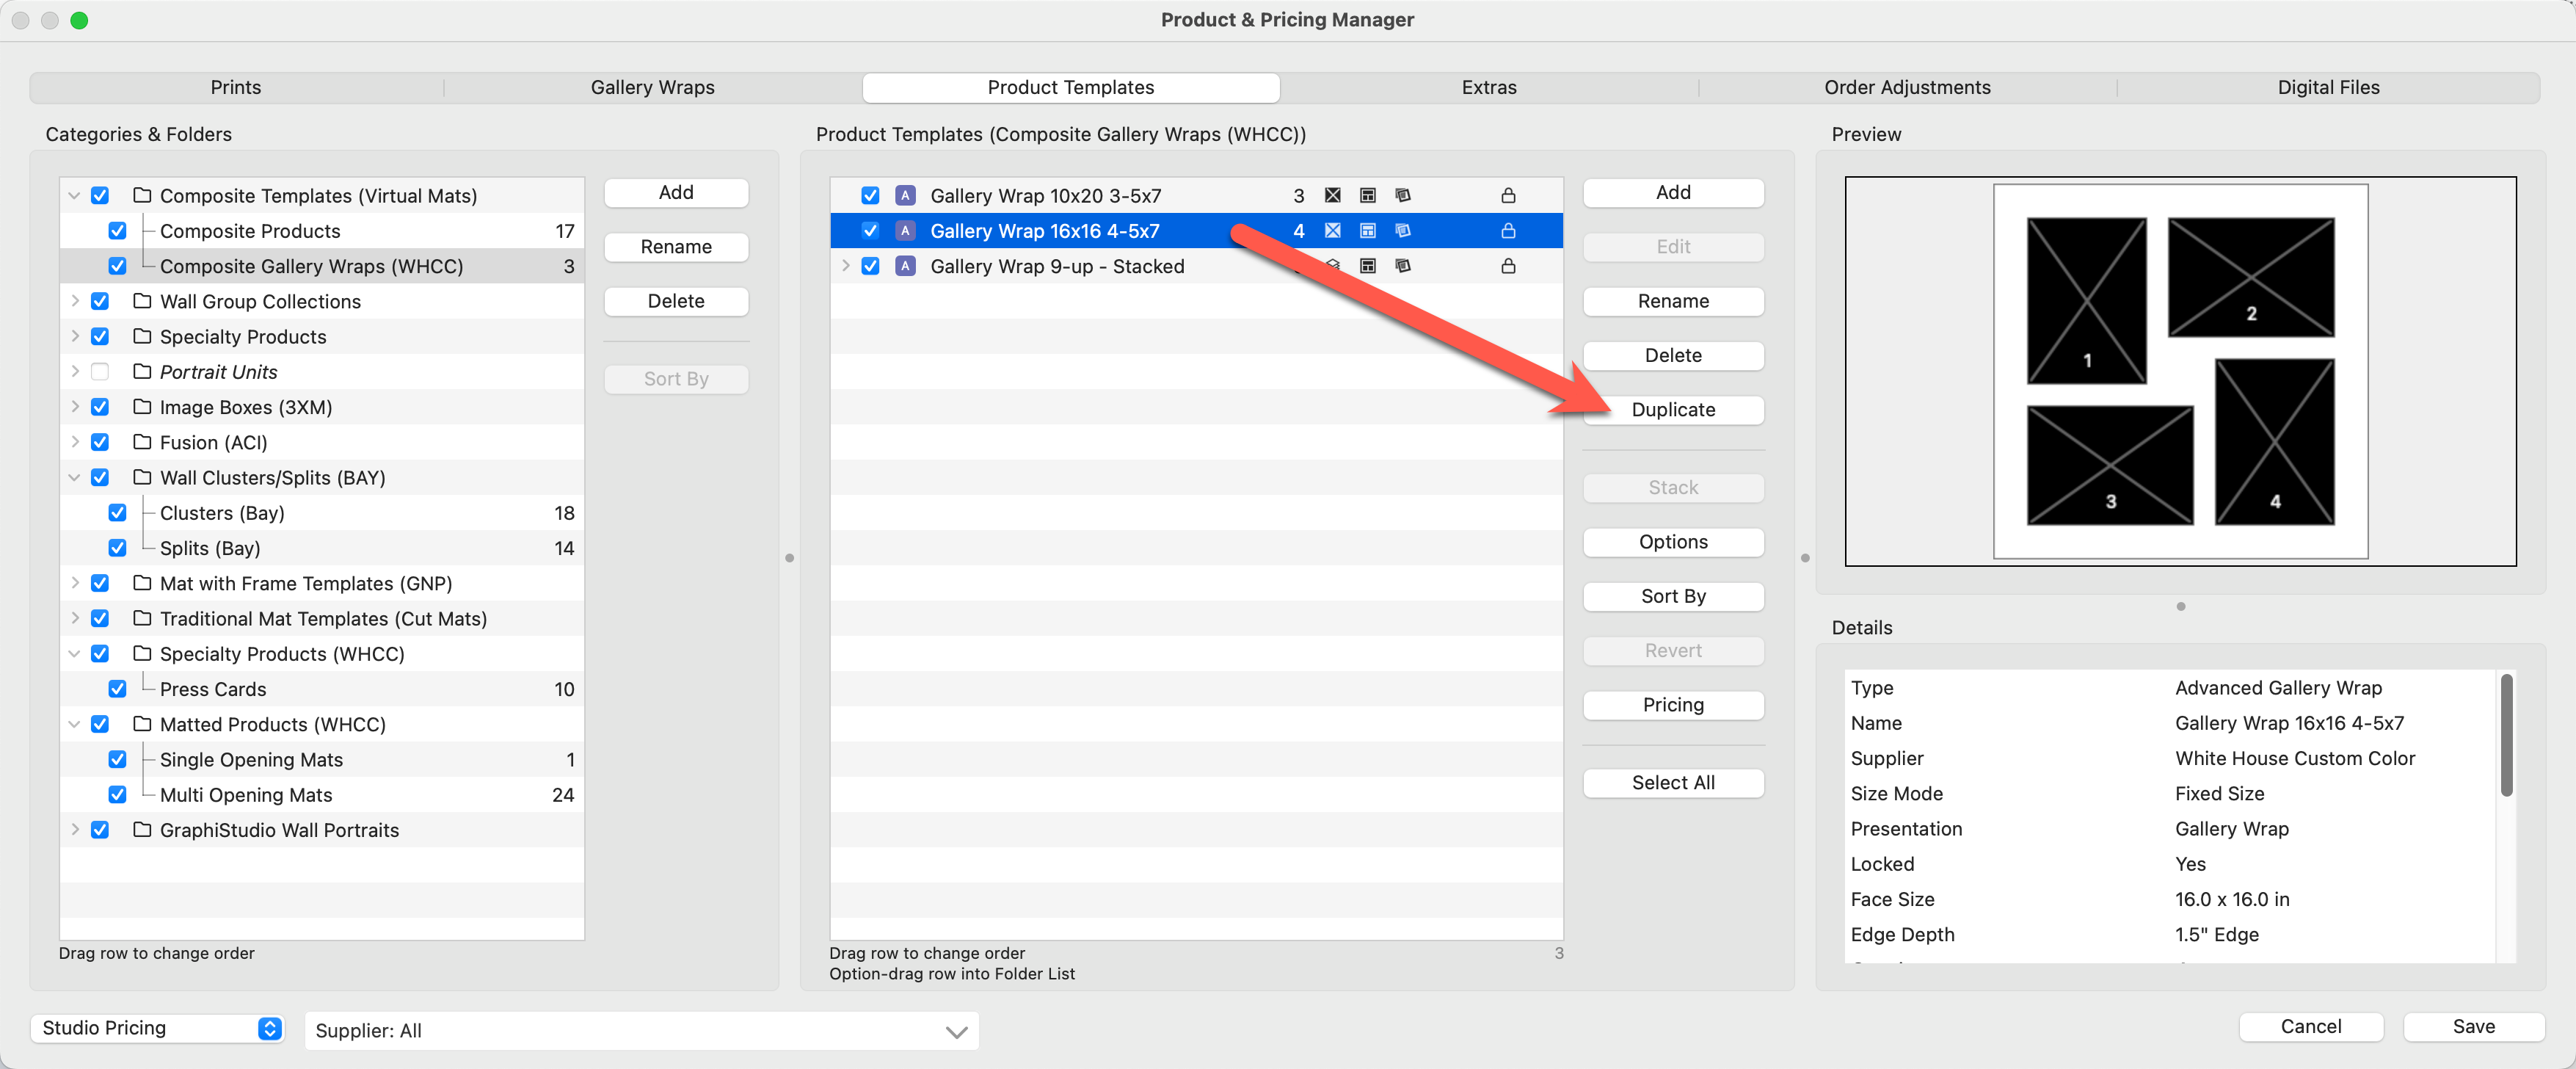
- Type in a new name for the product template.
- Optionally change the product type, presentation option, and anything else applicable.
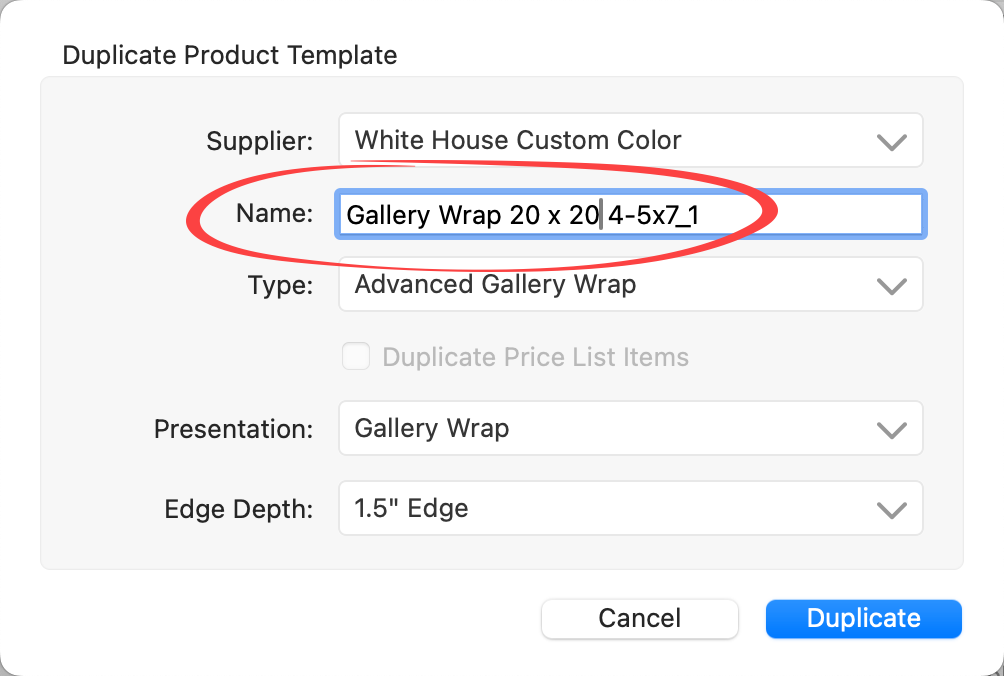
- Click "Duplicate."
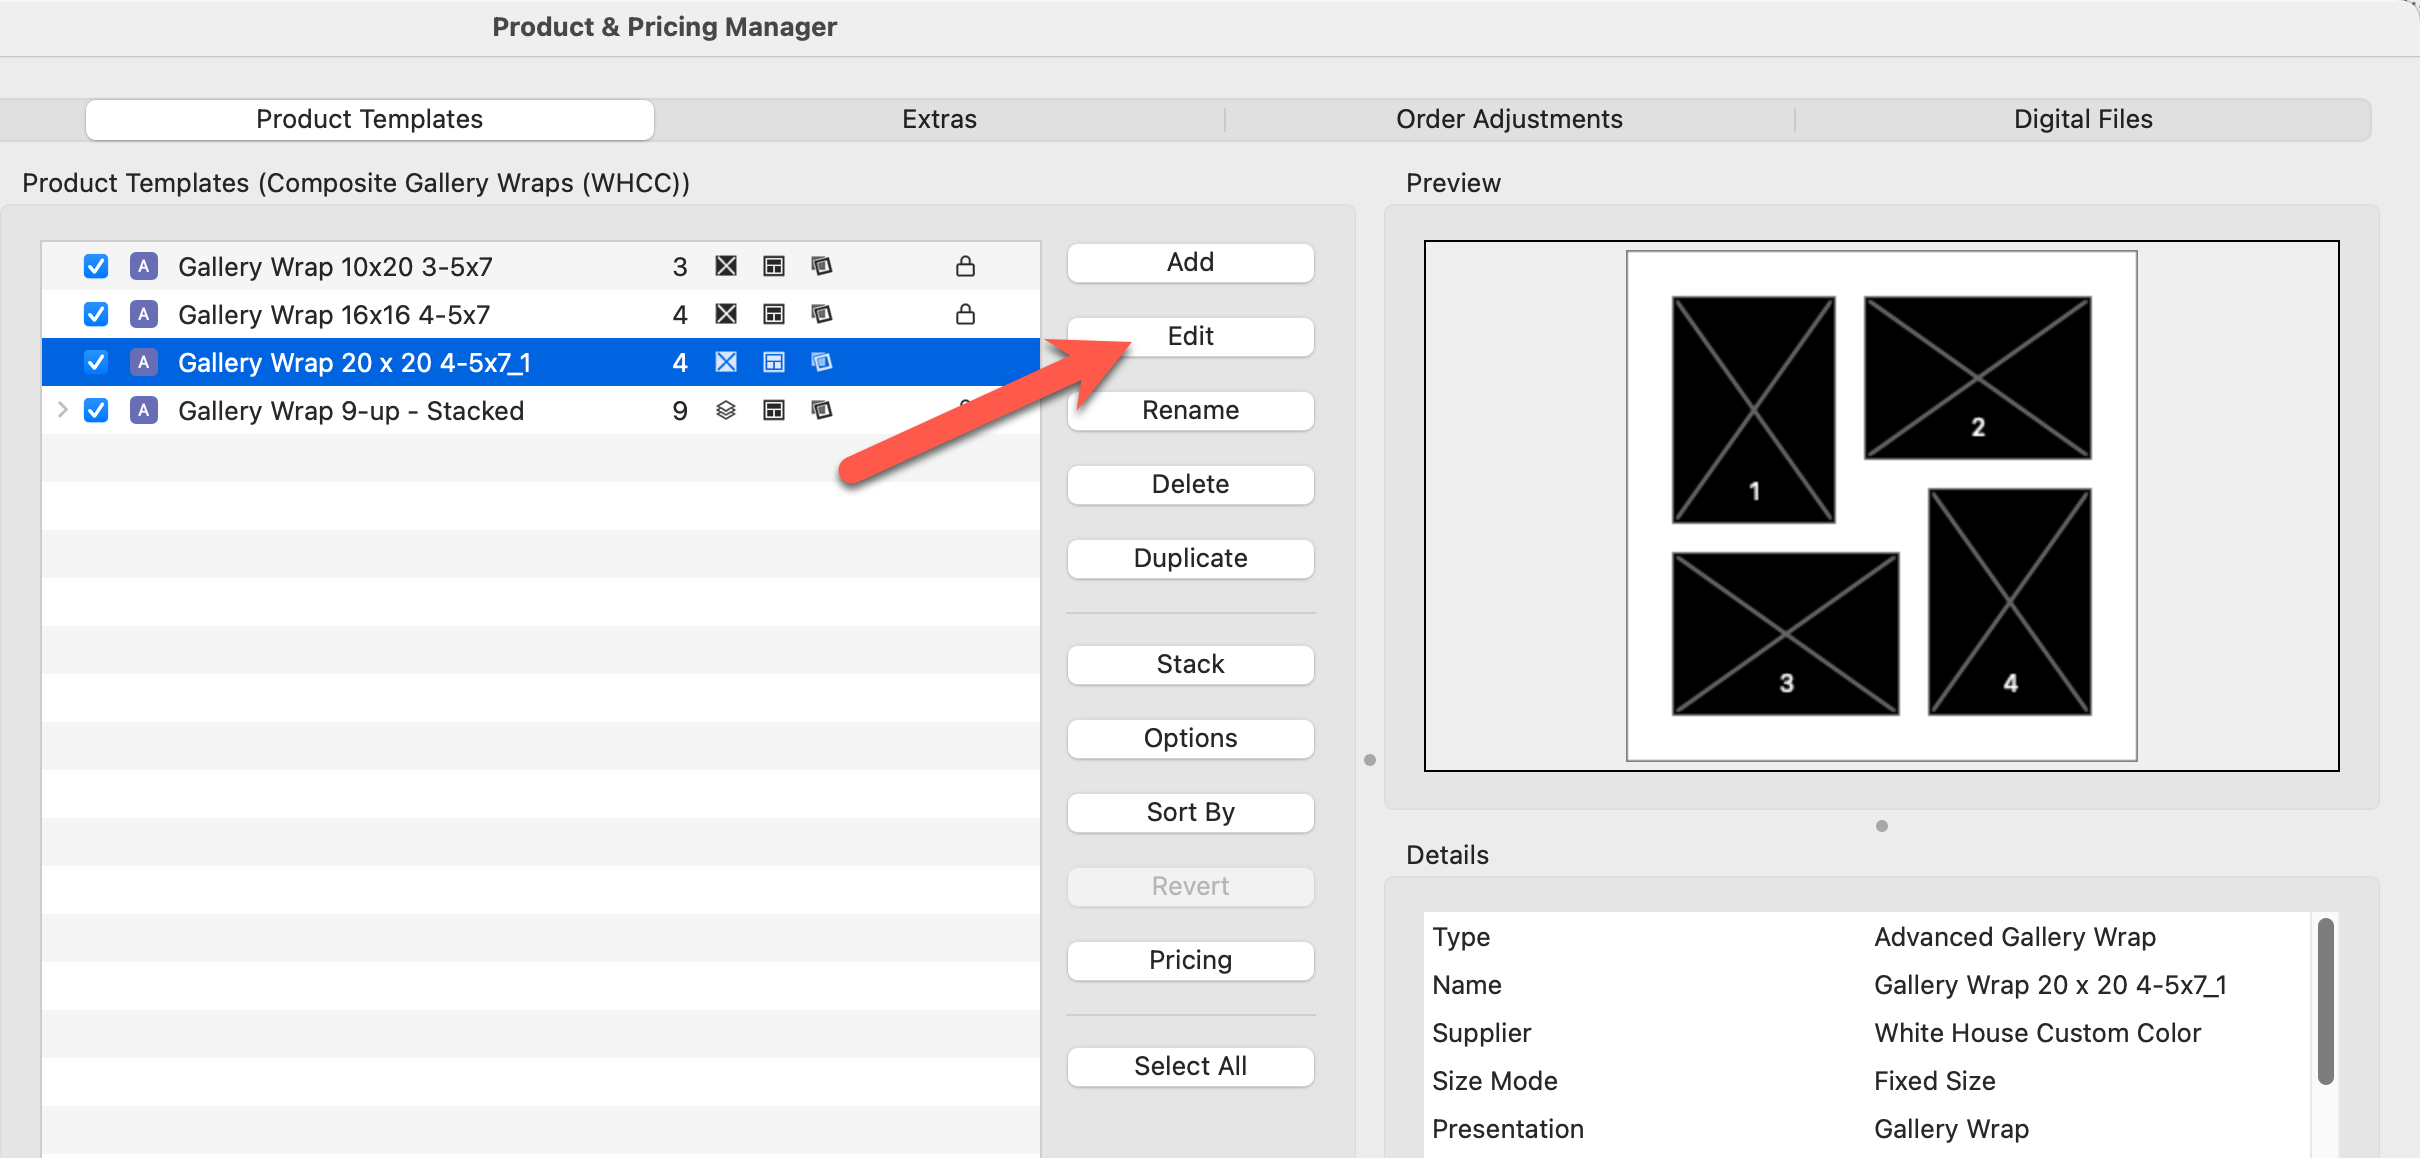
- The duplicated product template will appear under the original in the list. Note the lock symbol
 does not appear.
 - With the duplicated template selected, click "Edit."
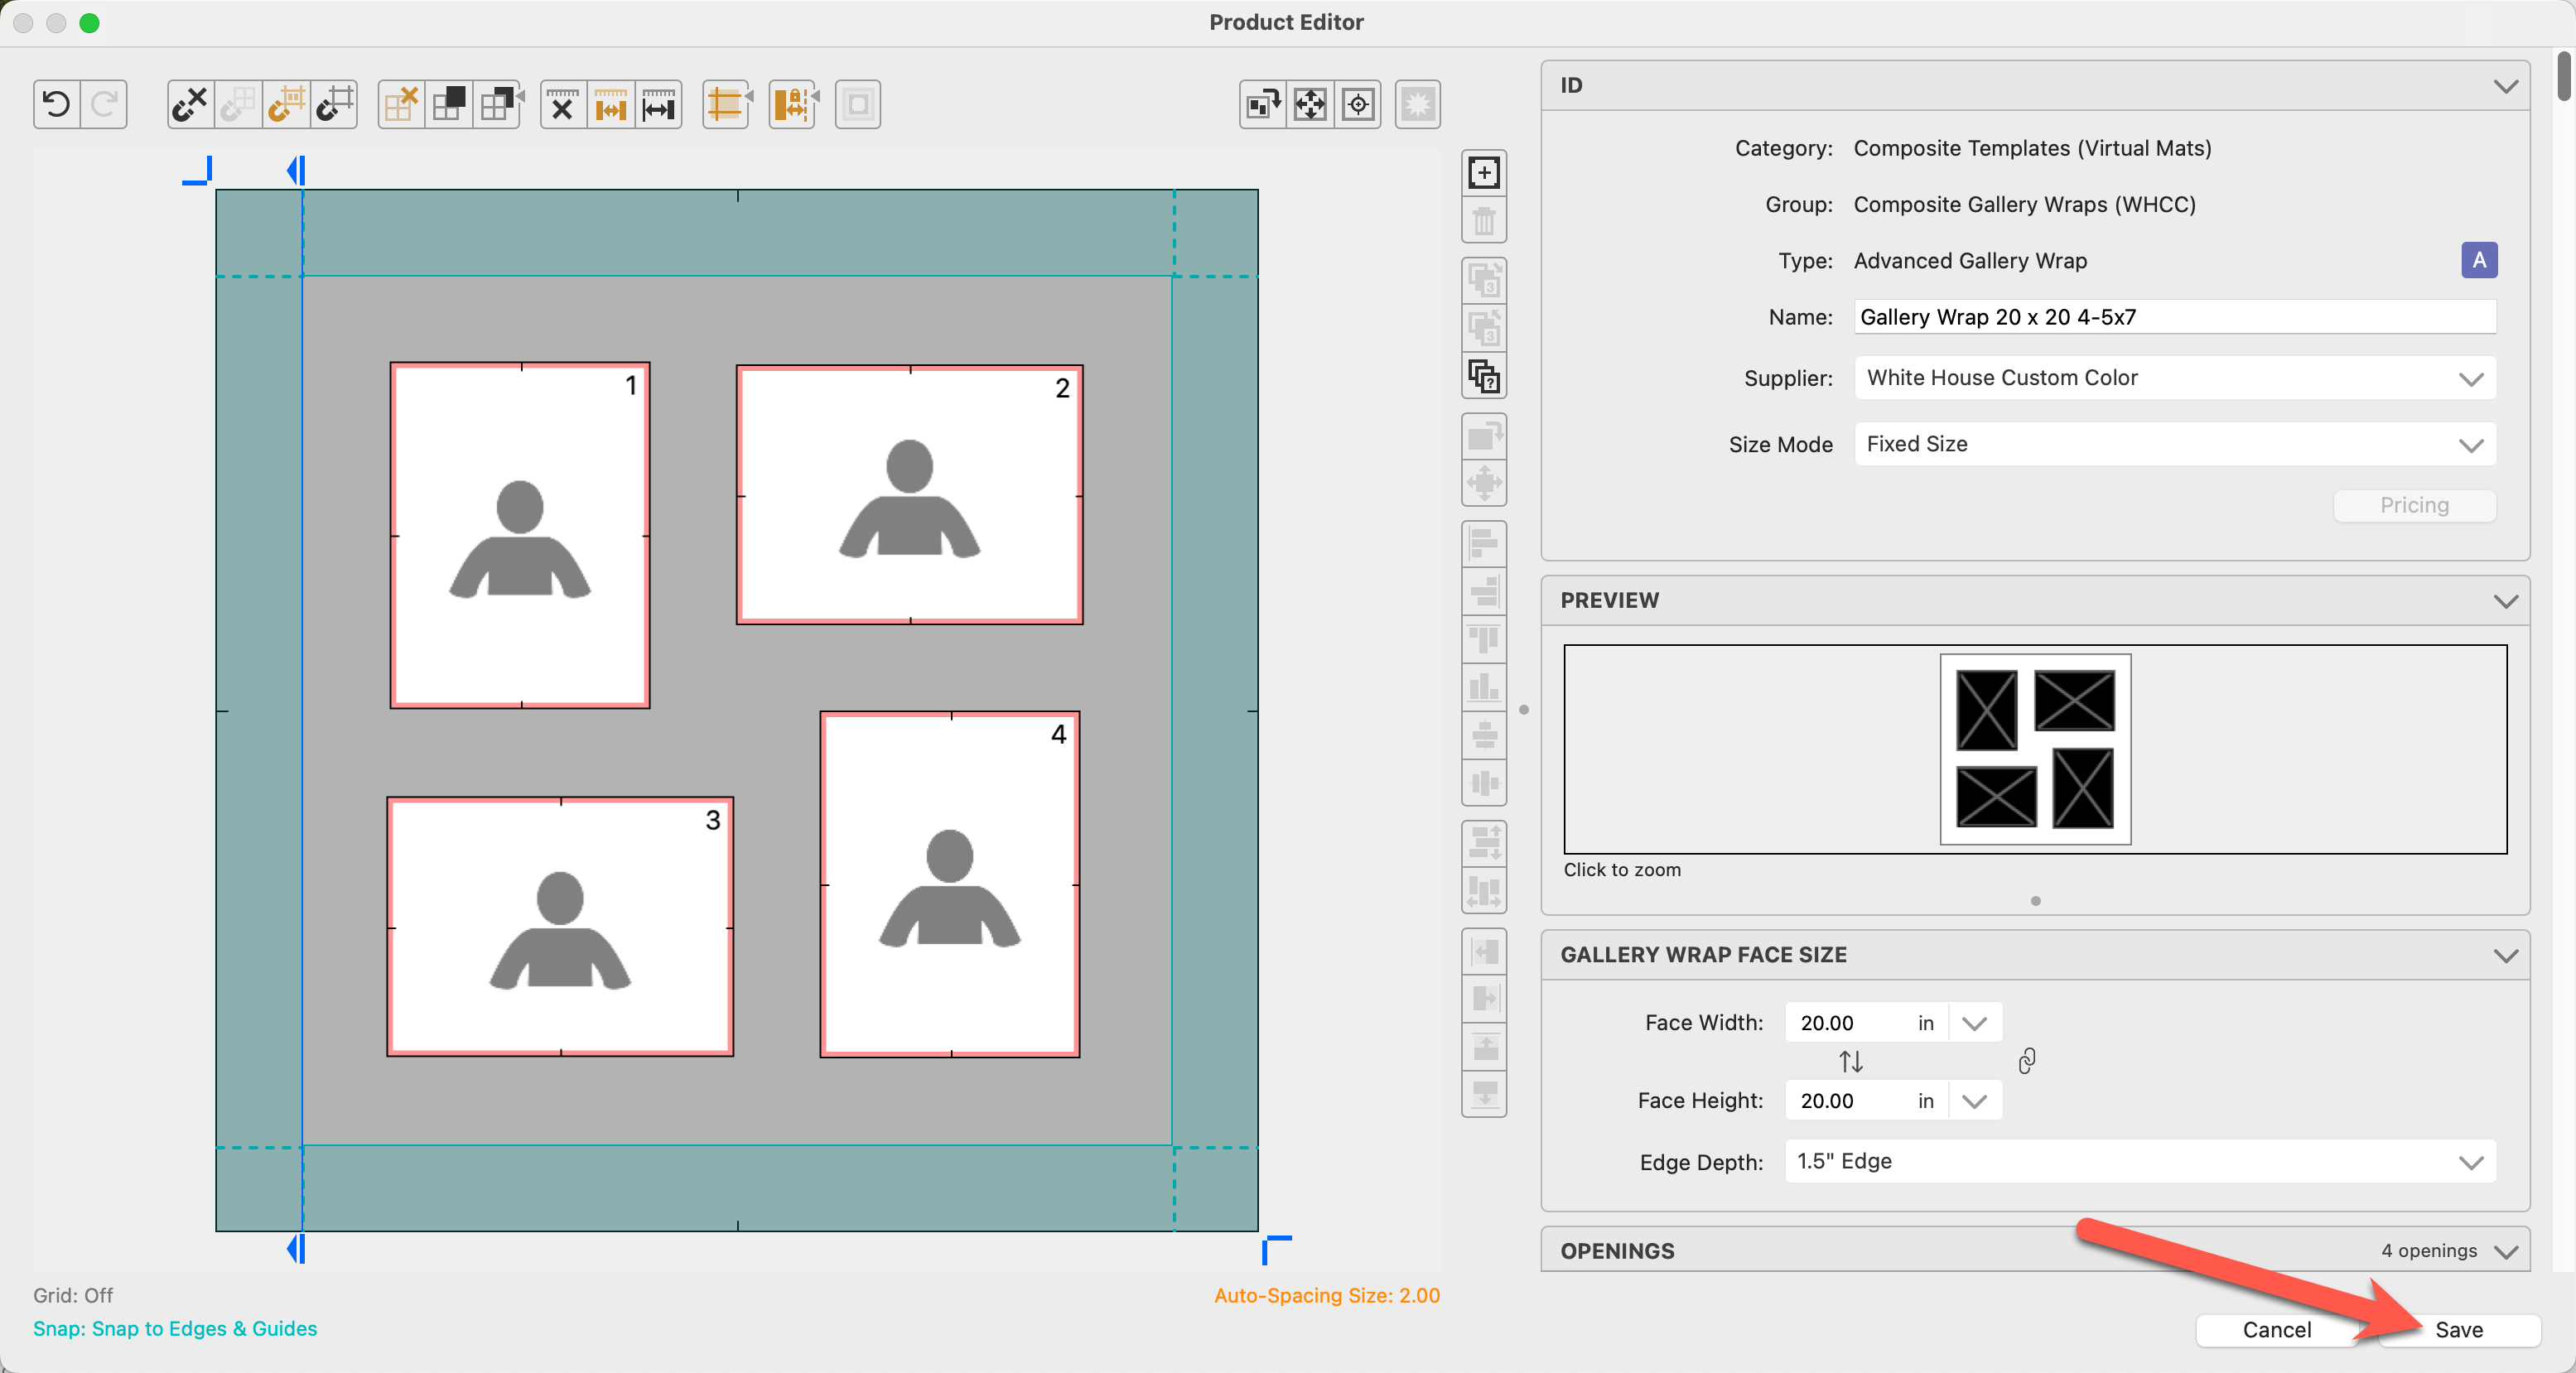
- The Product Editor will launch. Modify the product template here. Once complete, click on the Save button.
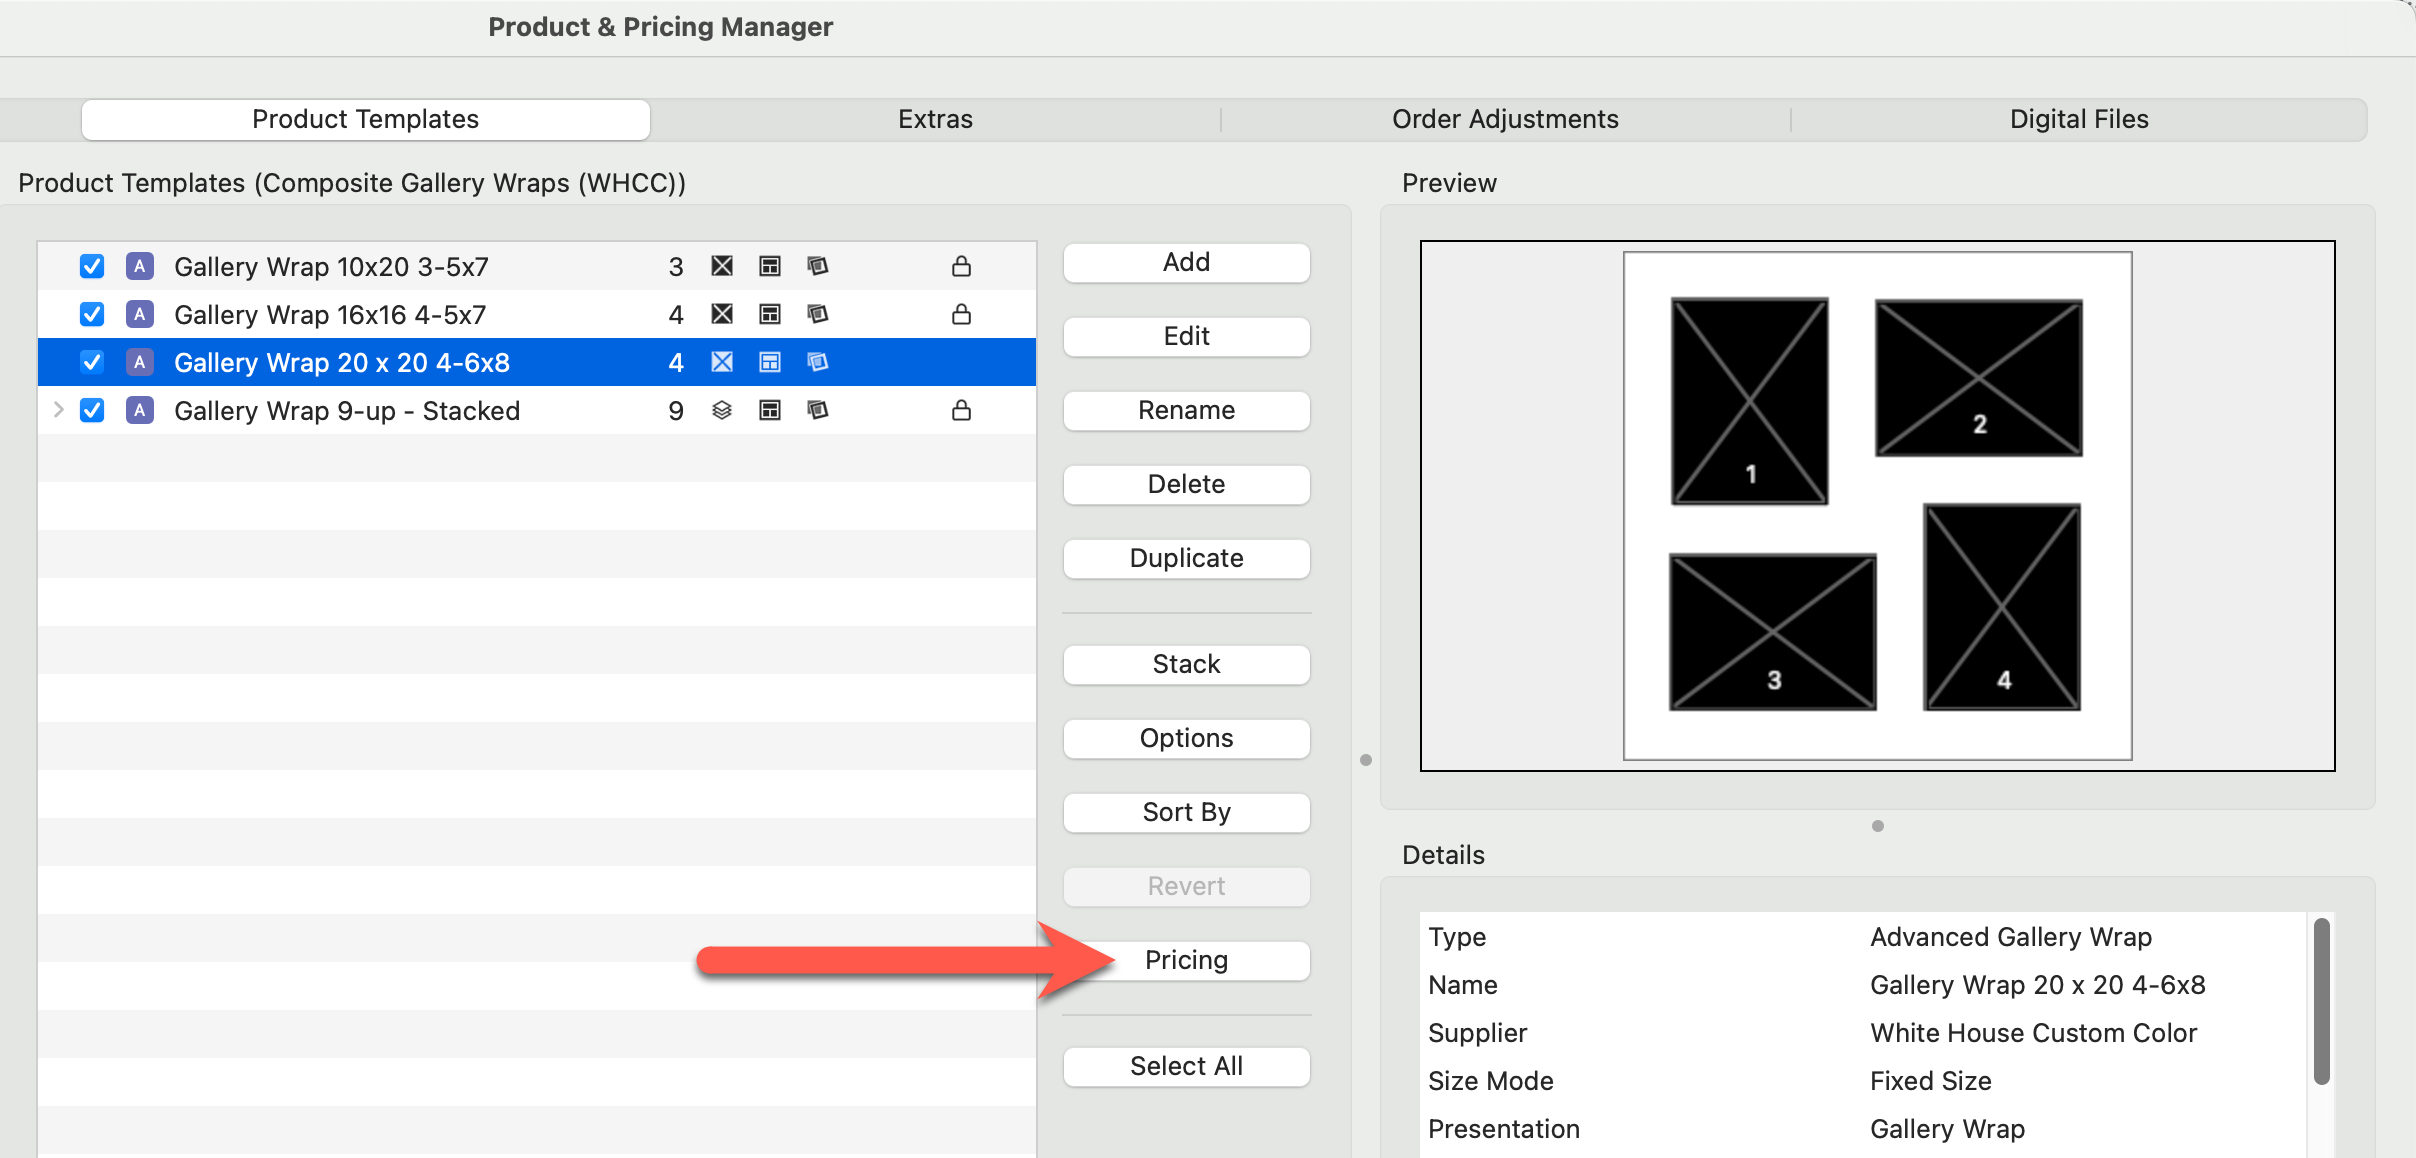
- The last step is to click the Pricing button and price the new product template.
When you go to price your product templates and see that no price list items appear in the pricing dialog, don’t worry—this is intentional. Many products, especially those with numerous size or finish options, can have hundreds of possible variations. Rather than overwhelming you with every option, ProSelect leaves it up to you to curate and add only the specific sizes and finishes you want to offer. This approach keeps your product list clean, focused, and tailored to your studio's needs, making it easier to manage and price what you actually sell.
Practical Example
The Matted Products Collection from WHCC was downloaded and installed. Once installed, the collection needs to be priced.
- Open the Product & Pricing Manager.
- Navigate to the Products tab.
- Select the Category and Folder to view items in the collection.
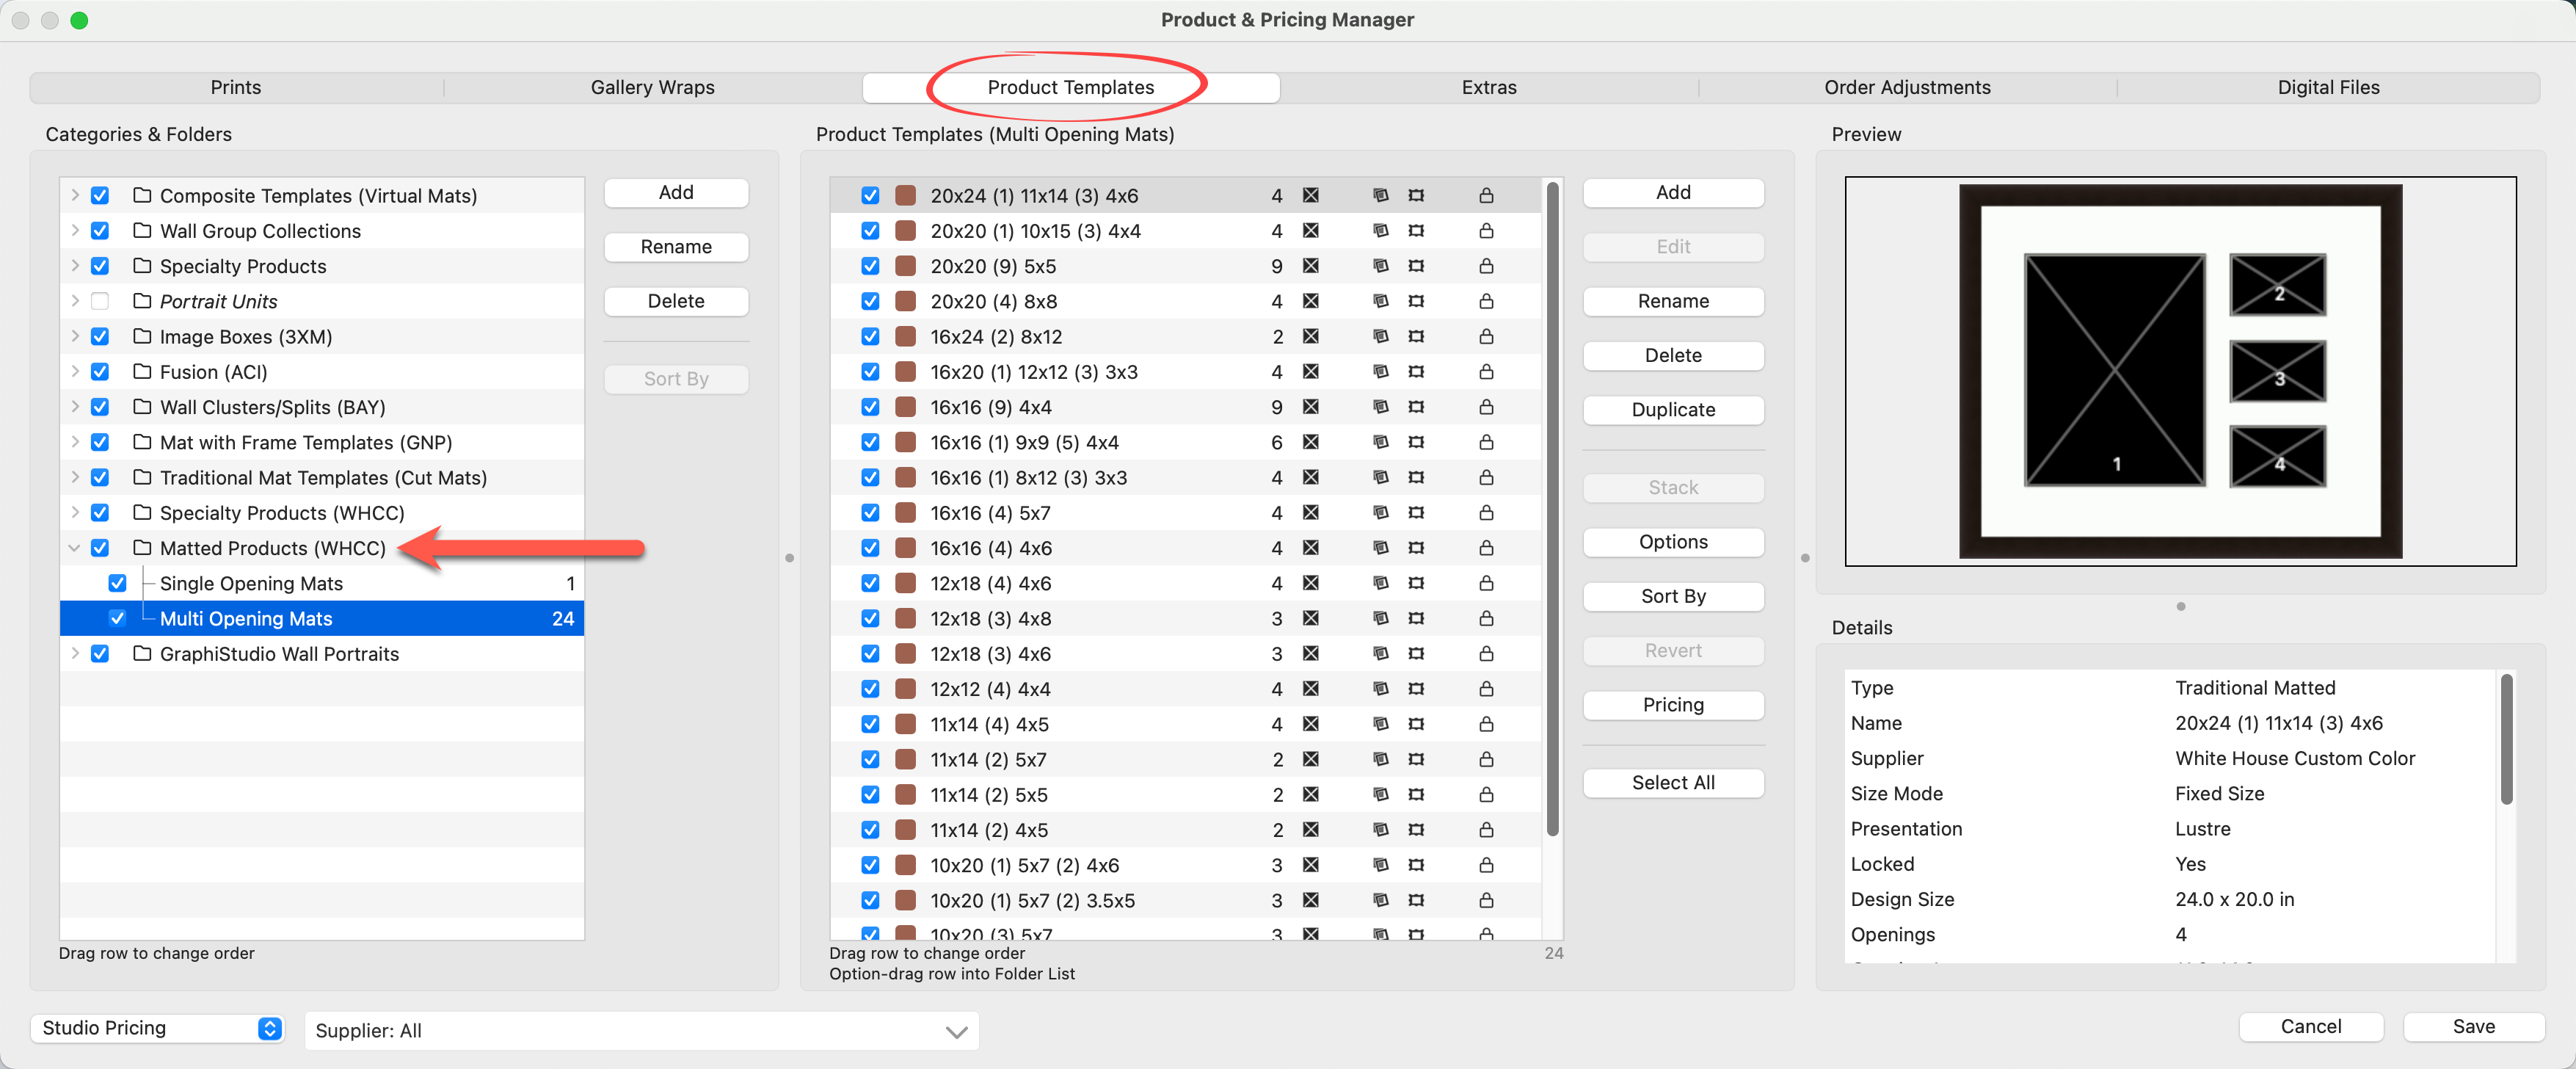
- The WHCC Matted Products Collection is comprehensive. Before you begin to price all of the products, it is advisable to take the time to "turn off/uncheck" any products you do not wish to offer. This approach helps you avoid spending time pricing products you don't intend to use.
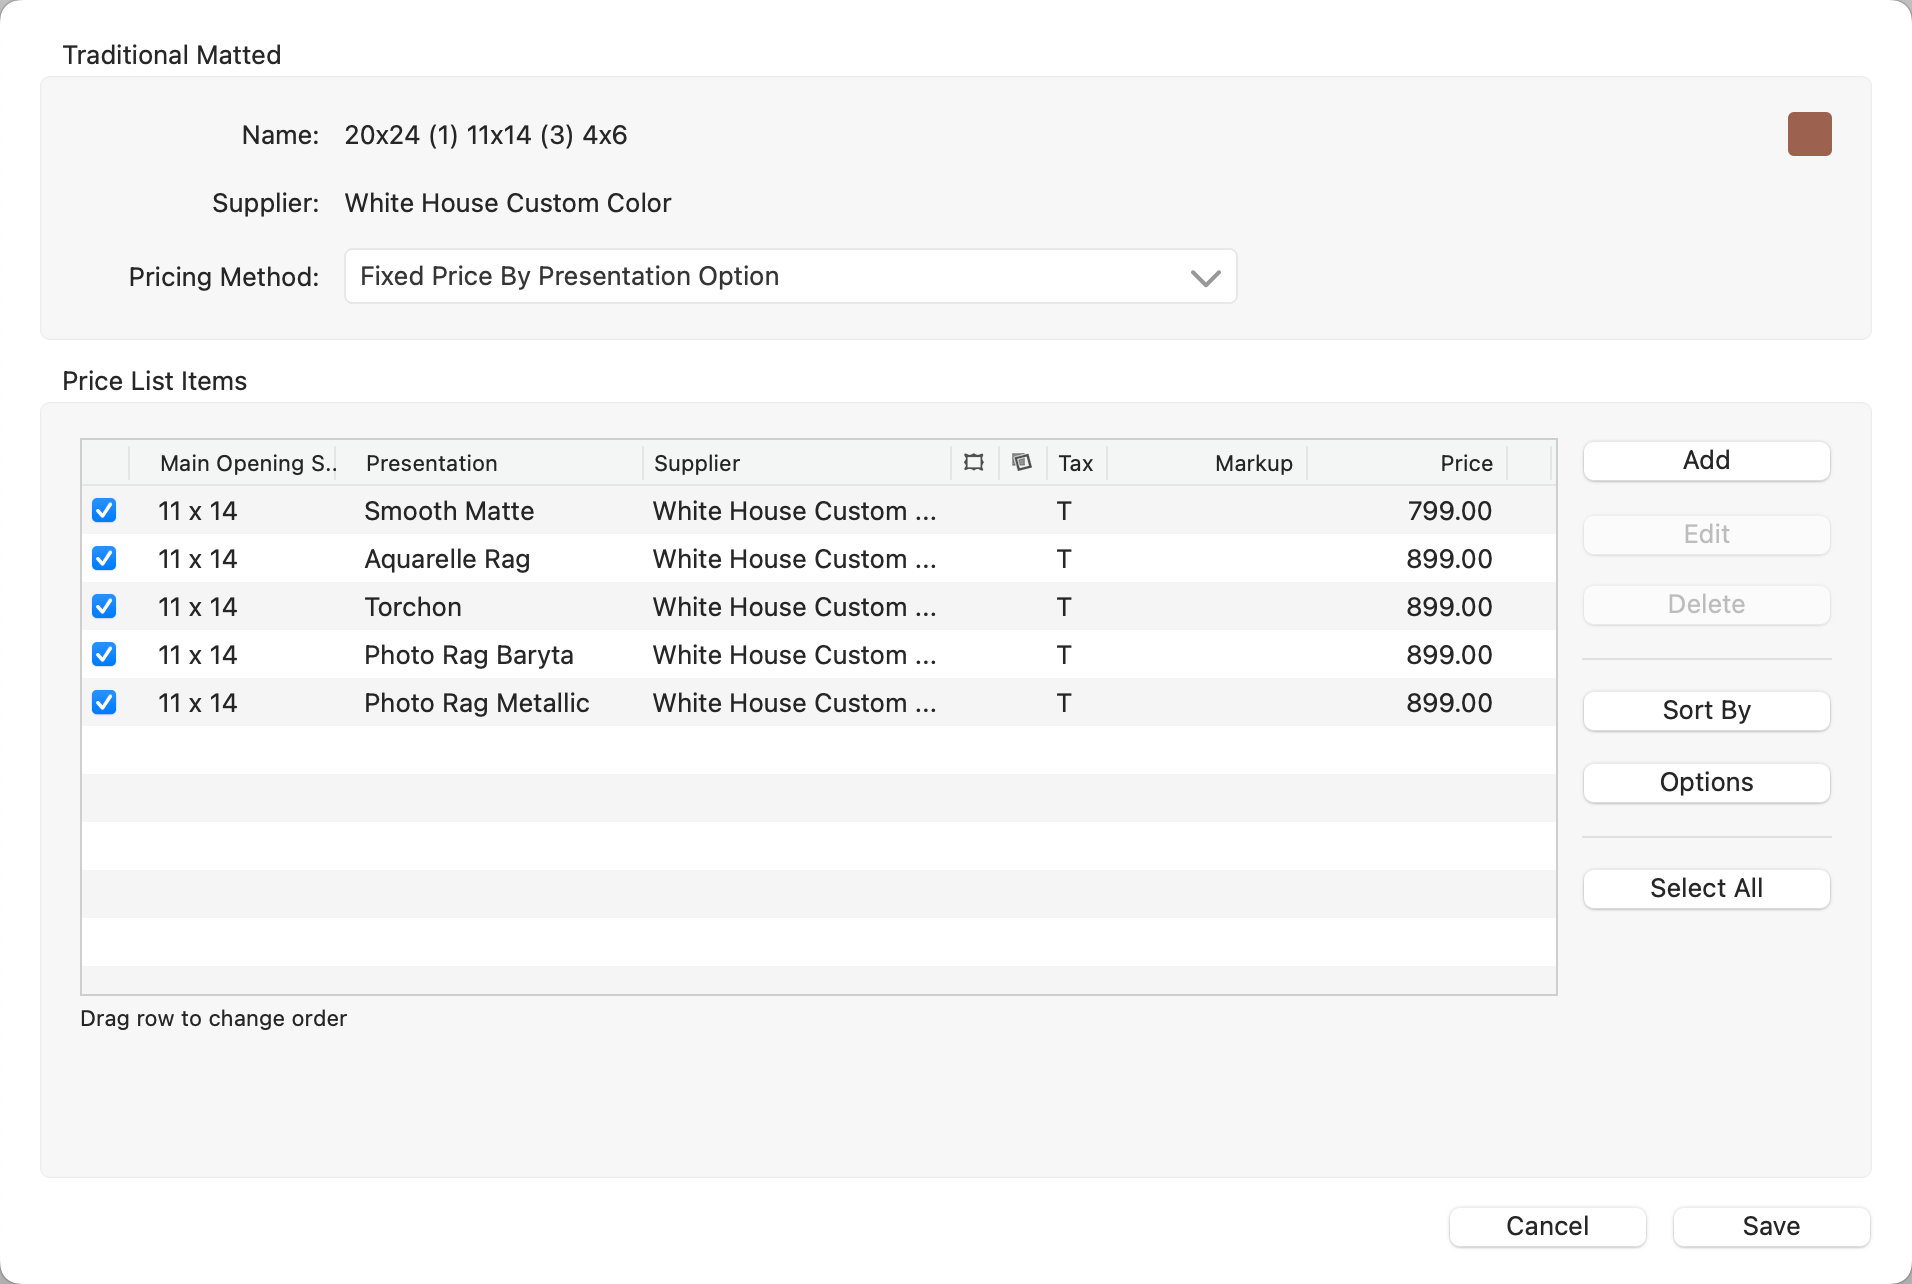
- We will now price the first product in the "Multi-Opening Mats" folder. Select the product "20x24 (1) 11x14 (3) 4x6" and click on the Pricing button.
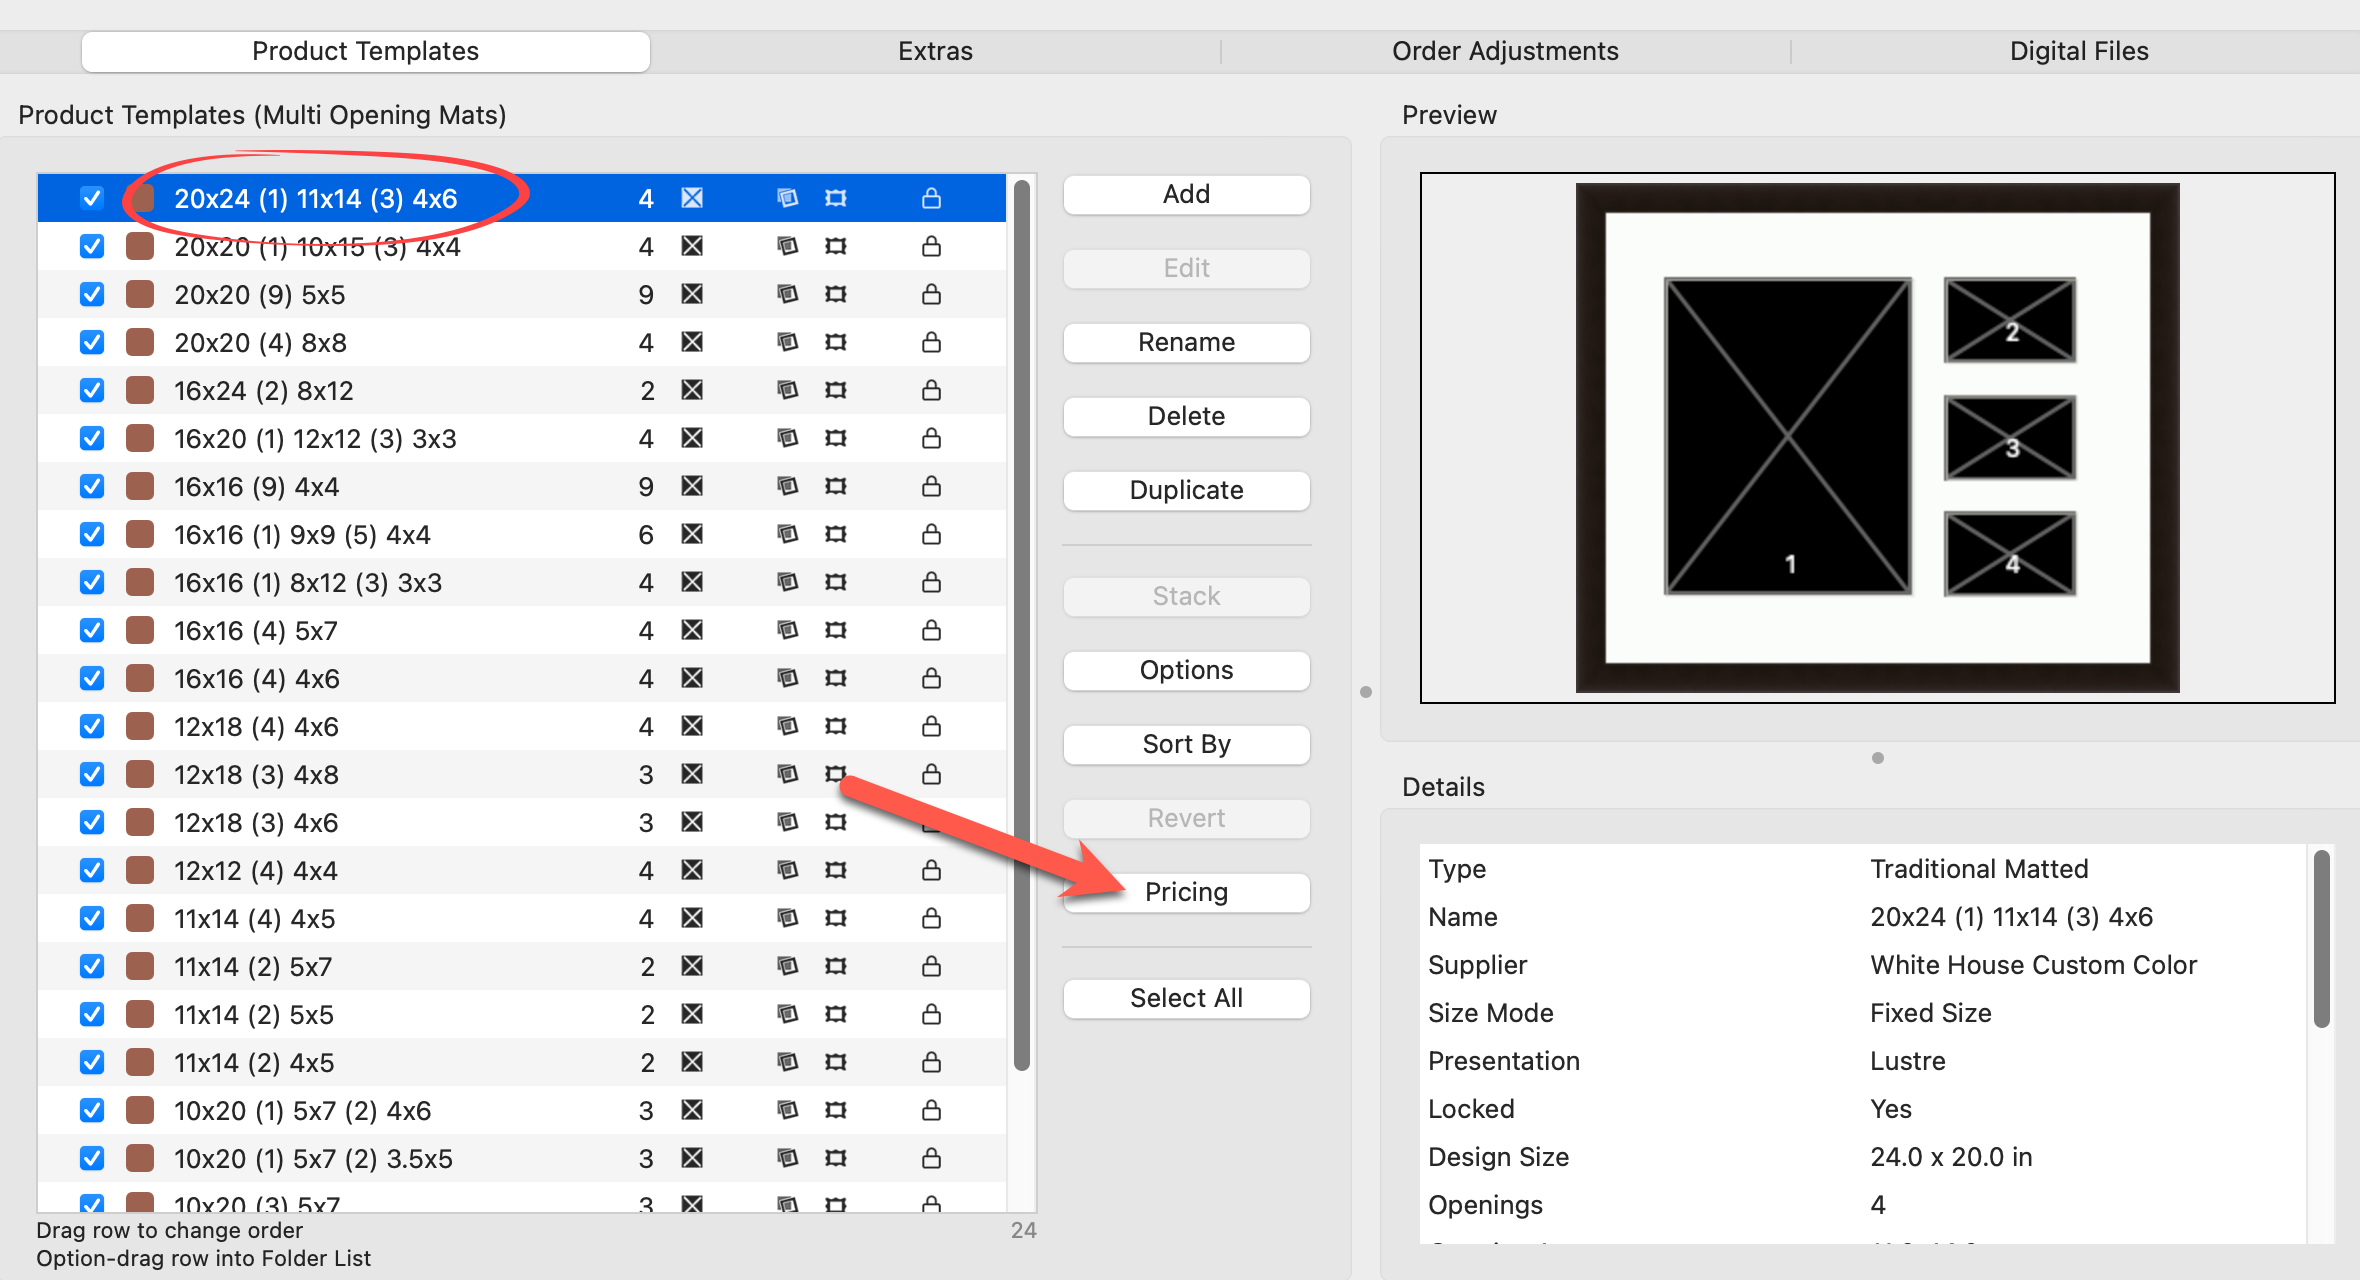
- You will notice that there is no pricing set up in the Pricing dialog. This is intentional. WHCC has a vast range of paper finishes, and to include pricing for all of them here would be overwhelming. It is recommended that you only set up pricing options for the print finishes you will be selling.
- For this example, we will be using the pricing method "Fixed Price by Presentation Option." This pricing option requires each item to be priced individually. It is slightly more time-consuming than "Sum of Parts" pricing; however, it is more precise. "Sum of Parts" pricing can also be used. It is a fast, efficient pricing method that combines all the individual elements of a product together, using items you have already priced in your price list. Read more about Sum of Parts here.
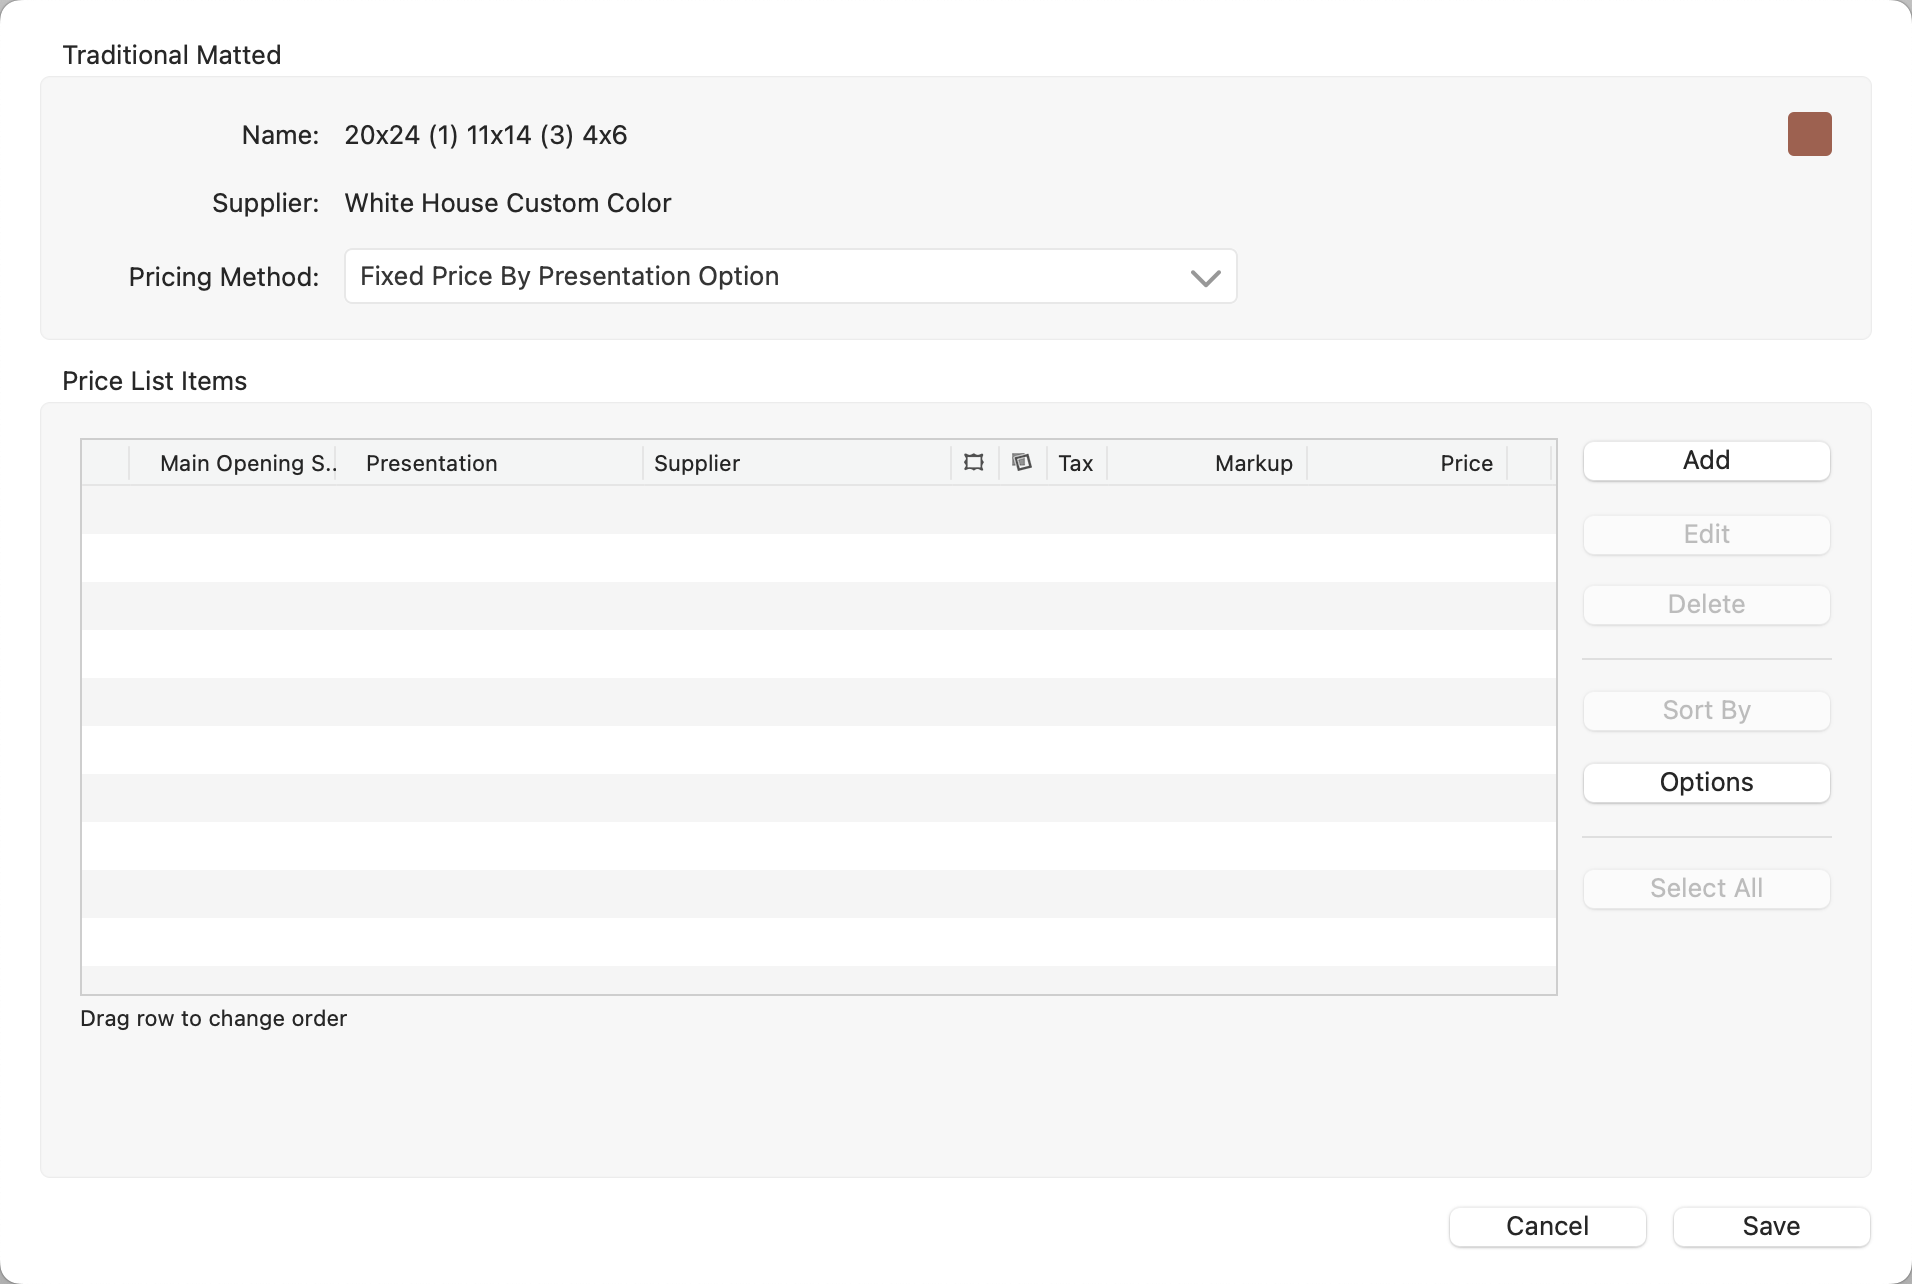
- Click on the Add button.
- Select a Presentation Option (print finish) for the item.
- Price the item using either Supplier Cost x Markup or Fixed Price.
- Click "Add Item."
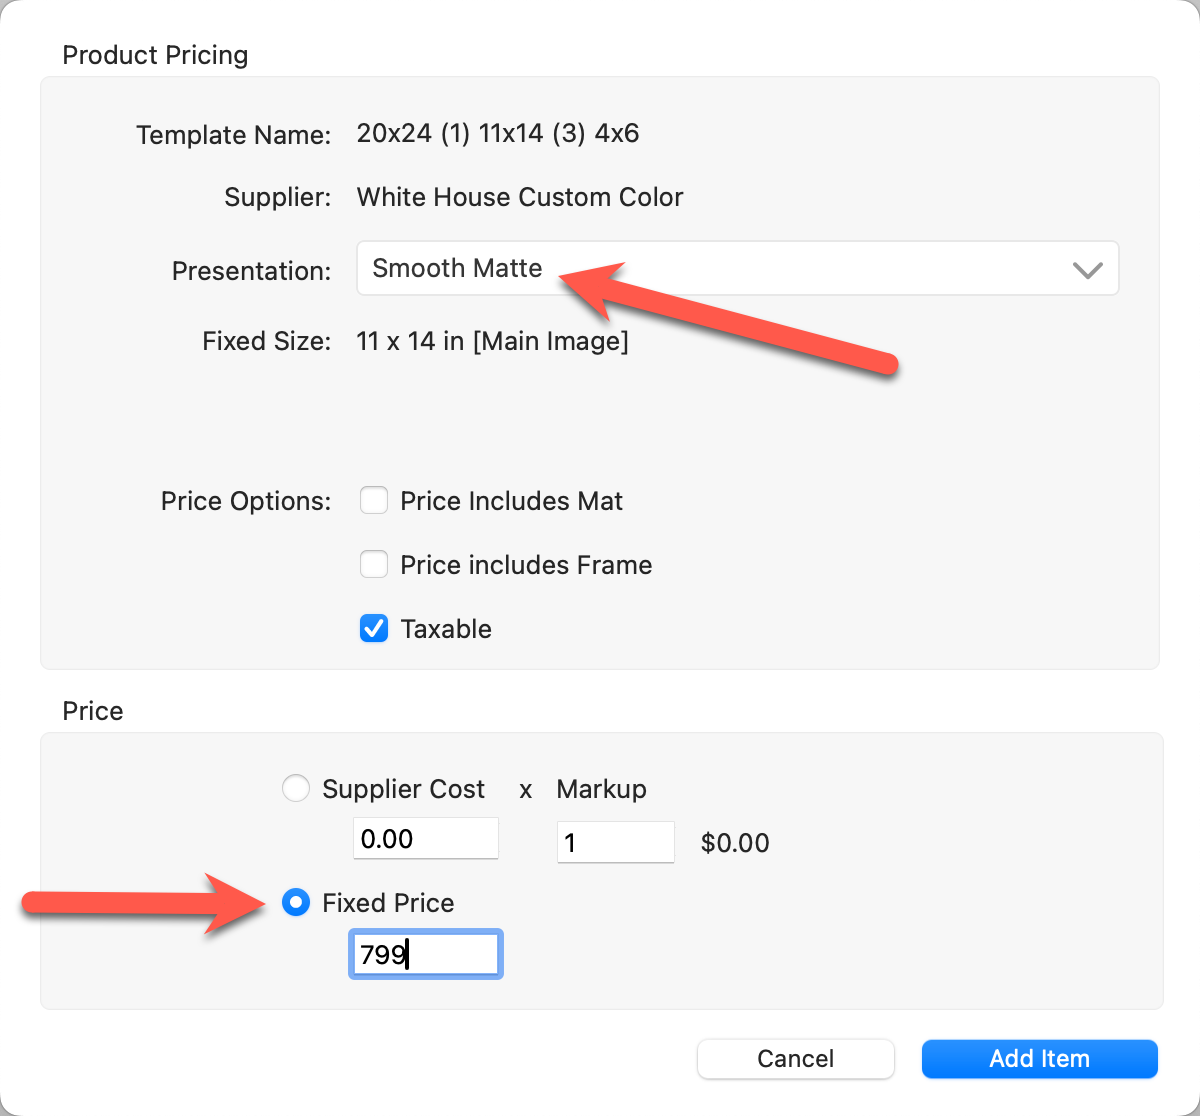
- Back in the Pricing dialog, we now have one price list item set up for this product.
- Repeat these steps to add price list items for each presentation option you want to offer.
- Once you have completed pricing, click the Save button.
- Save the changes you made in the Product & Pricing Manager.
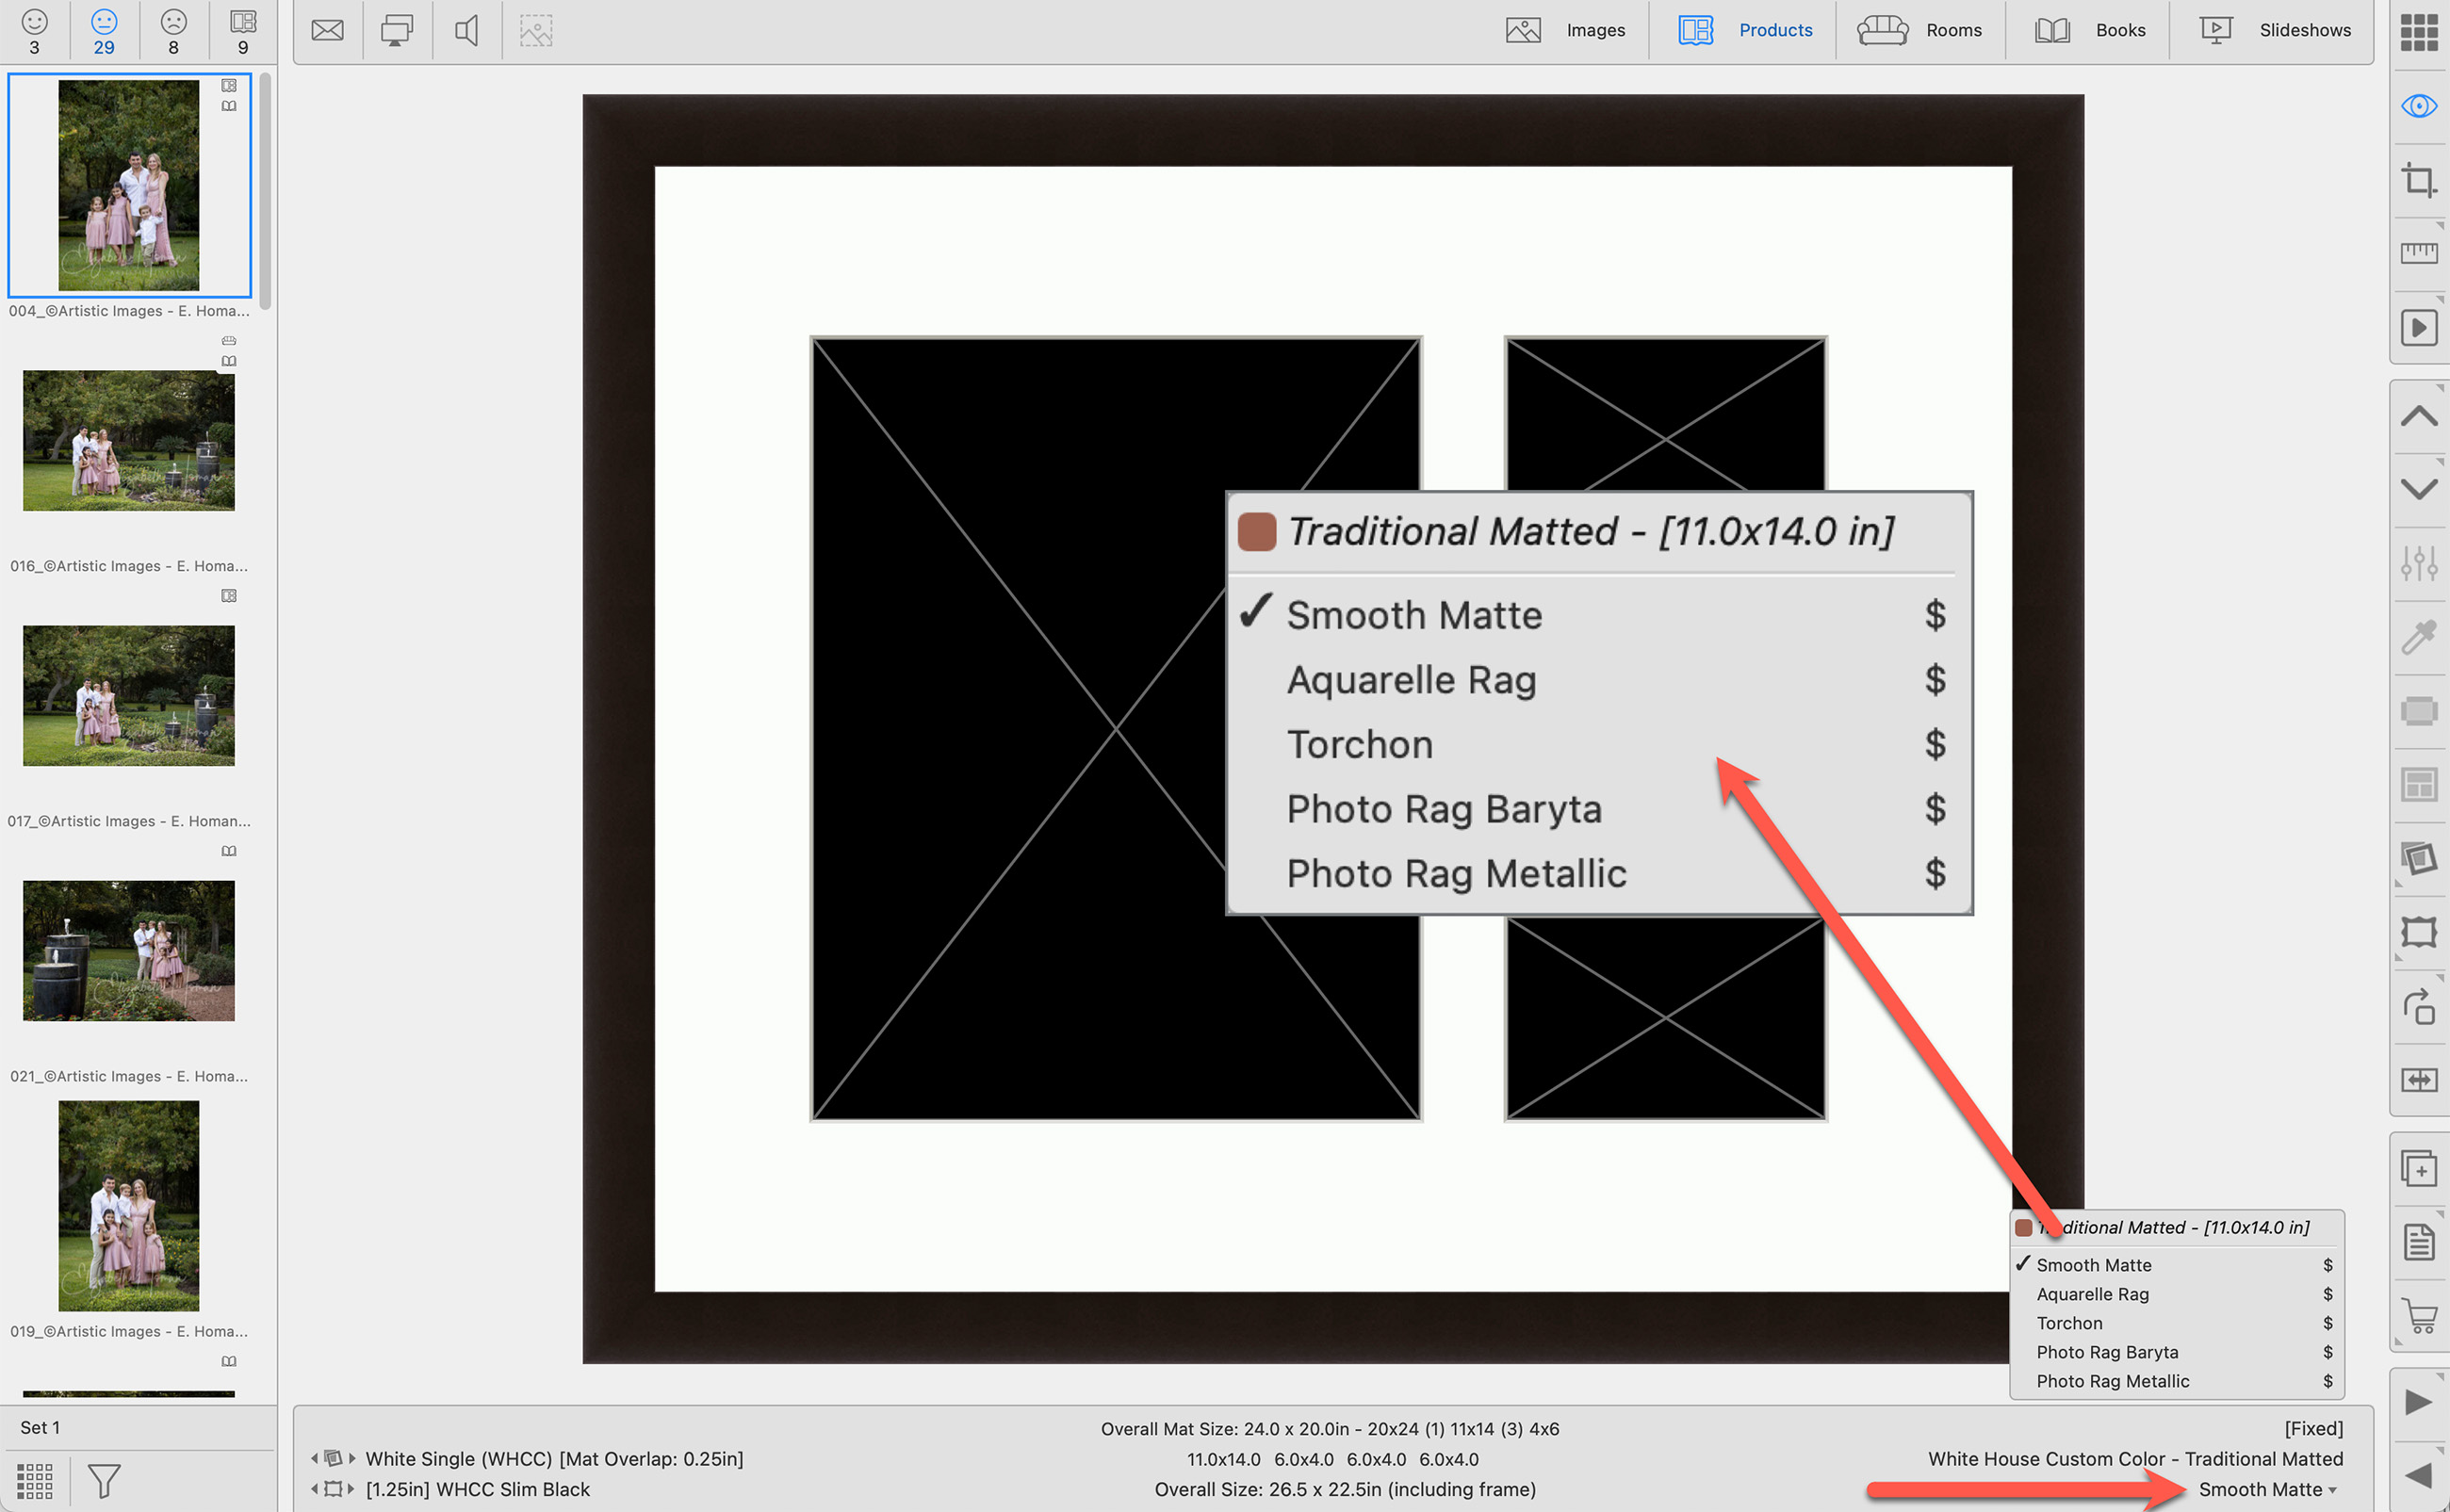
- Back in the main interface, when you're using a product with multiple price list items, you can easily switch between them by clicking the drop-down arrow in the info bar, right next to the currently assigned presentation option.