Upgrading ProSelect
The New Generation of ProSelect introduces a variety of enhancements designed to streamline pricing, product setup, and overall usability. With these improvements, products can be created and presented to clients more quickly and accurately, while ordering and production processes have become more efficient.
We understand that ProSelect comes with a learning curve. Many users utilize only the basic functions and achieve great success, while others maintain extensive setups that have evolved over many years, adapting to various changes. Some setups may “work,” being a mix of workarounds and processes that seemed right at the time.
Since Pro Studio Software acquired ProSelect, our goal has been to innovate and think outside the box. We even brought on a new team member with no prior ProSelect experience to critically examine each part of the program and ask why. This approach is ongoing.
The New Generation of ProSelect includes many foundational changes. We were not afraid to overhaul basic processes, update terminology to be more relevant, and reorganize menus to be more intuitive. As a mature product, ProSelect has undergone many updates, but it must continually adapt to the fast-paced changes in products offered by labs, and this generation is designed to meet those evolving needs.
Because this New Generation offers so many innovations, the installation of ProSelect 2025 will not affect or overwrite your legacy ProSelect version (2022r1). This allows you to take the time to properly set up the new version, practice, and get comfortable using it before working live with clients. In the meantime, you can continue running your business as usual with your legacy version.
Prepare Your Legacy Version
Before you dive into the current generation of ProSelect, please review the following important information carefully:
- Confirm that you are using ProSelect 2022r1.10, the latest legacy version.
- If not, download and install ProSelect 2022r1.10.
- Your existing pricing, templates, rooms, and setup data will carry forward only if 2022r1.10 is installed on the same computer as your current legacy version.
- Continue running your daily sales and workflow in ProSelect 2022r1.10.
- Do not upgrade directly to ProSelect 2025.
- Once 2022r1.10 is in place and your data is confirmed, you are ready to move to the new generation of ProSelect.
When installing ProSelect 2025 for the first time, it installs in a new directory under Pro Studio Software, leaving your existing version unaffected. This setup allows you to continue using the older version while you configure your new version. While transitioning from ProSelect 2022 to 2025, maintain separate album files. Albums from 2022 or earlier can be opened in 2025 with all data intact, but albums created or saved in the new generation cannot be opened in older versions. If you already have ProSelect installed on your computer, you'll have options to migrate existing data.
Important Change: Data Migration
Pricing and setup data do not automatically move forward into ProSelect 2025.
- The new generation does not support importing full legacy databases.
- Instead, you can selectively migrate certain assets using Collections.
Startup Options
Upon starting versions of ProSelect 2025, you are given two startup options: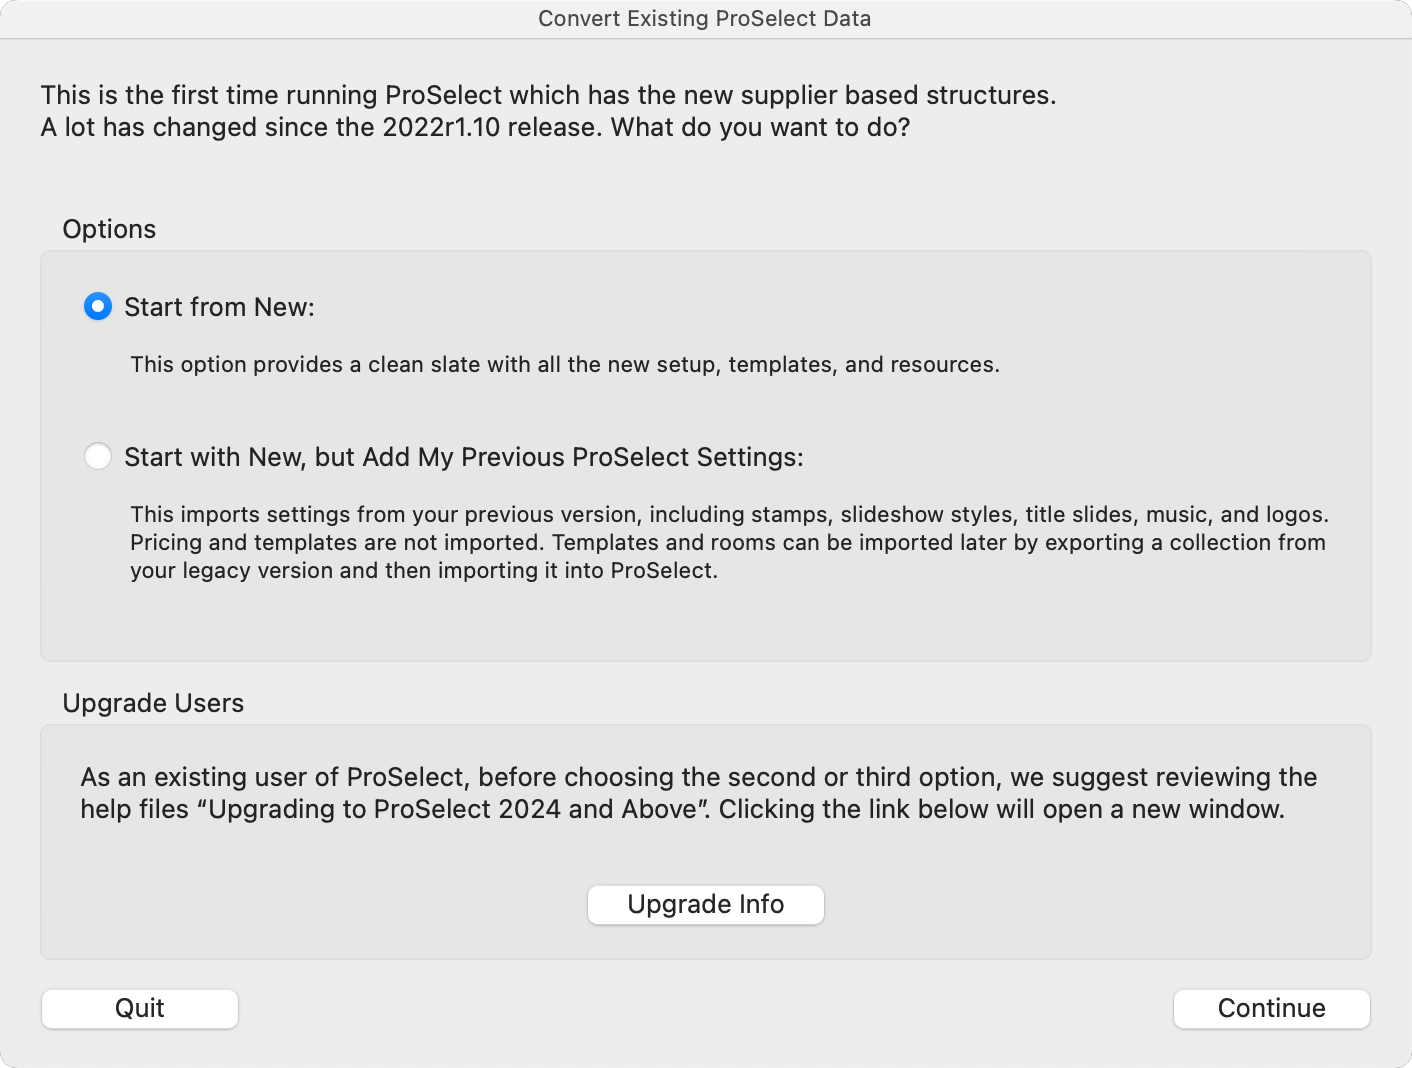
- Start from New: *Recommended: This option installs fresh, optimized data designed specifically for ProSelect 2025. Starting fresh makes it easier to understand new features and ensures the training materials and videos match what you see on screen. You can selectively migrate certain assets from your legacy version using Collections.
- Start with New, but Add My Previous ProSelect Settings: This option imports your version 2022 basic settings like stamps, slideshow settings, music, logos, and Library Rooms. Any pricing and template data from your current version is NOT imported. Instead, you will get the 2025 default pricing and template data. You can selectively migrate certain assets from your legacy version using Collections.
What Can Be Migrated
- Print Pricing: Print products and pricing must be set up in ProSelect 2025. The process is faster and more flexible than in legacy versions, with multiple setup methods available. You have the option to export your legacy price list for reference (go to the Orders menu, and select "Export Price List as CSV...").
- Export Templates via Collections
- Templates can be exported from ProSelect 2022 and imported into ProSelect 2025 using Collections.
- Before exporting, review the templates already included in the new version.
- You may see fewer templates at first glance, but there are actually more due to Stacking.
- When exporting from ProSelect 2022r1.10, select only the templates you need, not everything.
- Export Rooms: Rooms can also be exported via Collections. Be selective and intentional when choosing which rooms to move forward.
- Import the Collections: Import the newly created .tpk files into ProSelect 2025. See Importing Collections.
- If you find yourself needing to adjust or correct your setup, ProSelect offers the flexibility to reset your data and start anew. Click on Reset ProSelect for more information. Select "Reset to 2022r1 or Earlier Data Migration Options," and the Startup Options will appear again.
When installing a version of ProSelect 2025 for the first time, it installs in a new directory under Pro Studio Software, leaving your existing 2022r1.10 version unaffected. Both versions run independently, and the new generation is easily identifiable by a different application icon.
- Your daily work in ProSelect 2022 is not affected. Continue to use this version as you normally would.
- It's recommended to keep using ProSelect version 2022 to finalize any orders created in that version.
- Take your time configuring and learning your new ProSelect version. When you are ready, start using ProSelect 2025 for your new albums.
While transitioning from ProSelect 2022 to 2025, maintain separate album files.
- Any file saved in ProSelect 2025 cannot be opened in ProSelect 2022.
- All files created in ProSelect 2022 can be opened in ProSelect 2025.
Using Lightroom
When using the Lightroom plugin with ProSelect, it's important to manage which version of ProSelect is active, especially if you have both a new version and ProSelect 2022 installed on your computer. Here’s how it works:
- If both versions of ProSelect are open at the same time, the Lightroom plugin will interact with the version that was opened first. This means that any images you send from Lightroom will be loaded into the initially opened version of ProSelect.
-
If only one version of ProSelect is open, then the Lightroom plugin will automatically use that version for loading images.
To ensure smooth integration with the Lightroom plugin, simply open only the version of ProSelect that you intend to use for your session. This will prevent any confusion or errors in loading images from Lightroom to ProSelect.
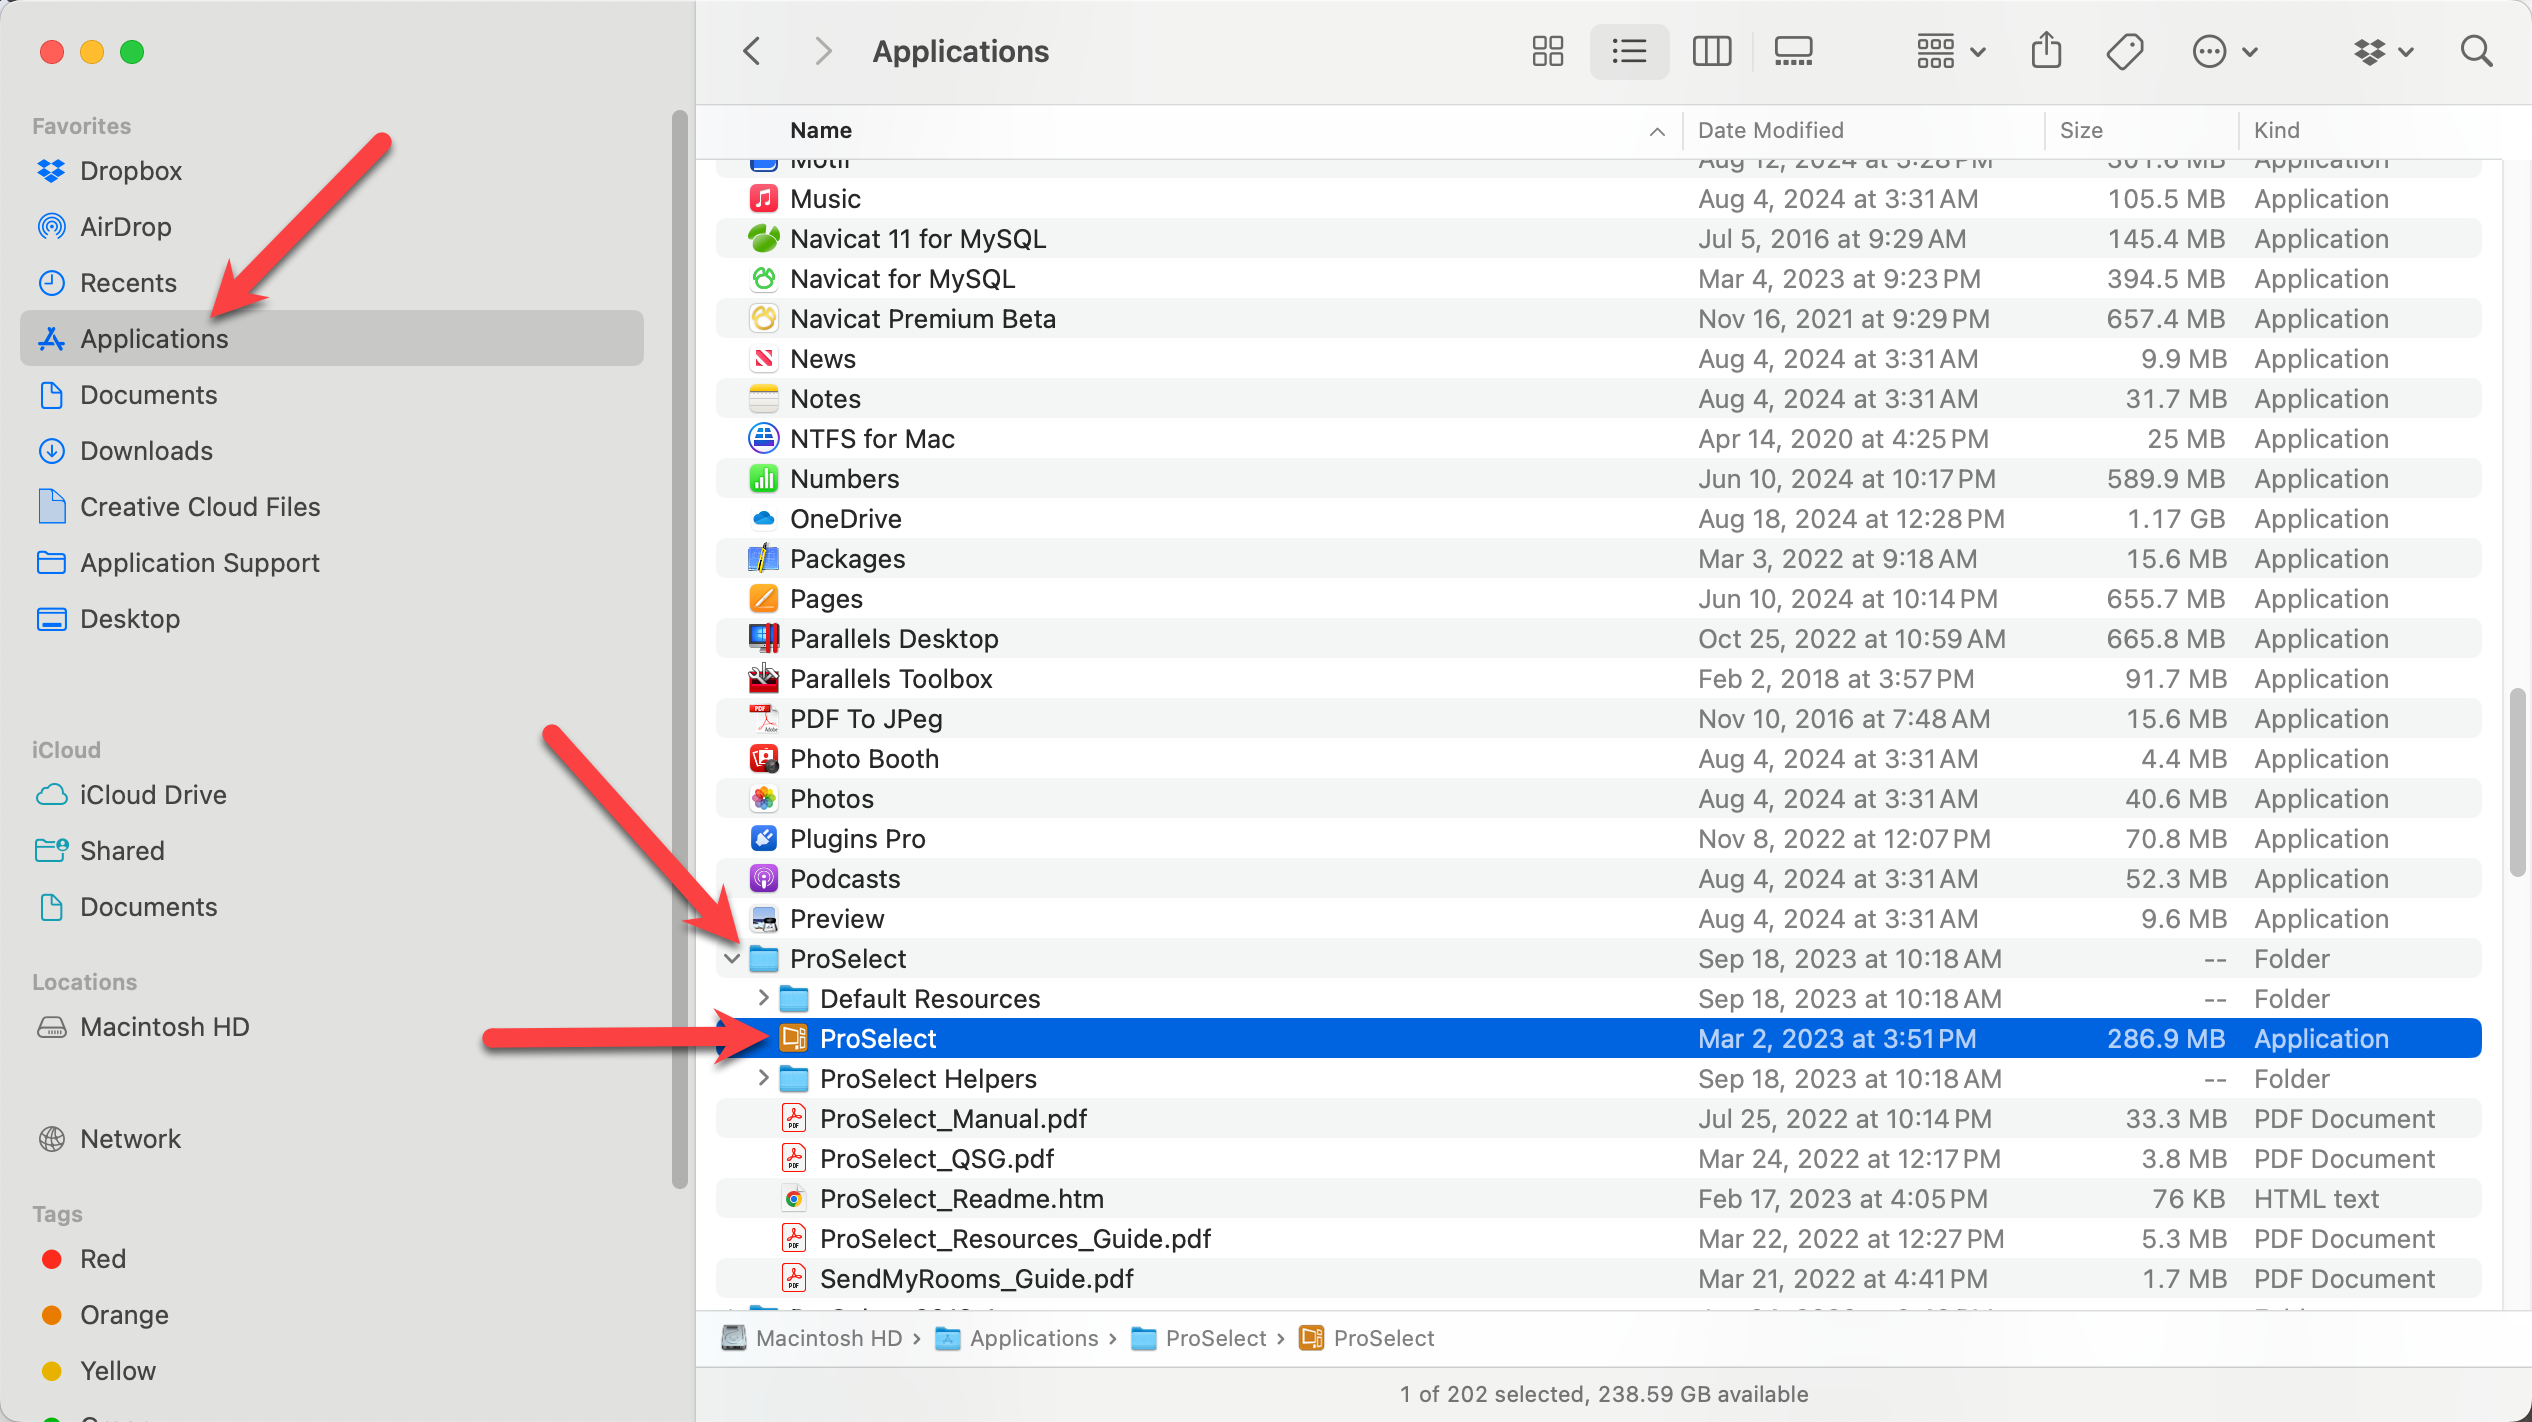
How to Find ProSelect 2022 on a Mac
- Open a new Finder window.
- Go to Applications.
- Scroll down and open the folder "ProSelect." Do not select "ProSelect 2025."
- Double-click on the ProSelect Application to open it, or click and drag the application to the dock.
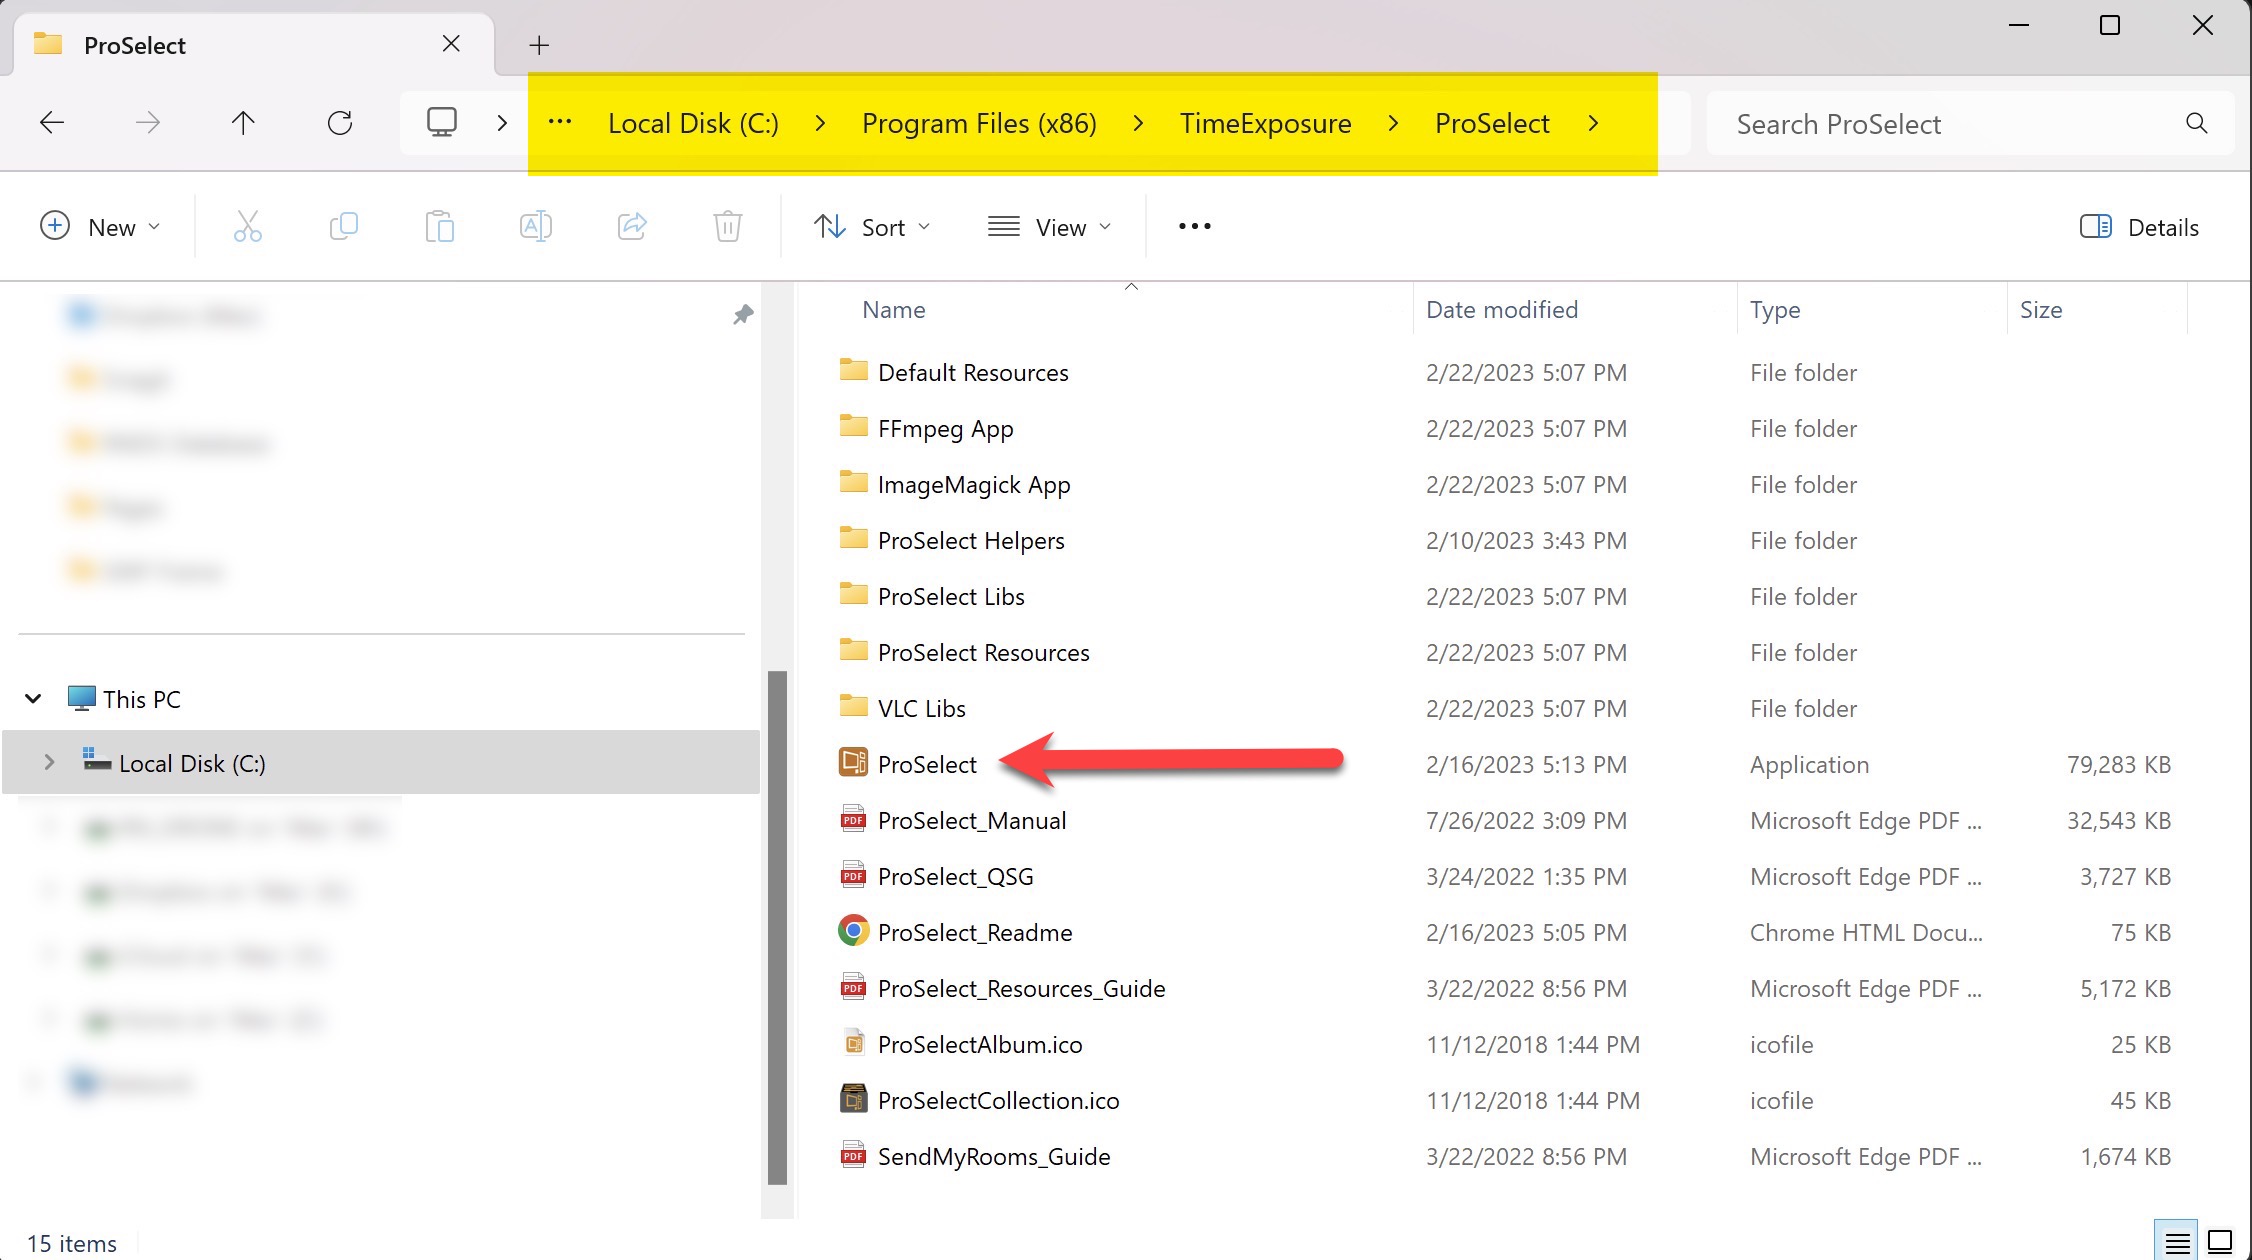
How to Find ProSelect 2022 on a Windows Machine
- Open File Explorer.
- Go to Local Disk (C:).
- Click on Program Files.
- Scroll down and open the folder "TimeExposure."
- Double-click on the ProSelect Application to run it. Alternatively, hold the Alt key and drag the application to your desktop. This will create a shortcut.
When transitioning from an older version of ProSelect to a newer version, it’s important to maintain separate album files.
Albums created in an older version can be opened in a newer version with all data intact. However, albums created or saved in a newer version cannot be opened in older versions.
To prevent compatibility issues, we recommend completing any jobs started in the old version using that same version, and starting all new jobs in the new version.
When selecting "Option 1 - Start from New," the Pro Select default data is installed. This option provides a fresh set of data with all the new 2024 templates and products already loaded. This will allow you to fully utilize ProSelect 2024’s features. You will be able to "turn off" any products you don't wish to offer, and add in your own.
What's Included in the 2024r1 Default Data
- Prints: Sample print and presentation option configurations from popular Suppliers such as WHCC, Millers, and Bay Photo.
- Gallery Wraps: Pre-configured Gallery Wrap options from ACI and WHCC.
- Composite Templates: A comprehensive collection of ready-to-use popular composite templates.
- Rooms: 30 calibrated and ready-to-use Library Rooms.
- Book Designs: A sample of popular book designs (setup parameters) from WHCC, Bay Photo, Finao, and ACI.
- Stacked Album/Book Pages: Pre-configured template spreads for both square and vertical albums.
- Stacked Wall Groupings: 52 Wall Groupings using stacked sizes for use with most Suppliers.
- Frames: A selection of frame moldings available from popular Suppliers including GNP, WHCC, and ACI.
- Traditional Mats: A comprehensive selection of commonly used traditional mats from Suppliers including GNP, WHCC, and 3XM.
Stacked sizes are new for ProSelect 2024r1. Many fixed-size product templates have multiple sizing options because they have been "stacked together." Remember to use the drop-down arrows next to stacked templates to reveal all the sizing options.
-
Print Products: Have a spreadsheet or printed copy of all the print products you offer. It should include:
- Size: List all the sizes available for each print.
- Print Finish (Presentation Option): Lustre, Glossy, Matte, etc.
- Supplier: Identify the supplier for each print product.
- Selling Price.
- Click on Print Import Sheet - Fixed Price to download and use this sample spreadsheet. It can be used to import up to 10 new Presentation Options in 43 commonly used sizes. Simply replace "Presentation Option 1,2, etc." with your print finishes. Type in a fixed price for each size you want to offer and follow the steps to import the pricing spreadsheet into ProSelect. Please note you can start from Step 7, because the spreadsheet has already been generated for you.
-
Gallery Wraps:
-
Option 1: Use a Supplier Collection. Gallery Wraps have the added complexity of Edge Depths and Bleed. These are all configured for you if you install a Supplier Collection. You can price the Gallery Wraps after import.
-
Option 2: Have a spreadsheet or printed copy of all the gallery wraps you offer. It should include:
- Sizes: List all the sizes available for each gallery wrap
- Presentation Option: Premium, Economy, etc.
- Edge Depth: 1", 2", etc.
- Supplier: Identify the supplier for gallery wrap.
- Selling Price.
-
-
Wall Collections:
- Type: Determine whether the collections are lab-offered or self-created.
- Details: List sizes, presentation options, suppliers, and selling prices.
- Keep in mind there are 14 different Wall Grouping collections available in the ProSelect Default Data. These Collections use Stacked Sizing, giving you multiple size options for each grouping.
-
Composite Products:
- List any composite products offered.
- Note the configurations, suppliers, presentation options, and selling price.
-
Traditional Mat Configurations:
- List any traditional mats offered.
- Note the configurations, suppliers, presentation options, and selling price.
-
Specialty Products such as Image Boxes:
- Supplier Information: Identify who supplies your image boxes or similar products.
- Details: List sizes (if applicable), presentation options, and selling prices.
-
Albums and Books:
- Supplier Details: Note the suppliers for your albums and books.
- Sizes and Pricing: Document all available sizes and their corresponding prices.
When you first open ProSelect 2025, you may be asked to configure a new Starting Product. Configuring a "Starting Product" is essential because the software requires it to function correctly. This setting includes a Presentation Option—essentially a print finish—and a Size that is automatically applied to all newly imported images. It ensures images display properly in Room or Actual Size views. Commonly, a Custom Print in 24x36 inches is a good initial choice. Even if you haven't set up pricing for prints yet, this configuration is still required. You can adjust this default setting at any time.
You could think of the "Starting Product" in ProSelect as the default font and size in a word processor. When you start typing a document, the word processor automatically applies a font and size to your text. Similarly, ProSelect applies the chosen print finish and size to all imported images, ensuring they display correctly and consistently in the program. Just as you can change the font and size in your document as needed, you can adjust the presentation option and size in ProSelect anytime after the images are imported.
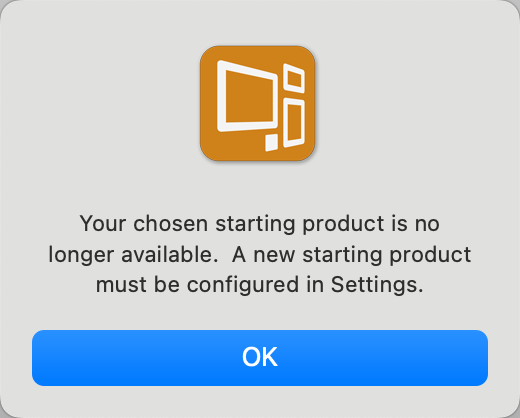
- If the above dialog pops up, click OK.
- You will be directed to the Settings > Importing Images tab.
- A Starting Product consists of a Presentation Option and a Size.
- Presentation Option: The selected Presentation Option will be applied to all images upon import into ProSelect. It should represent your most common or preferred product type (or print finish). This default gives you a starting point. At any time after import the assigned Presentation Option can be changed.
- Size: The selected size will be applied to each image when they are first shown in Room view or Actual Size view. This ensures that images do not appear too small when initially shown in either view. The recommended default size for this setting is 24x36 or 30x40.
- Select your chosen Presentation Option and Size. Note that you can modify and adjust this at any time in the Settings.
There are three methods to set up pricing for prints in ProSelect. Click on The Product & Pricing Manager, Prints to learn more.
- Method 1: Using Supplier Collections.
- Method 2: Importing Information from Spreadsheets.
- Methos 3: Creating Pricing Directly within ProSelect.
Video Links
We recommend watching the following videos to determine which approach best suits your needs. Once you have selected a method, you can proceed to set up your prints.
Setting up Pricing for Prints - Method 1 - Using Supplier Collections
Setting up Pricing for Prints - Method 2 - Using Spreadsheets
Setting up Pricing for Prints - Method 3 - Pricing Within ProSelect
Glossary of Terms
Mirror Image Mode > Presentation Mode
Virtual Mats > Virtual Styles
Mat Designs > Mat and Style Designer
Price Lists and Products > Product & Pricing Manager
Print Paper Sizes > Paper Sizes
Preferences > Settings
Template Manager > Product & Pricing Manager
Surrounding Mat > Traditional Mat
Inner Mat > Virtual Style
Template Editor > Product Editor
Layouts > Products
Select Size View > Actual Size View
Album: A ProSelect job containing images from a session, event, or wedding.
PSA File: The file extension for a ProSelect Album. This file contains internal images for viewing, order and product data, and client information. It contains links to original images, but not the full-resolution files.
Working with modes: ProSelect has five Working with Modes. Working with Images (WWI), Working with Products (WWP), Working with Rooms (WWR), Working with Books (WWB), and Working with Slideshows (WWS).
Sorting tabs: This area contains the “Smiley” tabs (Yes, Maybe, and No). When in Working with Products, Working with Rooms, and Working with Slideshows, an additional Products tab is added.
Information Bar: The area below the main working area. It shows details regarding the screen above.
Prints: A single image ordered at a specific size. By default, Prints are dynamically sized based on your Paper Sizes.
Products: Any orderable item in ProSelect.
Composite Product: A product that can contain one or more images rendered on a single sheet of paper or other media. The rendered area may contain a Virtual Style that adds edge treatment to images and background decoration.
Traditional Matted Product: A single image or a group of images where a traditional mat will be added when creating the finished product.
Traditional Mat: A physical mat with cut openings, usually with bevel edges, that is overlayed onto an image(s) as a part of the framing process.
Virtual Style: A graphic enhancement to a composite product that can be as simple as a keyline around an image, a single color background, or a complex combination of edge treatments, textured elements, and graphic blocks.
Graphic Block: An element available in the creation of a Virtual Style that can contain colors, graphic elements, and textures for use on composite products.
Product Editor: Also referred to as the "Template Editor." The Product Editor is used to design a wide range of product templates to which you can add your images and sell. It allows you to create your own templates or copy and modify any others that you have.
Light and Dark Mode: Previously called themes, ProSelect now uses OS system settings.
Menu Bar Changes for 2024+
The ProSelect Top Menu Bar has been modified to be more focused and logical. The significant changes are listed here:

- "Images" has replaced "Album." Anything that relates specifically to your images will be found here.
- There is a new menu called "Products." The "Products" menu is a combination of the "Templates" and "Orders" menus.
- Within the Products menu is the Product & Pricing Manager. This replaces Price List & Products and the Template Manager. The Product Editor (previously known as the Template Editor) can be accessed through the Product & Pricing Manager.
- Gallery Wraps now have their own management area in the "Products" menu.
- Frames & Mats have moved into the "Products" menu.
- Paper Sizes and Presentation Options have moved to the "Products" menu.
- All options relating to Books have been moved into the "Products" menu.
- Themes have been revised in the "View" menu. PreSelect now uses light mode and dark mode from your system settings.
In Windows 11, the term "System Preferences" has been updated to "System Settings." In contrast, Windows 10 continues to use the term "System Preferences." For clarity and consistency in this online help guide, ProSelect will use the term "Settings" to refer to both concepts across these operating systems.
Downloadable version 2025 Menu Bar (Mac)
Downloadable version 2022 Menu Bar (Mac)
Follow these steps to export a collection from ProSelect 2022r1.10 and import it into ProSelect 2025.
Exporting Collections was previously a Pro-only feature. It is now enabled in ProSelect Basic specifically to support exporting to the new generation of ProSelect.
Export a Collection From ProSelect 2022r1.10
- Open ProSelect 2022.
- On the top menu, go to Resources > Export Collection.
- The Export Collection dialog will appear. From here, you can choose which Collections you want to export.
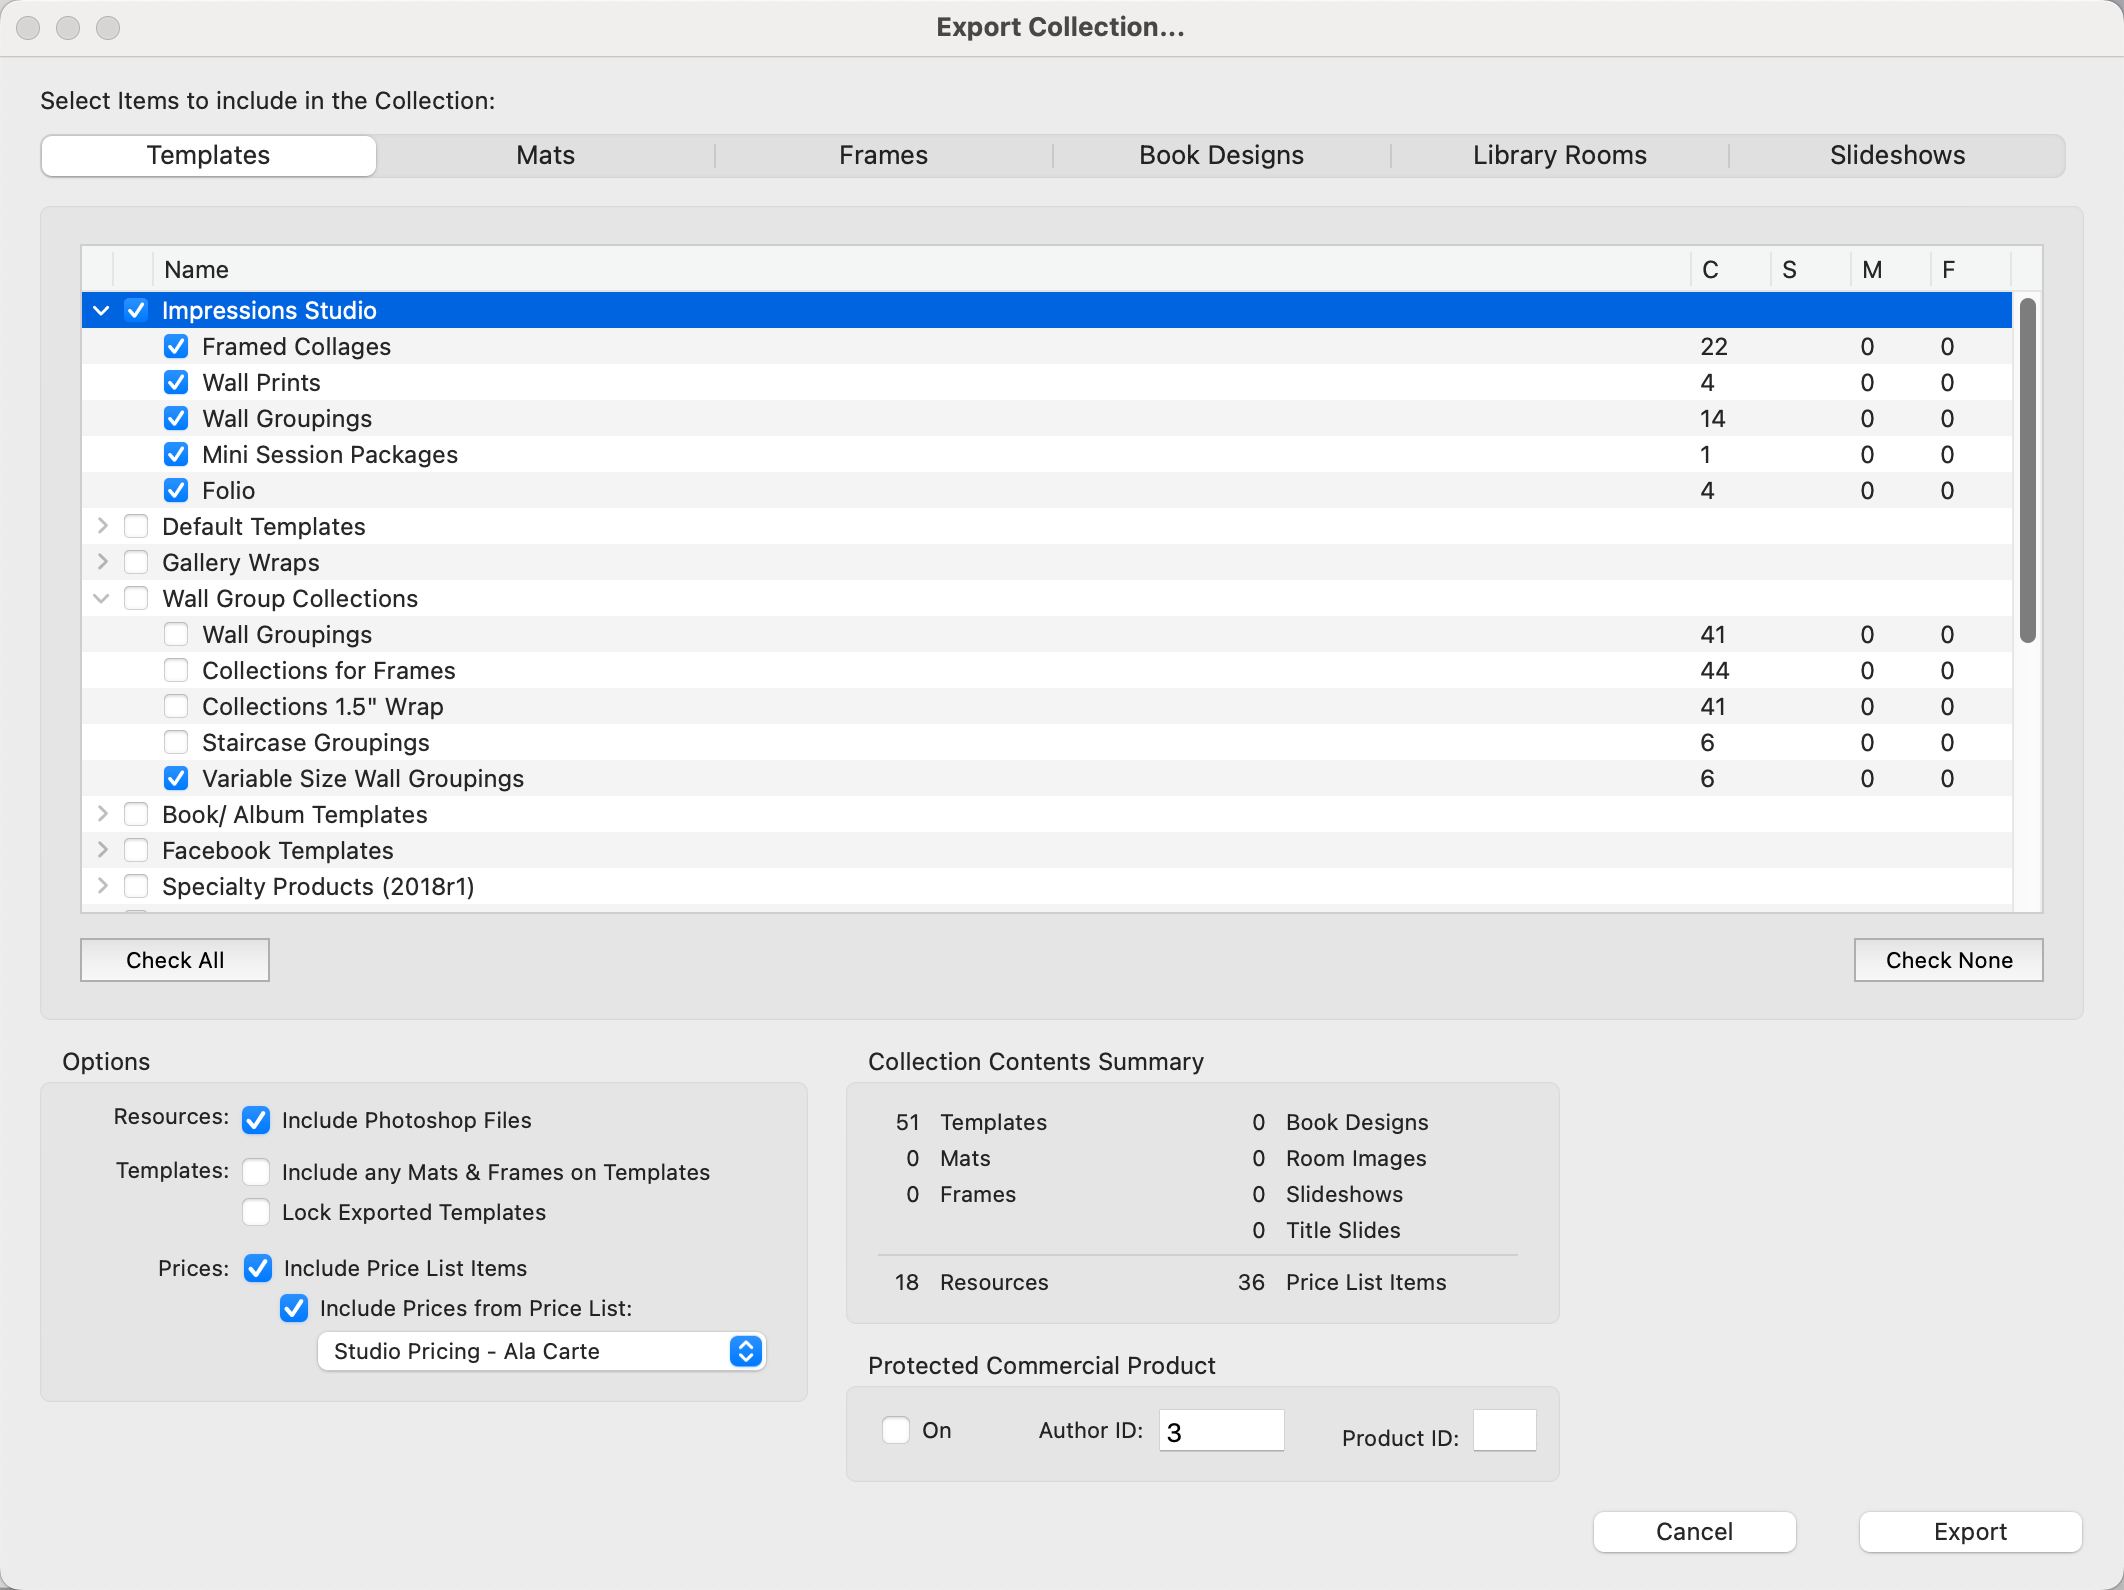
- Items available for export are categorized in the tabs at the top of the dialog. These include Templates, Mats, Frames, Book Designs, Library Rooms, and Slideshows.
- Use the checkboxes to select which items to include in the Collection. Items may be organized into root-level folders and subfolders, which you can view by clicking the drop-down arrows. You have the option to select the entire group or individual folders within the group.
- Once you have selected your items for export, click the Export button to save the Collection on your local computer.
Import a Collection into ProSelect 2025
Once you have exported a Collection from ProSelect 2022, you can then import it into a new version of ProSelect.
- Open ProSelect 2025.
- On the top menu, go to Products > Import Collection.
- Locate the Collection you want to import (it will have a .tpk file extension).
- Click Open.
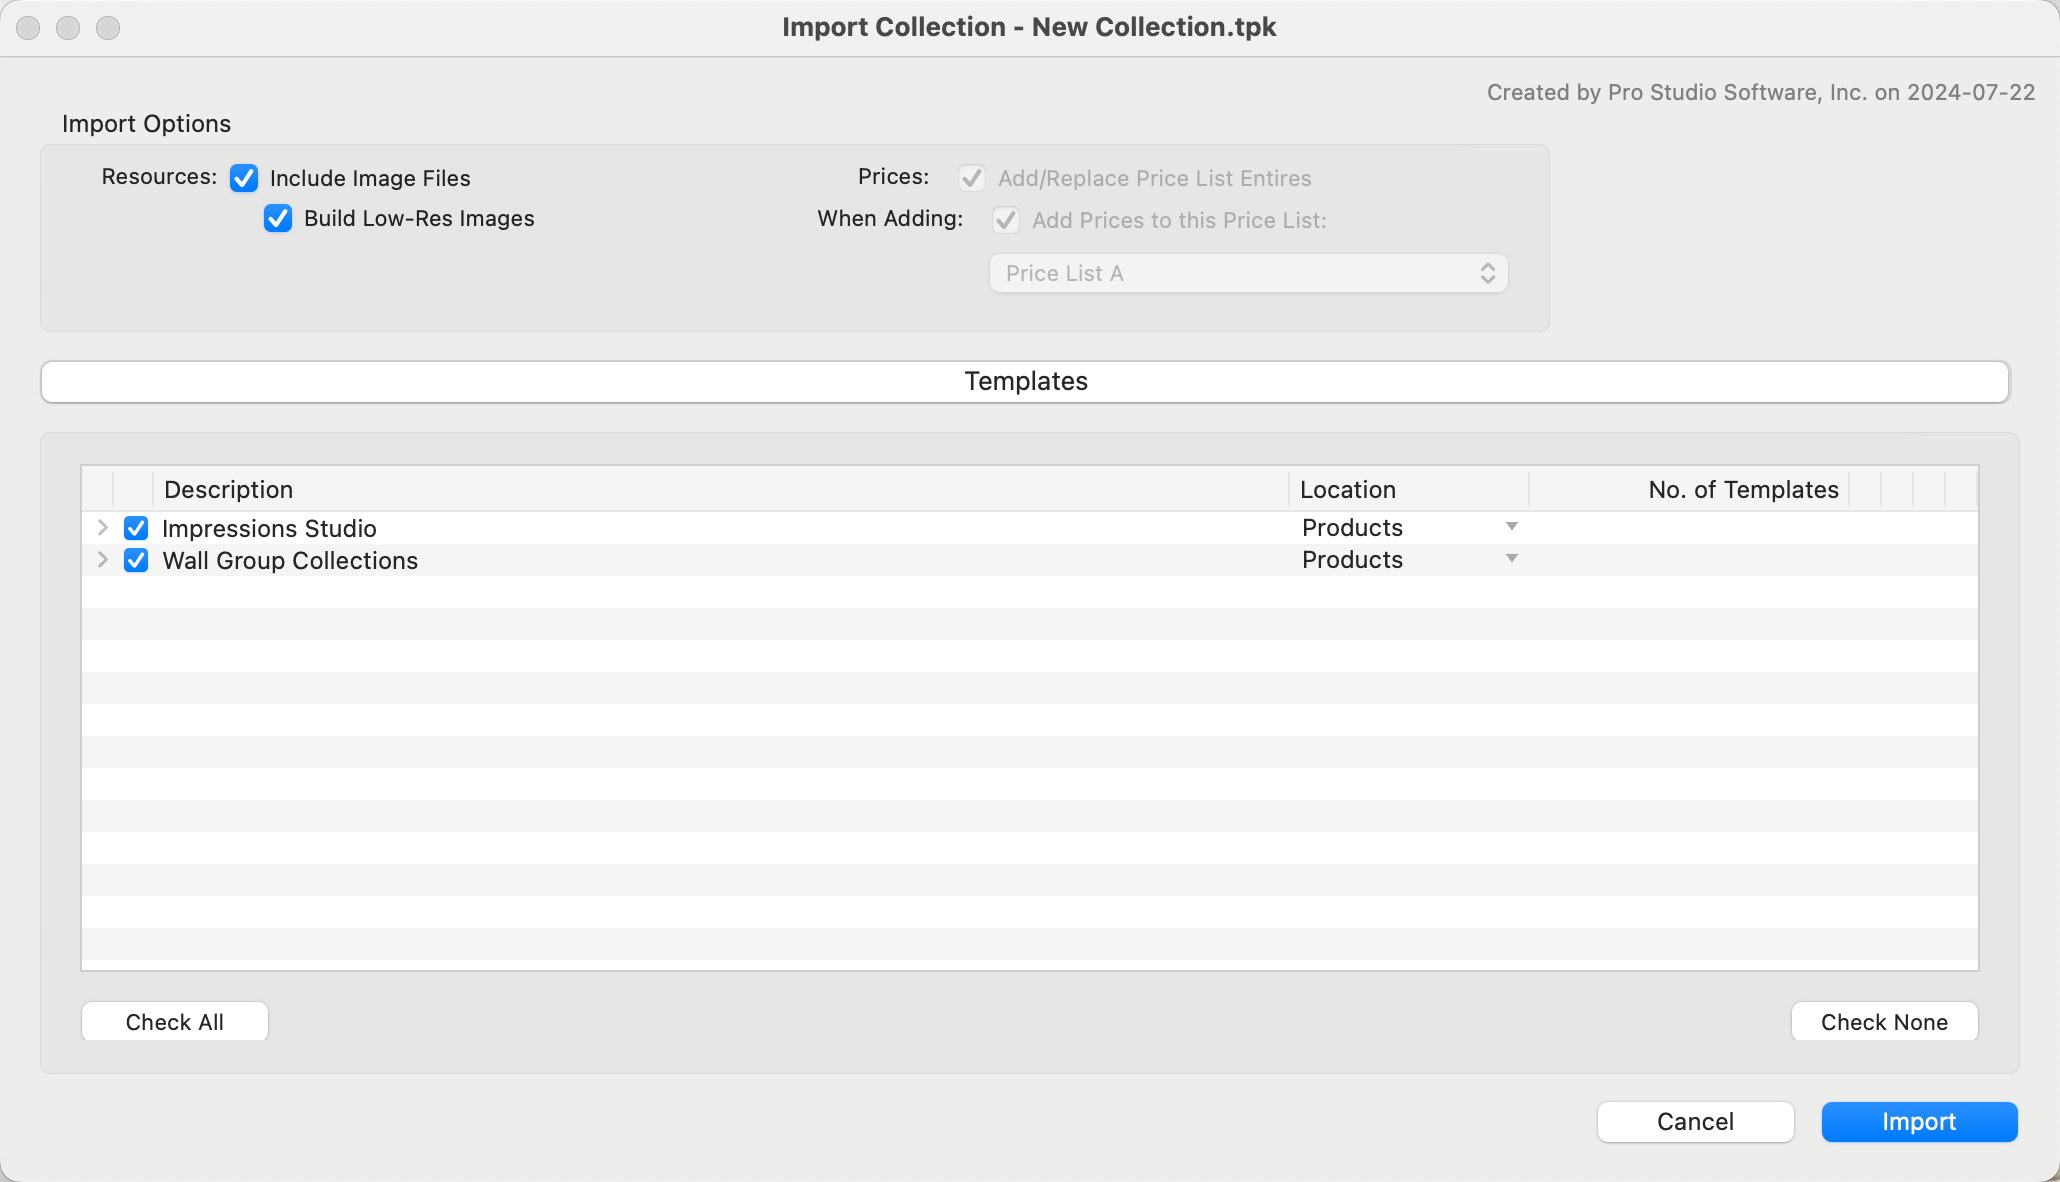
- The Import Collection dialog will appear.
- All of the items to be imported will be listed in the dialog.
- Click the Import button.
- All of the imported items are now in your new version of ProSelect. To view your imported items, navigate to the following areas:
- Templates: Products > Product & Pricing Manager
- Mats & Frames: Products > Frame & Mat Pricing Manager
- Book Designs: Products > Setup Book Designs
- Library Rooms: Resources > Setup Rooms
- Slideshows: Slideshow > Manage Slideshow Templates
Screen Resolution Requirements
In order for ProSelect 2025 to run properly, a minimum screen resolution of 1920 x 1080 OR 1920 x 1050 is required. Anything less than this resolution could result in tools or buttons being cut off from the main display. Upon first glance, it may seem that ProSelect runs just fine on a screen with a lower resolution, such as 1680 x 1050. But when certain windows or dialogs are opened, they may be cut off. To adjust your screen resolution, go to System Settings > Displays.System Settings > Resolution.
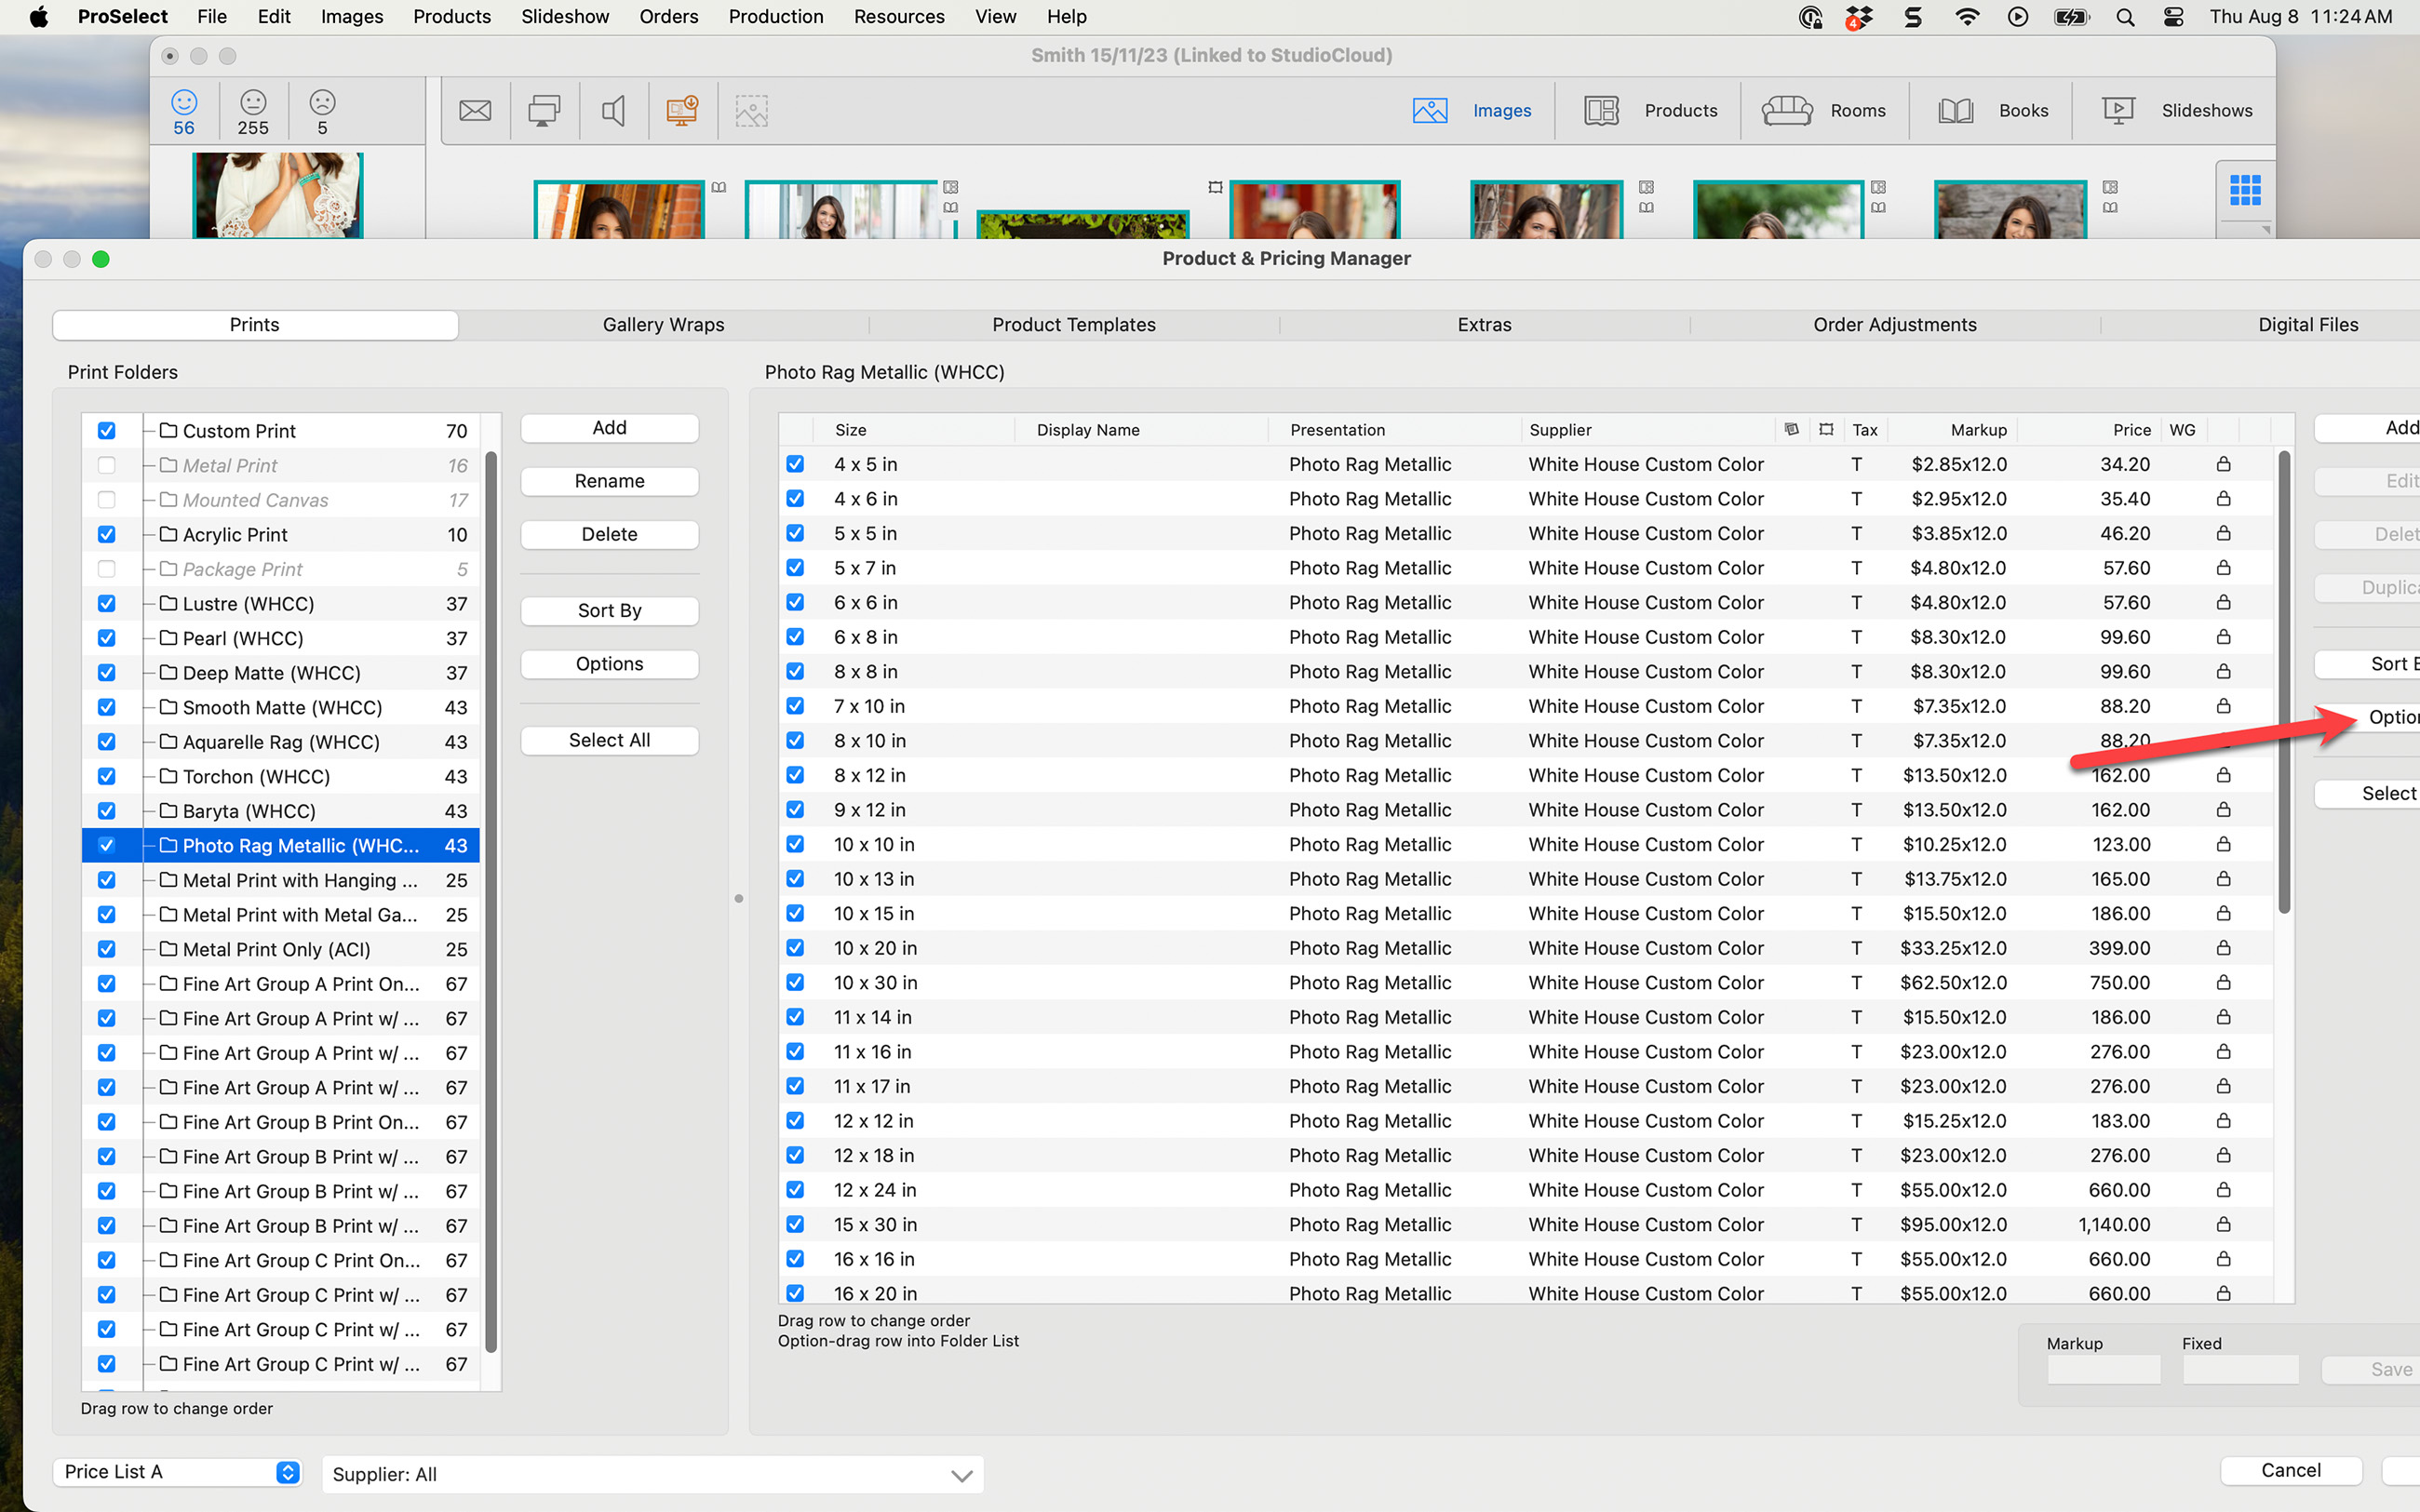
For example, here is a screen with a resolution of 1680 x 1050. You will notice that the ProSelect main display fits fine, but when the Product & Pricing Manager window is opened, the buttons along the right-hand side are cut off.
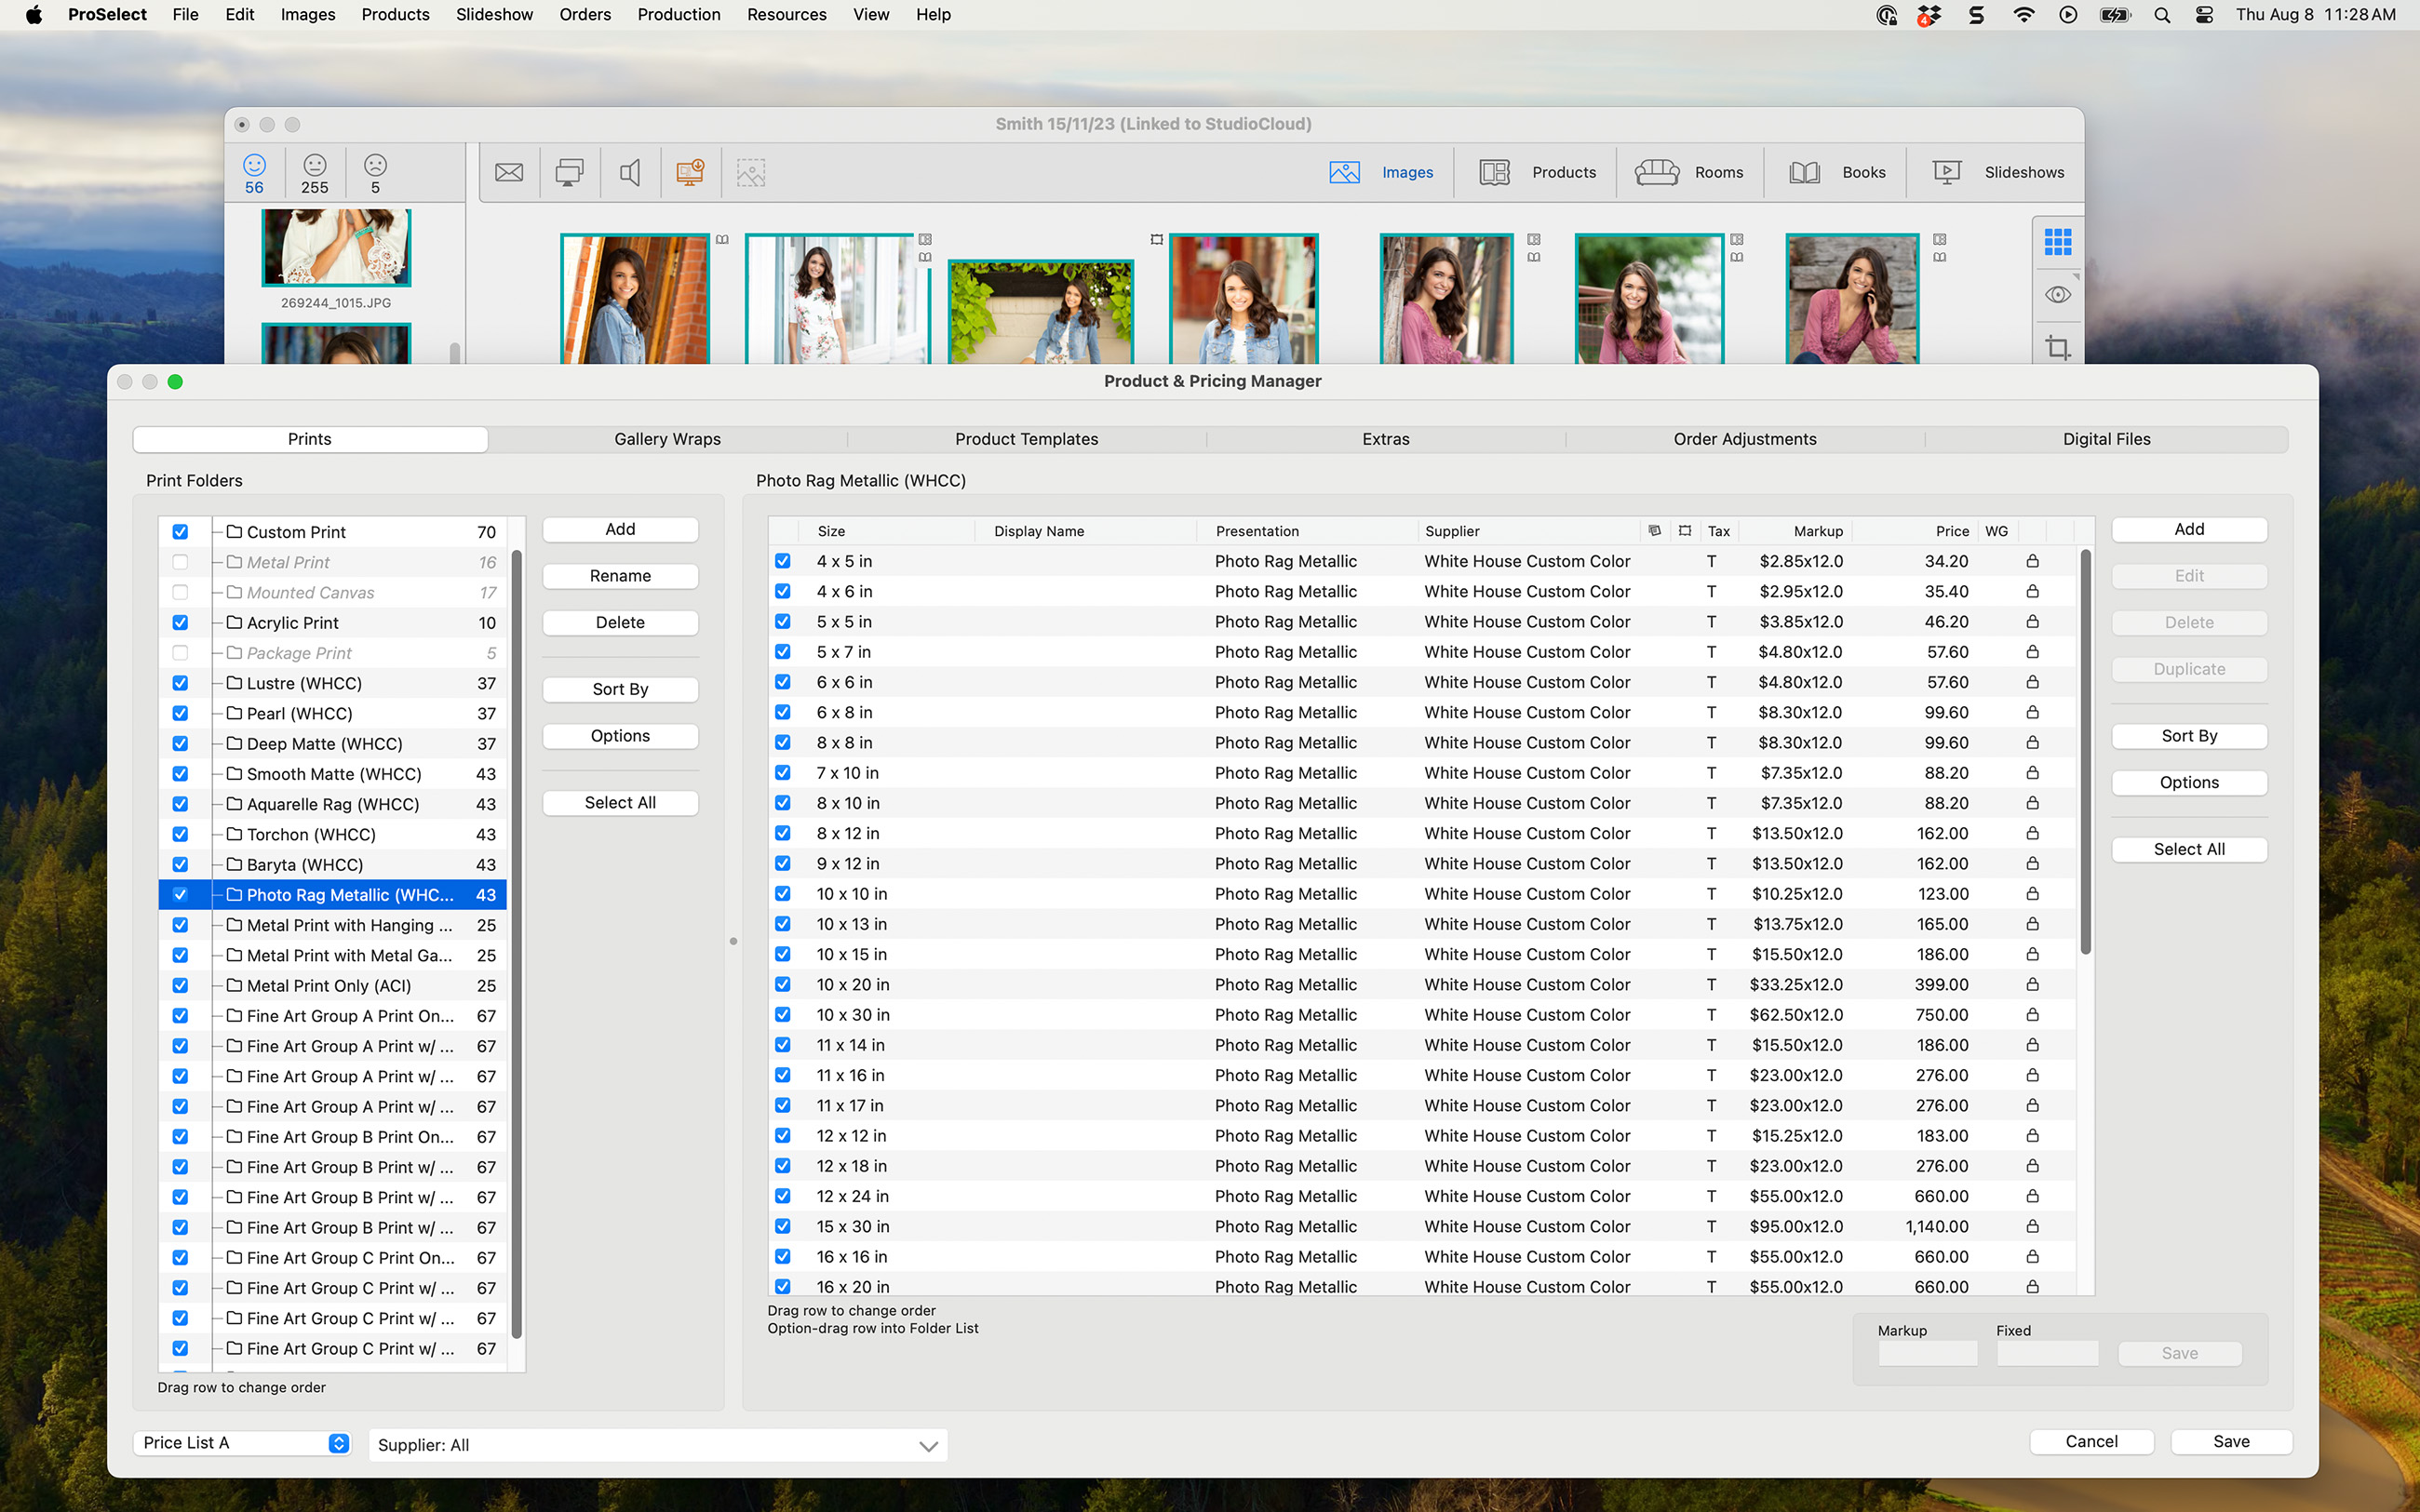
By adjusting the screen resolution to 1920 x 1200, the Product & Pricing Manager window fits on the screen properly.
Adjusting the Resolution on a Mac
- On your computer, go to System Settings > Displays.
- Be sure to select the appropriate screen first before adjusting the resolution.
- Resolution options are displayed using text boxes.
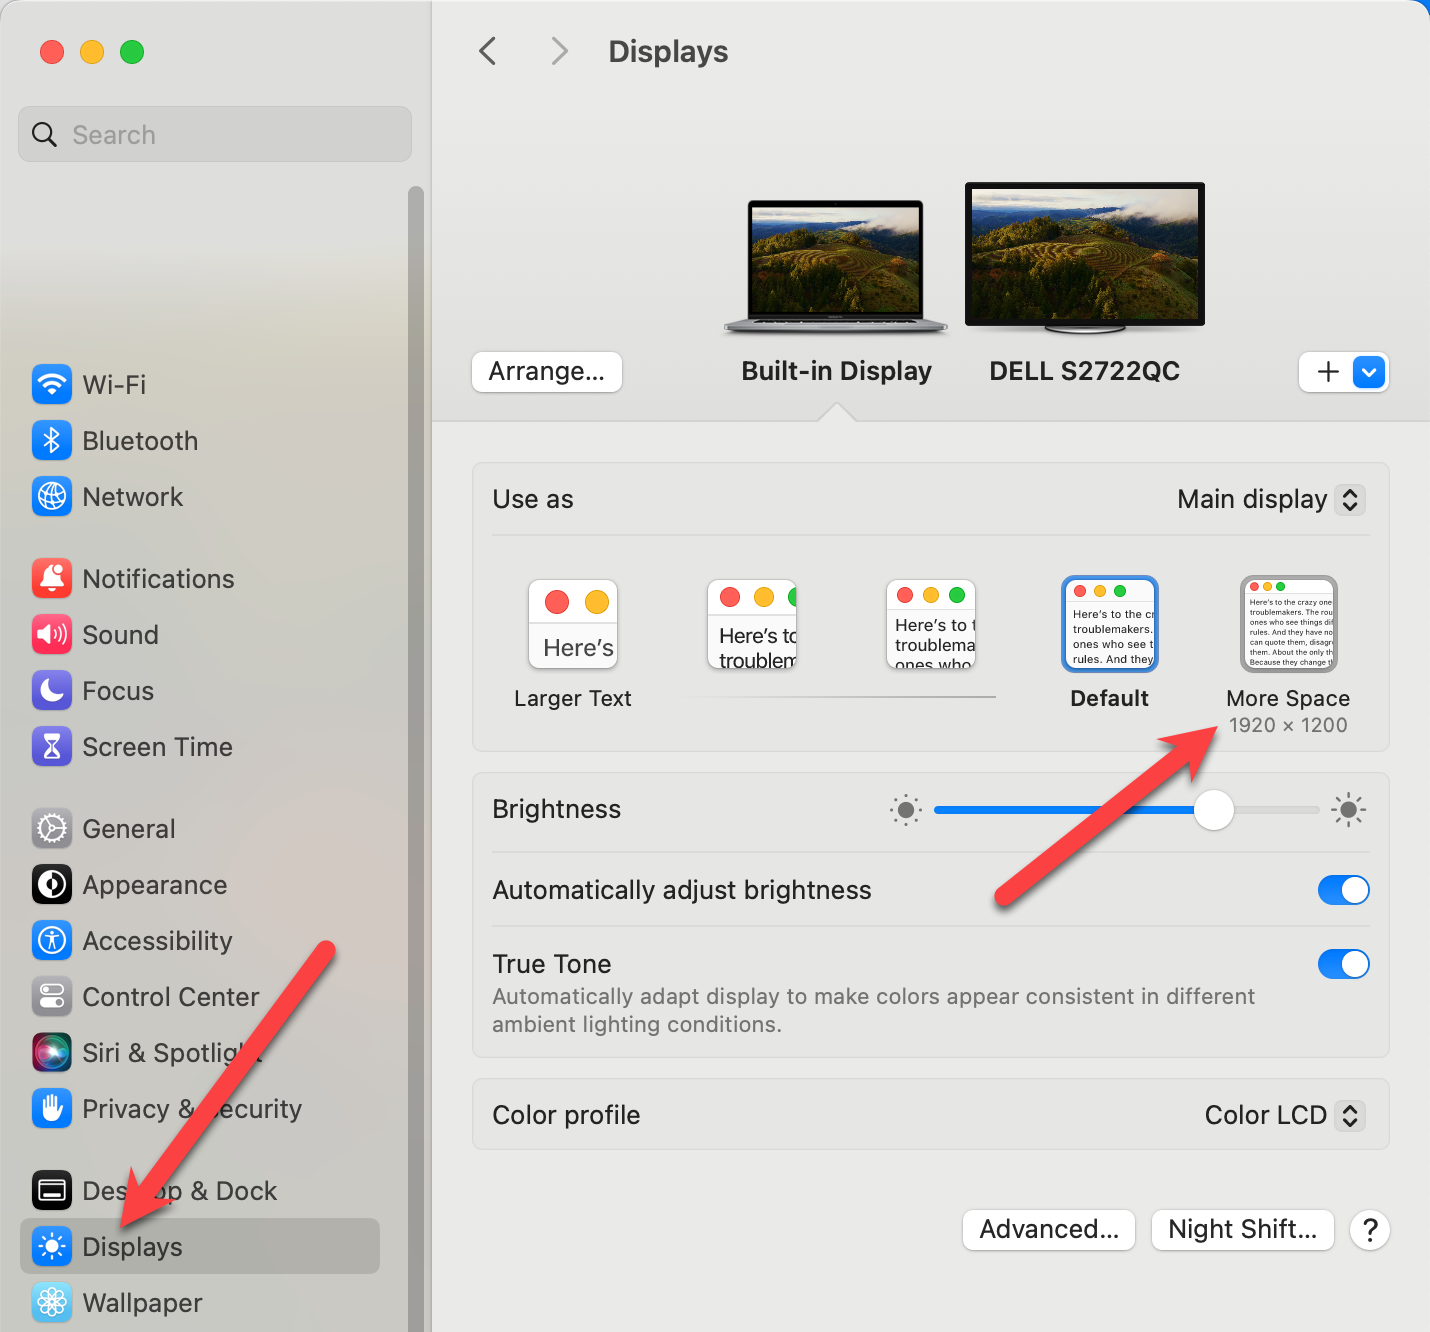
- Mouse over the text boxes to reveal the resolution size in pixels.
- Select the desired size.
- If you want more size options, hold the Option key down while clicking on a text box. This will reveal more resolution options in list format.
Adjusting the Resolution on a Windows Machine
- On your computer, go to Display Settings > Resolution.
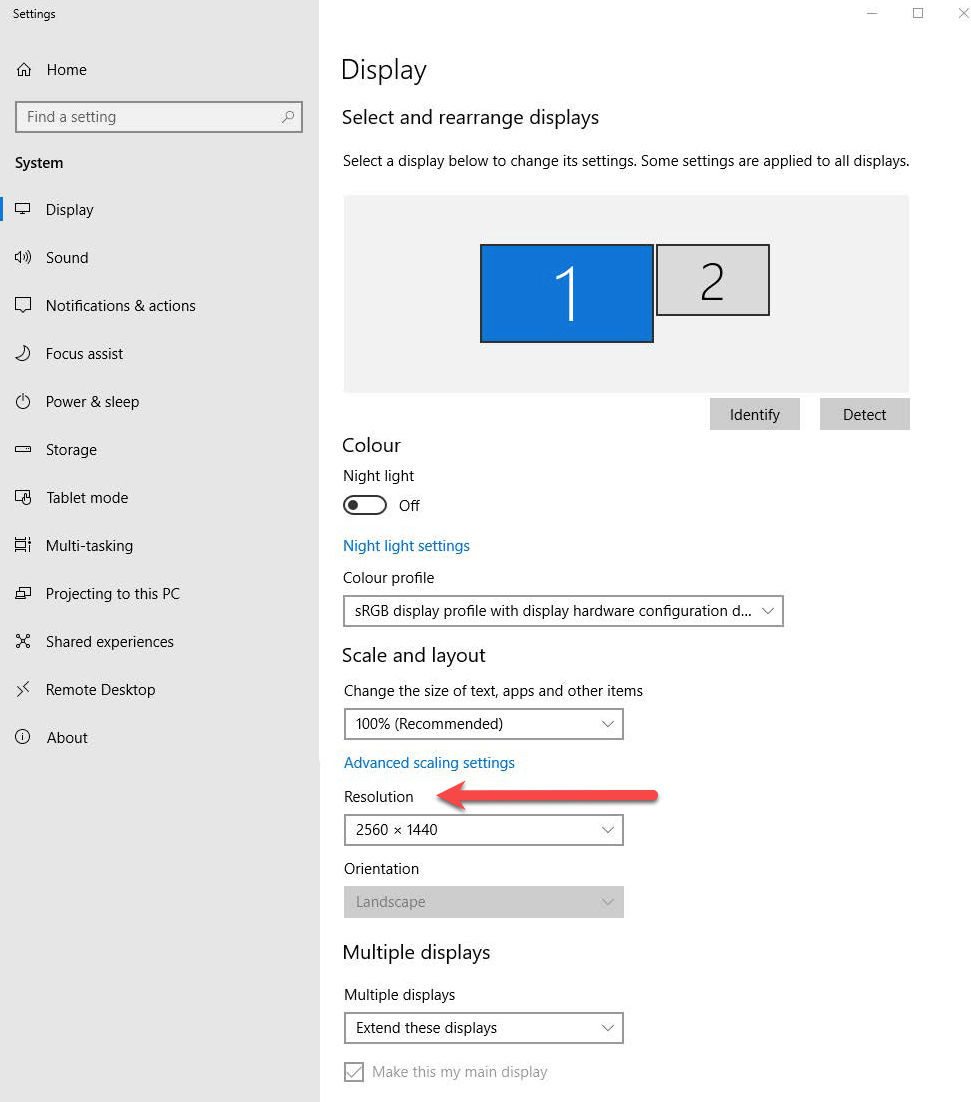
- Be sure to select the appropriate screen first before adjusting the resolution.
- Adjust the resolution in the box. It will be a drop-down list.
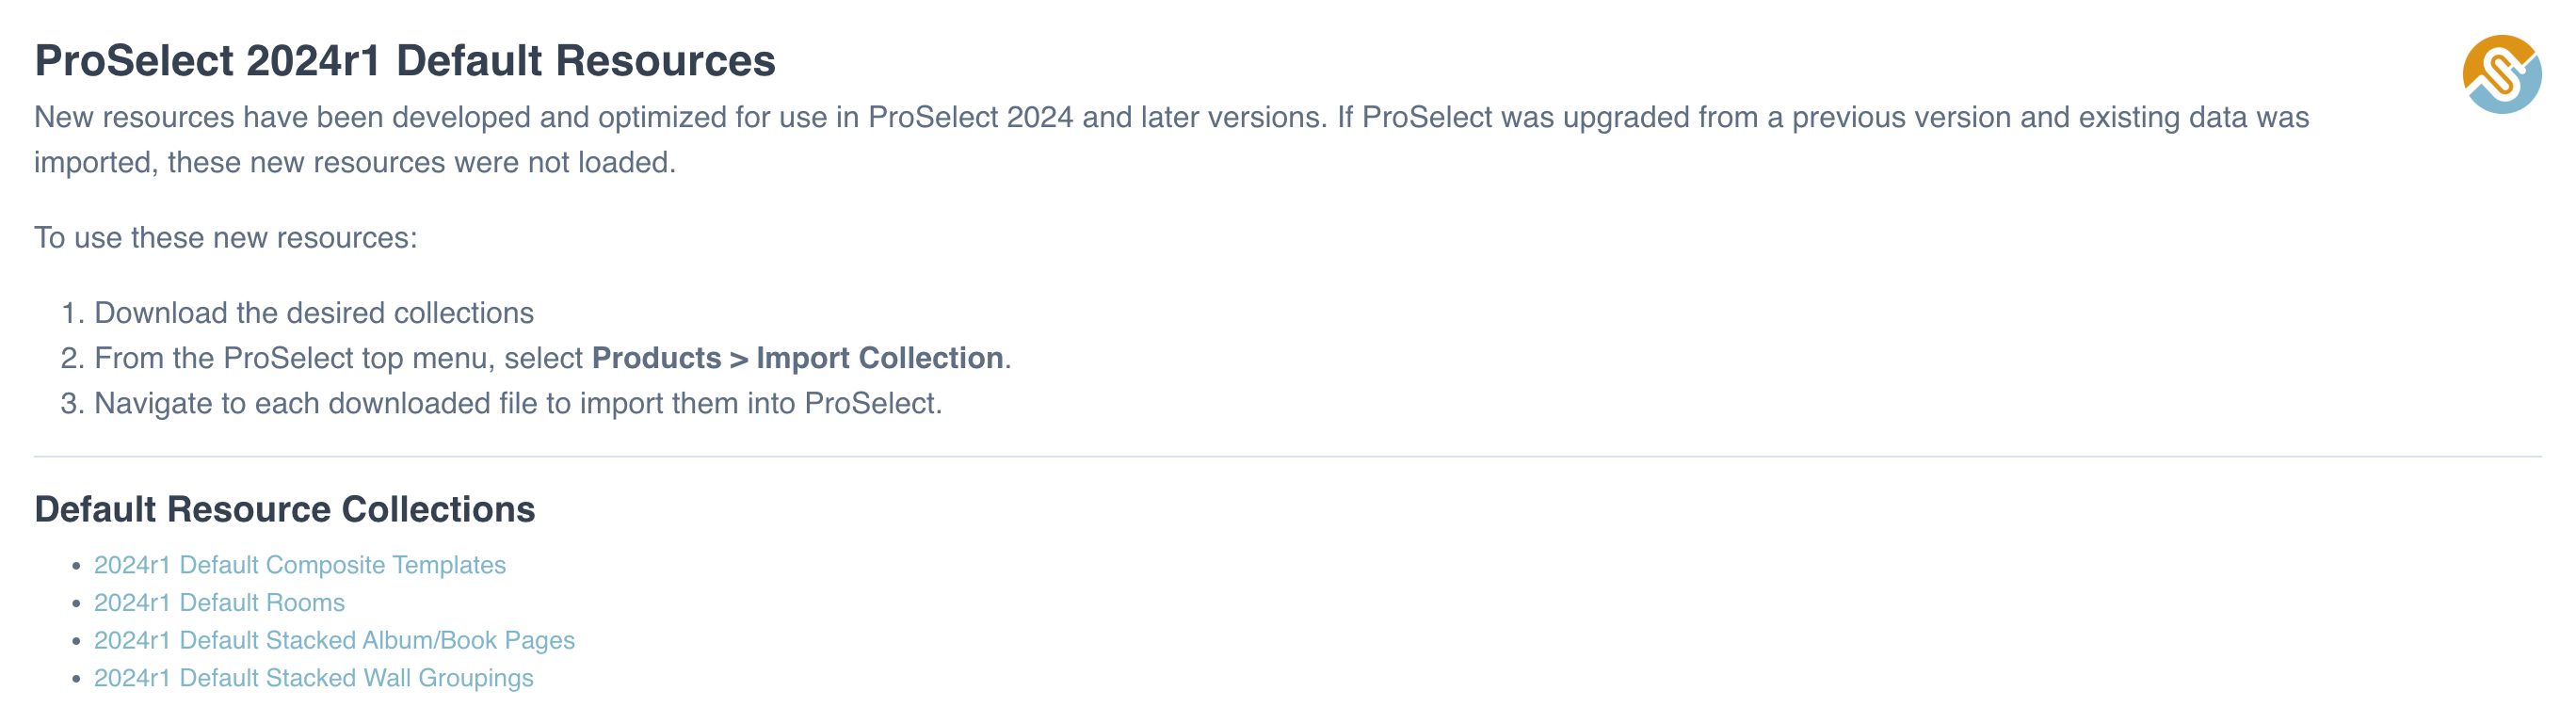
ProSelect default resources are broken down into separate downloadable collections. This means you can pick and choose which parts of the default data to download and install. There are some resources that may only be available from starting new or resetting your system to default.
Access the Default Resources
- Navigate to ProSelect.
- On the top menu, go to File > ProSelect Data > Install Default Resources.
- You will be directed to the Pro Studio Software website.
- From here, click on a collection to download it.
- The collection will download to your designated downloads folder.
- In the downloads folder, double-click the file to unzip (if it did not automatically unzip).
Import Collection in ProSelect
- Navigate back to ProSelect. On the top menu, go to Products > Import Collection.
- Find the collection file (.ppc) on your computer and click "Open" or drag and drop the file into the Image List on the ProSelect main screen.
- The Import Collection dialog will appear.
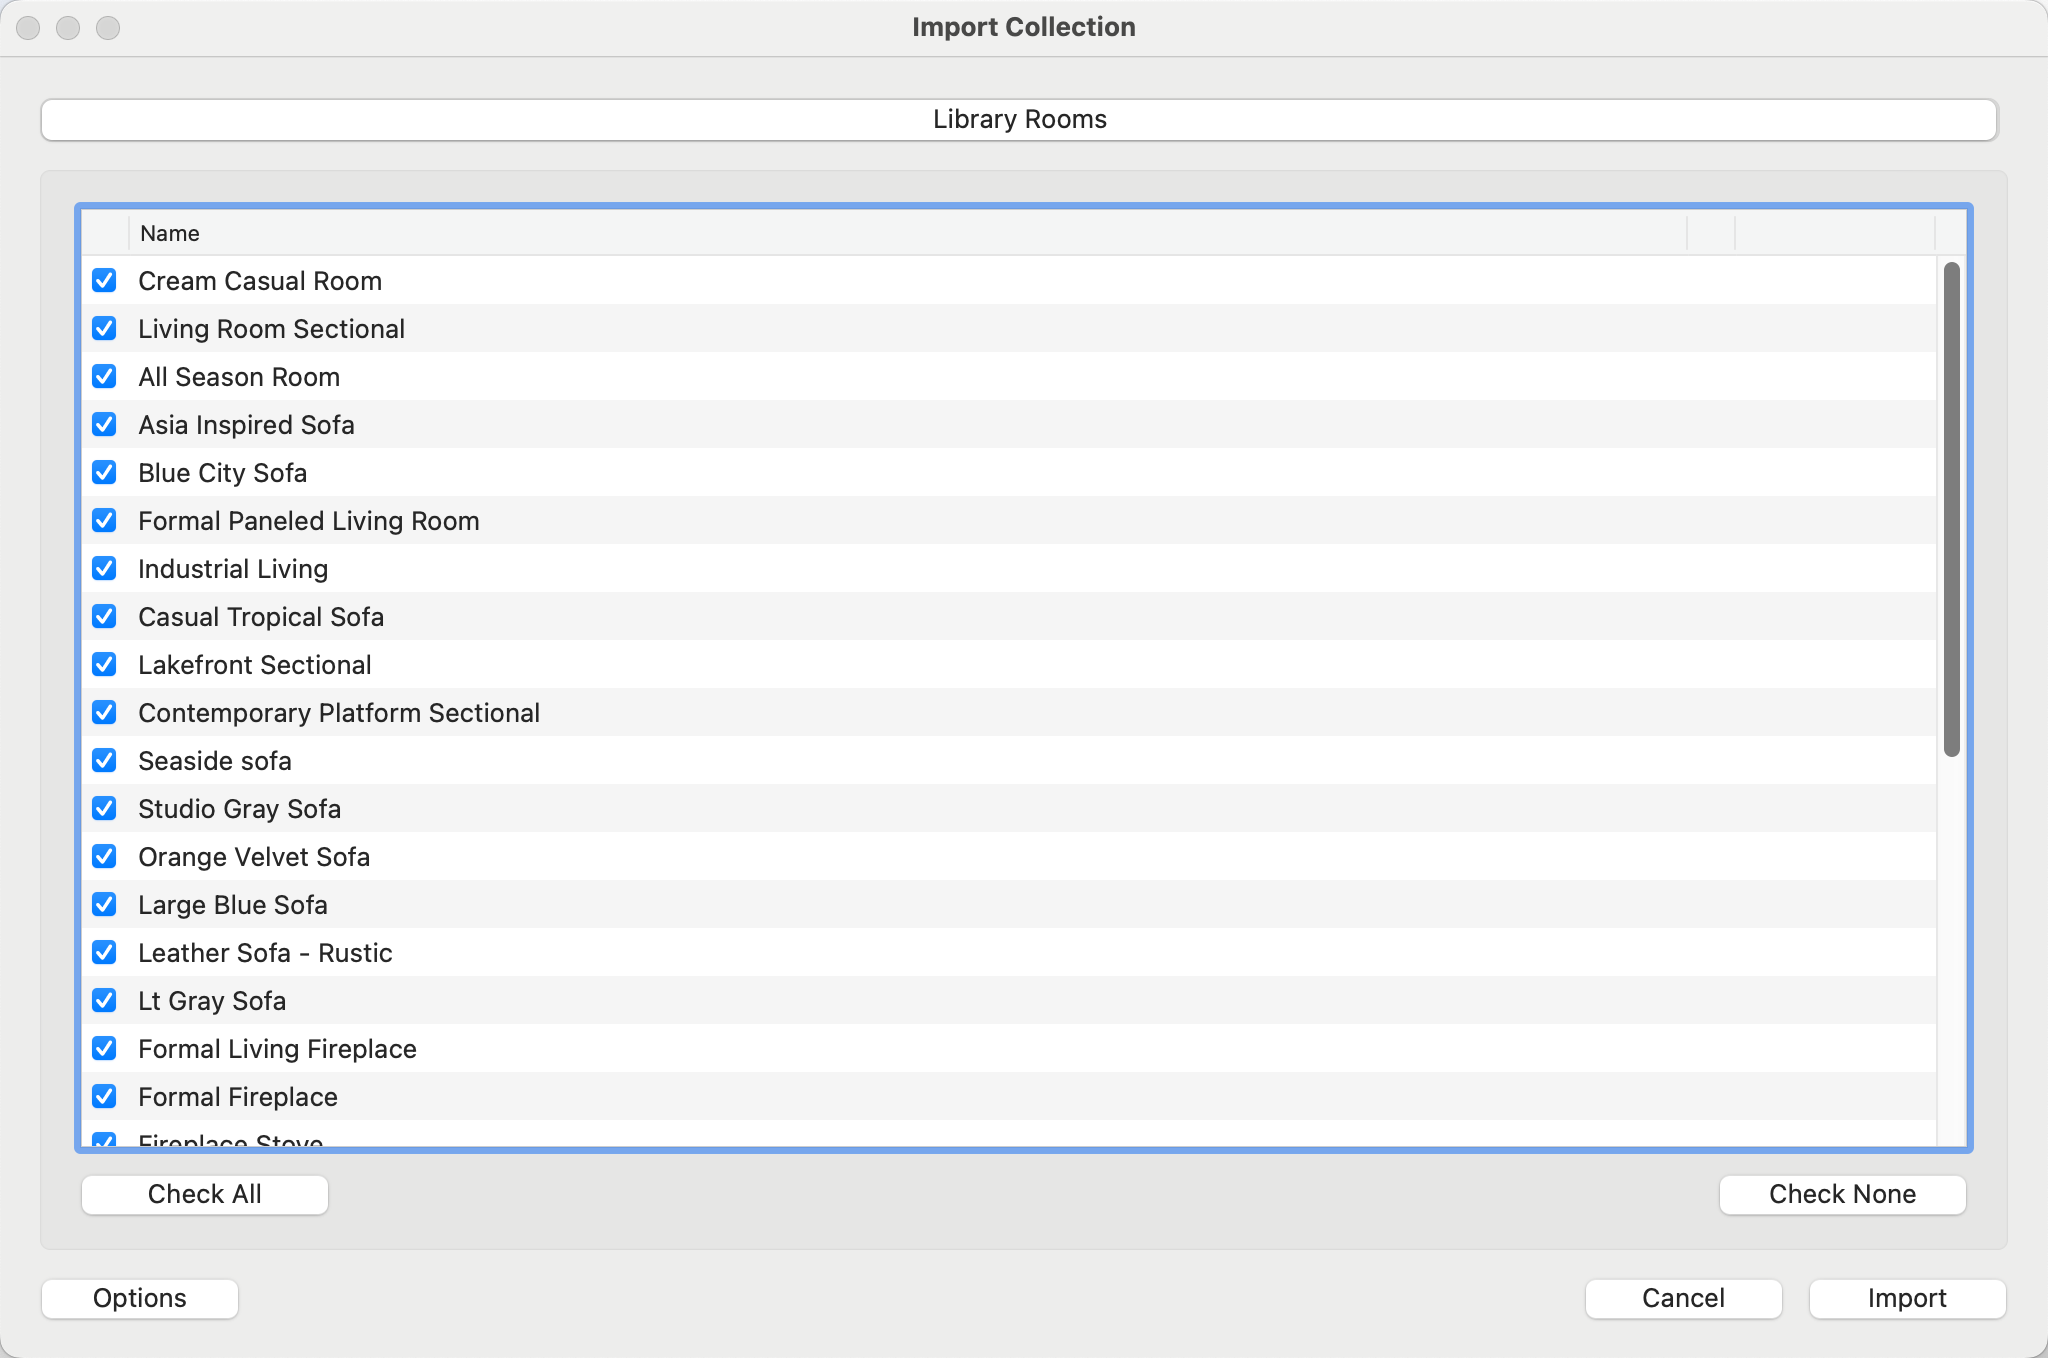
- Use the checkboxes to select which items to import. You can choose to "Check All" and import the entire collection, or "Check None" and select individual elements to import.
- Once you have gone through the tabs and confirmed which items to import, click the Import button.
Import Options
Import options are accessed by clicking on the Options button. These options are relevant to collections which include pricing and/or Photoshop files. In most cases, you should not change these settings.
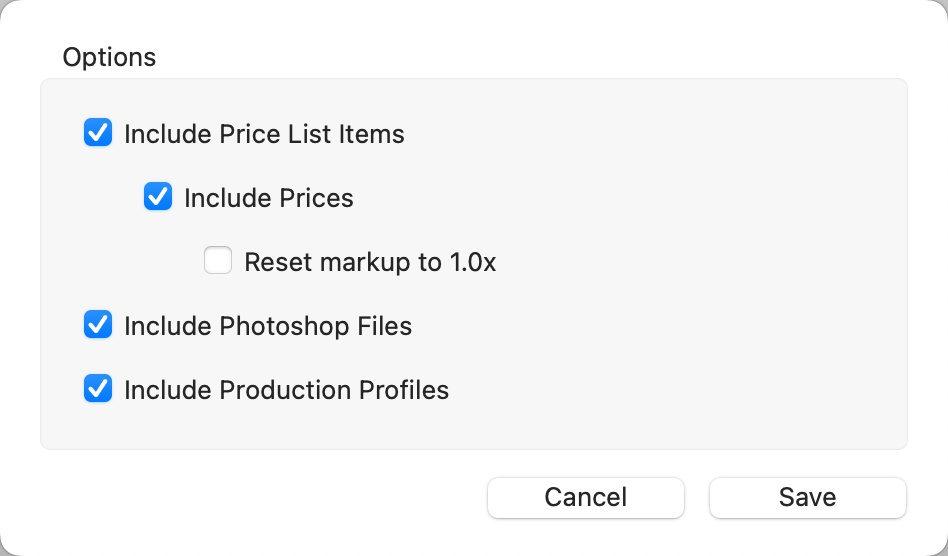
- Include Price List Items: By default, Price List Items will be included in the import as well as their prices. Pricing is imported to ALL Price Lists in ProSelect. Uncheck these boxes if you do not wish to import pricing.
- Reset Markup to 1.0x: If a markup has been utilized when pricing, you have the option of resetting all imported items to a markup of 1.0x.
- Include Photoshop Files: When importing a collection that includes items with associated high-resolution resource images (such as overlay images or mat images), these image files are automatically imported into the designated ProSelect Resources subfolder.
- Include Production Profiles: If any of the imported items have an assigned Production Profile, it will be imported as well. Uncheck the box if you do not wish Production Profiles to be imported.
If the Collection includes items already present in your ProSelect setup, these will be indicated as 'Conflict' in the right-hand column of the import window. You can resolve these conflicts by clicking on the down arrow and choosing either to Replace or Add the items. You can multi-select and apply either "Replace" or "Add" to more than one item at a time.
(a) Replace the existing items with those from the Collection.
(b) Add the Collection items as a new group, distinct from existing ones.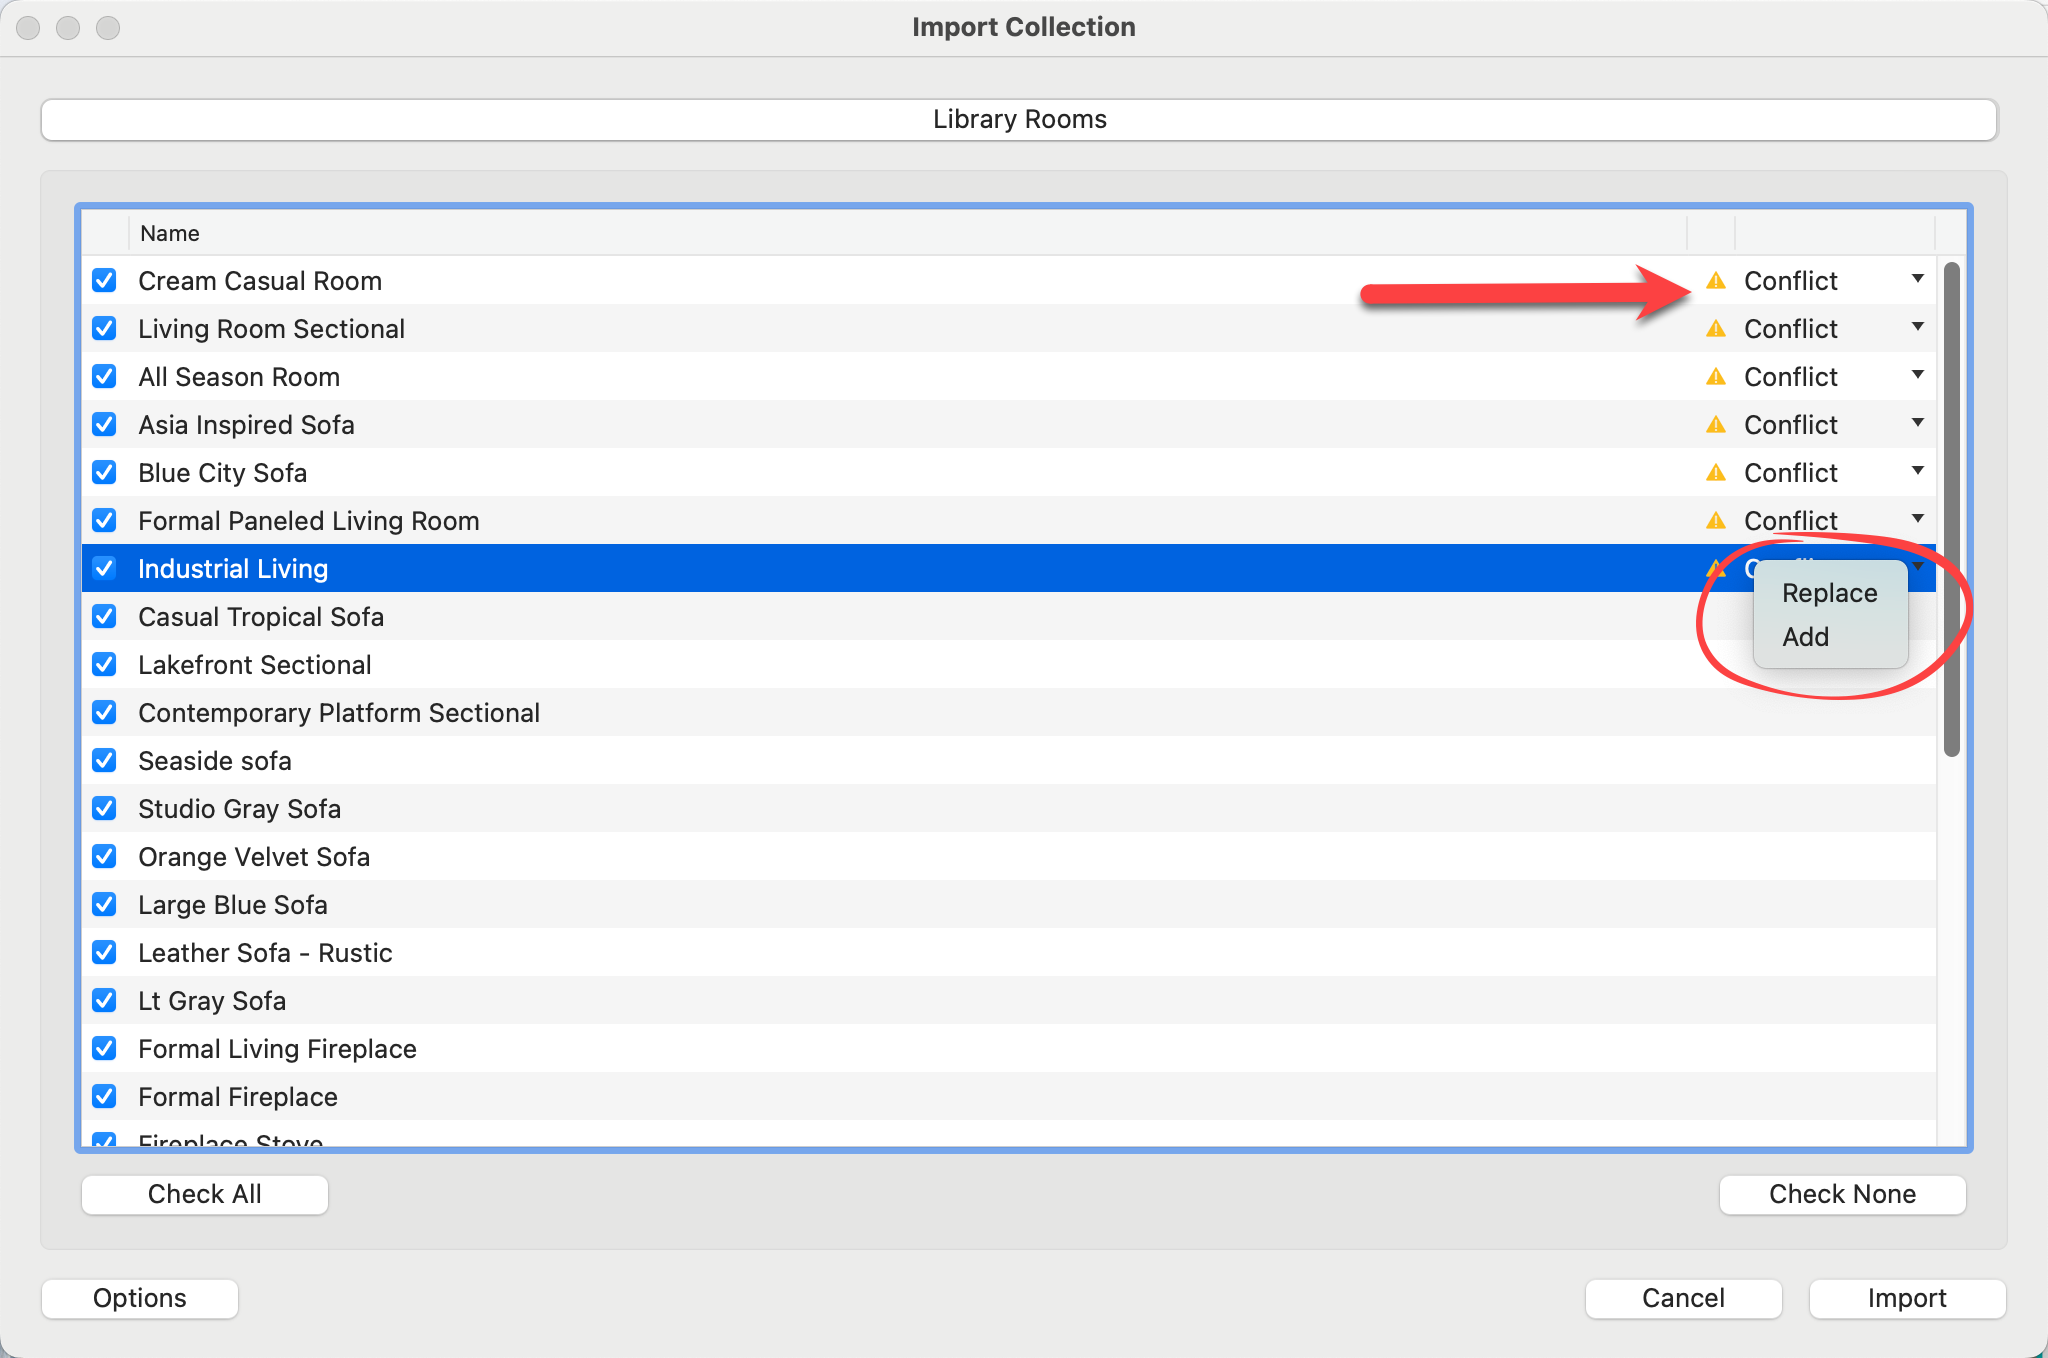
When adding a new group, ProSelect appends the current date (in YYYYMMDD format) to the name of the imported group. This helps differentiate it from any pre-existing groups and assists in managing multiple versions or variations of similar items.