 Sharing Data Between Computers
Many studios use multiple computers in their operation. Each computer using ProSelect must have the most recent pricing and product information available. ProSelect utilizes three primary data components:
- ProSelectData.xml File: This is a simple text file that holds important information such as pricing, paper sizes, template parameters, and references to overlays, backgrounds, frames, logos, and more.
- ProSelect Resources Folder: This directory contains essential elements like background images (used in styles and slideshow styles), template overlays, music, frames, library video content, room views, and more.
- ProSelect Settings File: Another XML text file, this one stores your ProSelect settings, registration information, a list of recently opened albums, window locations, etc.
For automatic synchronization of ProSelect data across multiple computers, each system must have access to both the ProSelectData.xml file and the ProSelect Resources folder. This setup ensures that all settings and resources are consistently updated and available on every machine using ProSelect.
Shared Folder
Using a shared folder involves setting up a common folder accessible to all users where the ProSelect data files are stored.
-
- Stores the ProSelect_Data.xml file IN the ProSelect Resources folder on the same network.
- Loads the shared copy on startup.
- Automatically saves any changes back to the shared location immediately after they are made.
- Click on Setup Shared Folder to use this method.
- Once setup is complete, the Shard Folder icon will appear on the ProSelect main interface on the top bar.
Ensure that all computers involved in sharing data are running the same version of ProSelect. This prevents data loss that can occur if an older version of the software accesses and potentially strips out data that only newer versions recognize.
If you only need to transfer ProSelect data to another computer occasionally, follow these steps to copy your ProSelect_Data.xml file and the ProSelect Resources folder. You can then transfer this to another computer. You can optionally transfer your Settings to maintain a consistent setup.
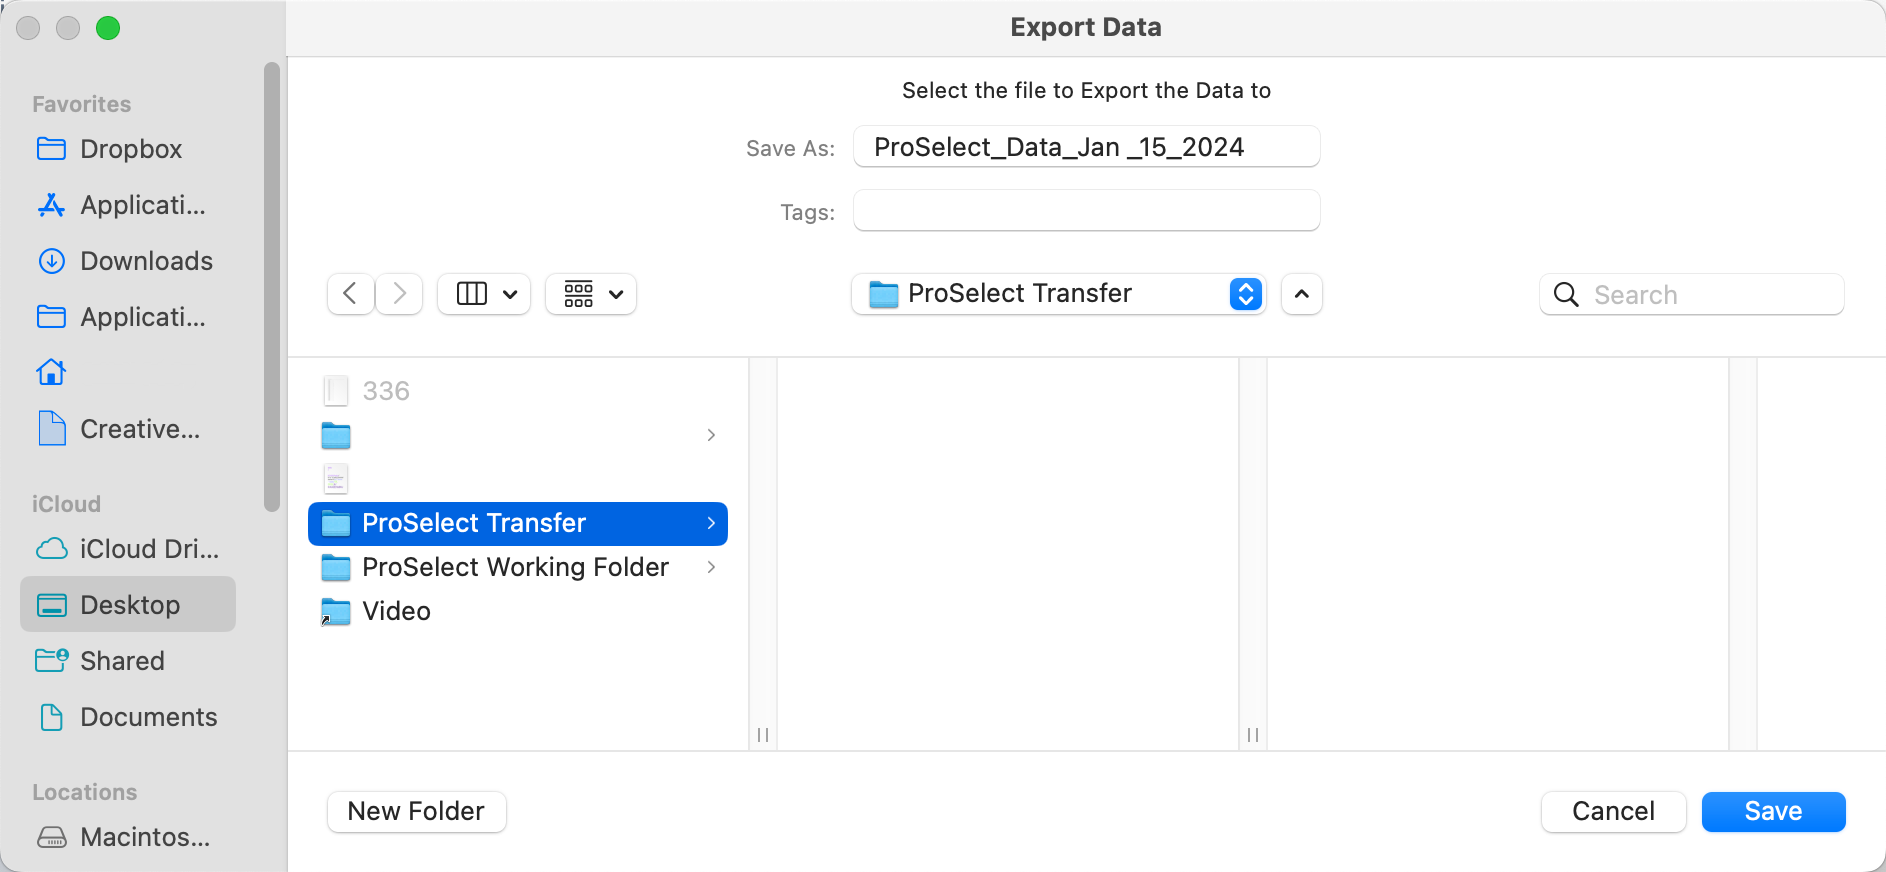
Step 1: Copy your ProSelect Data File
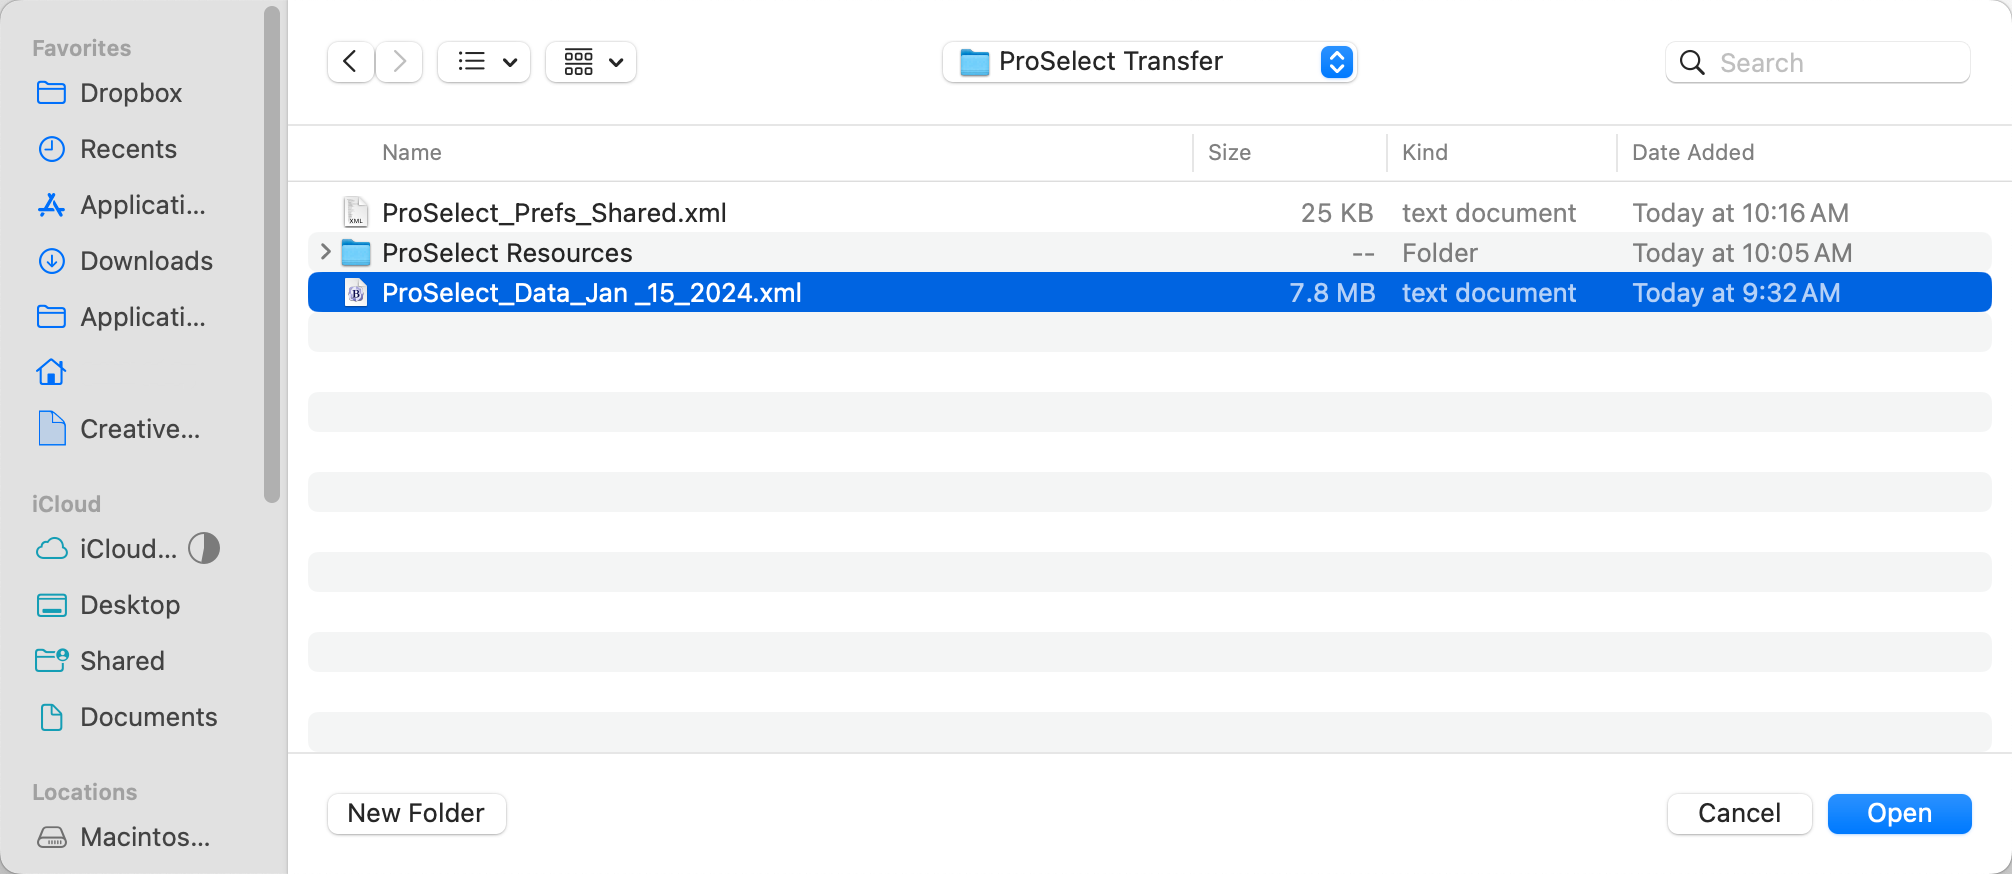
- In ProSelect, go to the top menu, File > ProSelect Data > Export Data to.
- Save the data file (.xml) to your computer (in this case, a folder called "ProSelect Transfer") or an external drive.
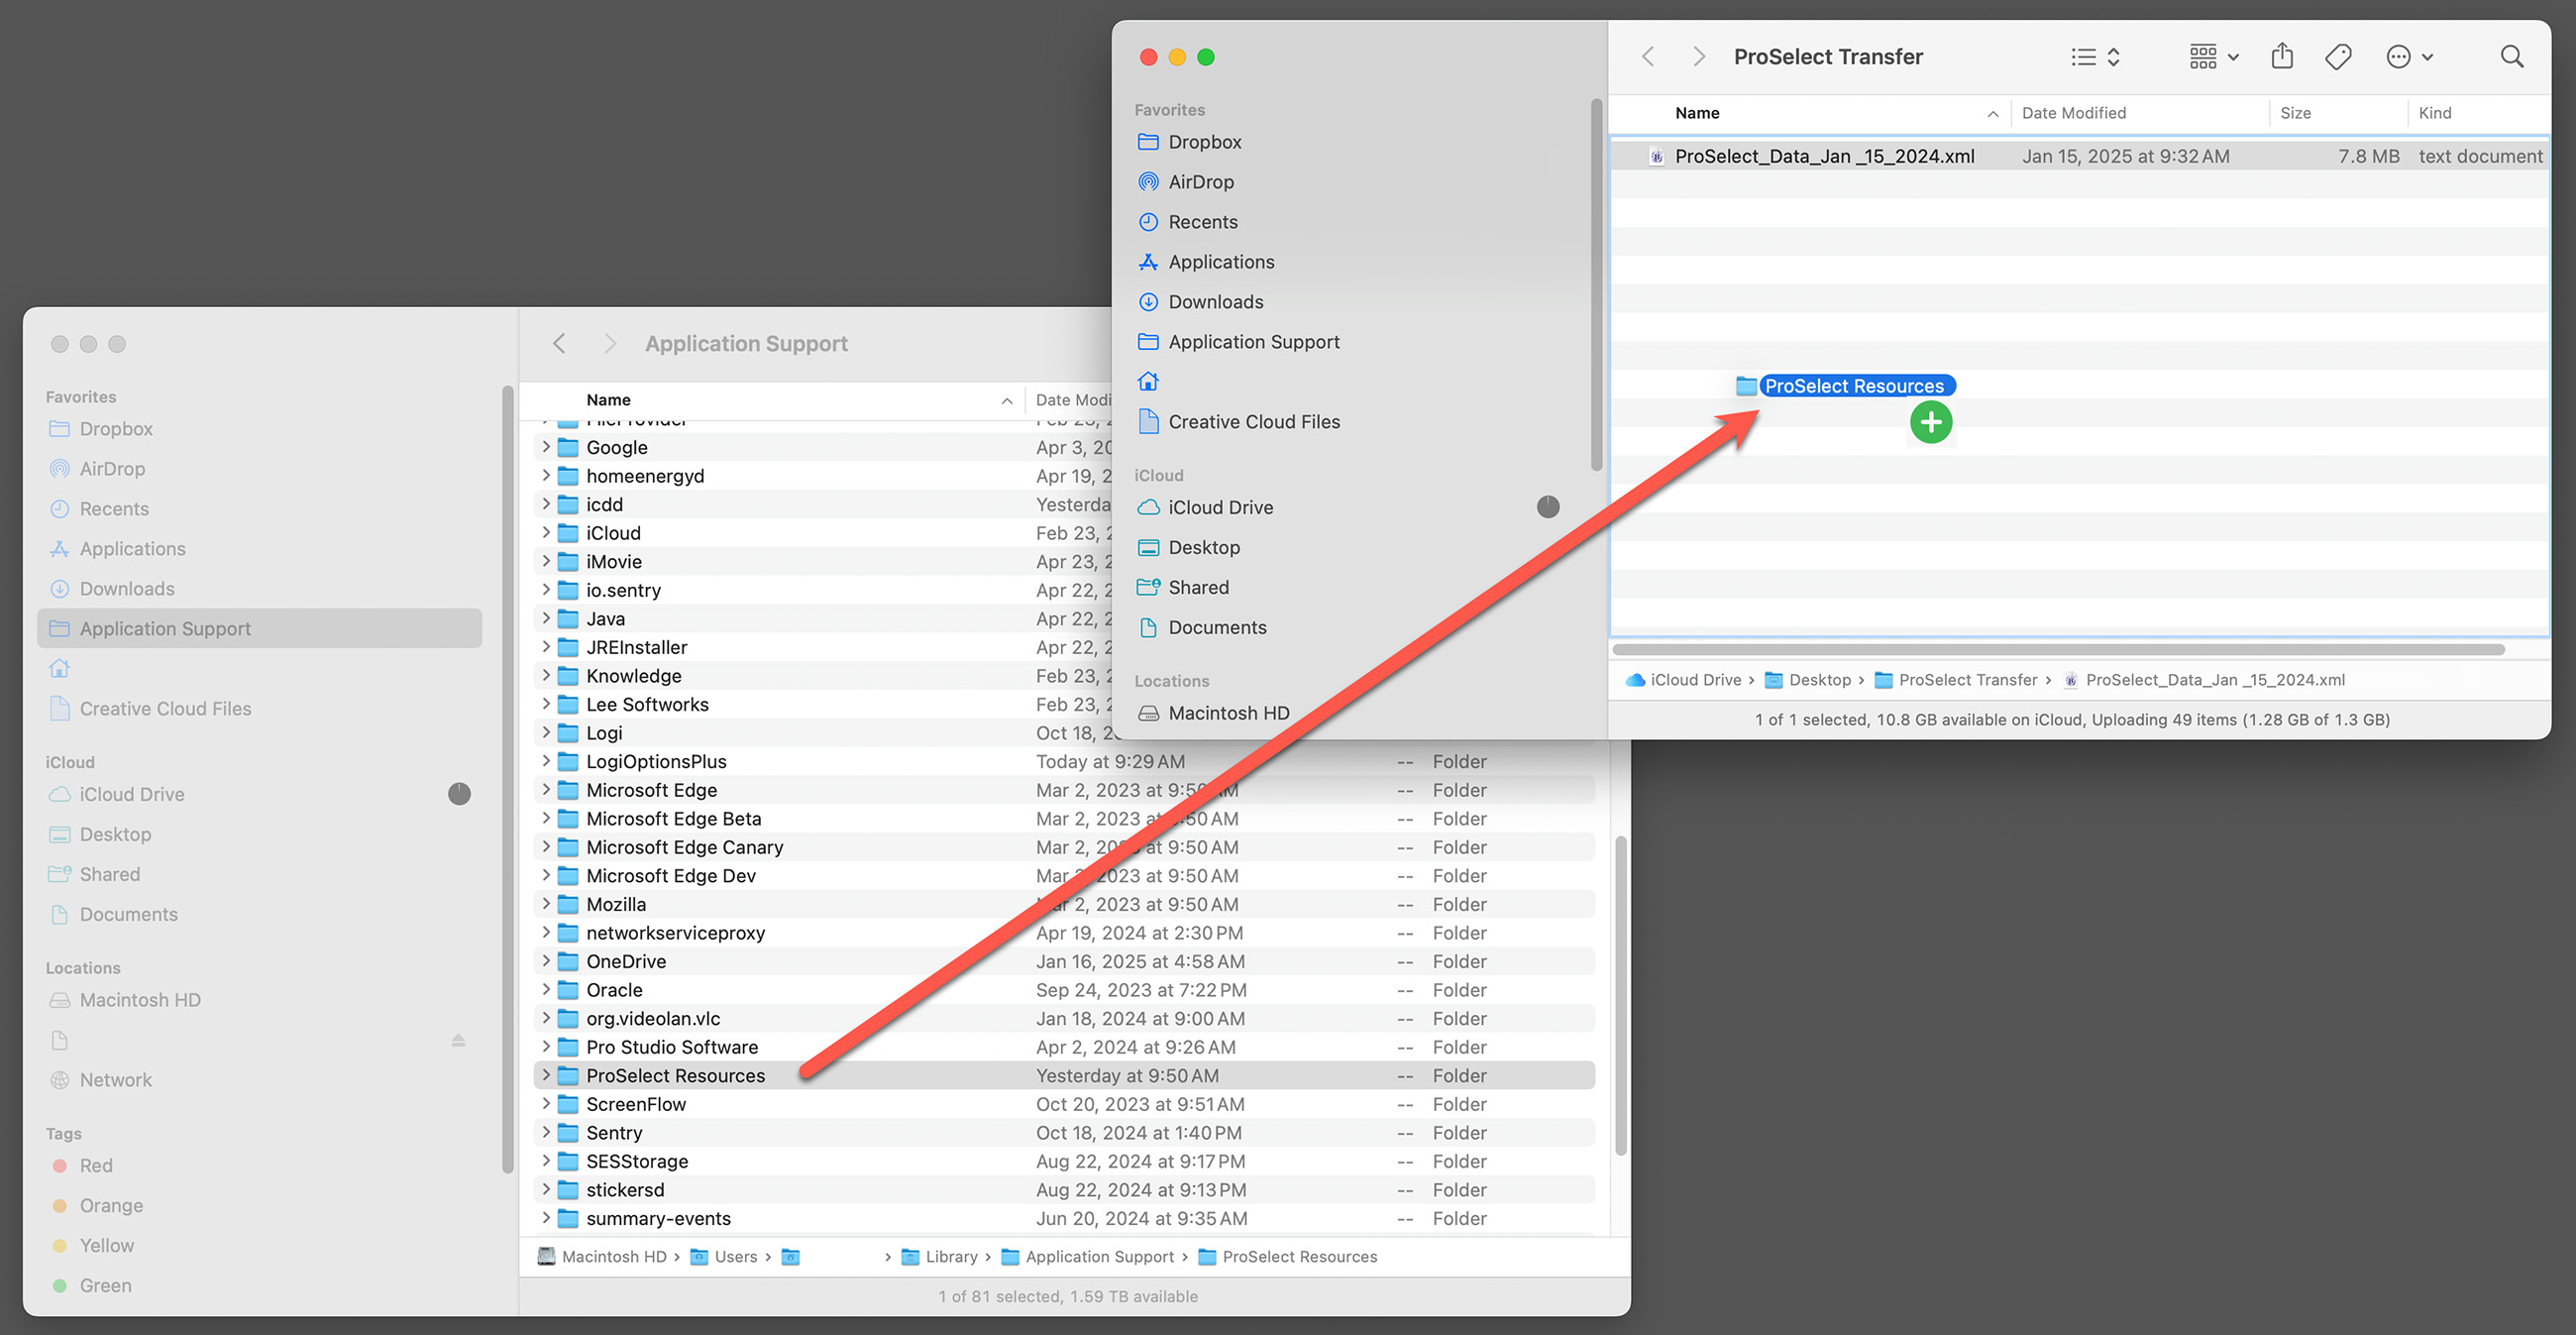
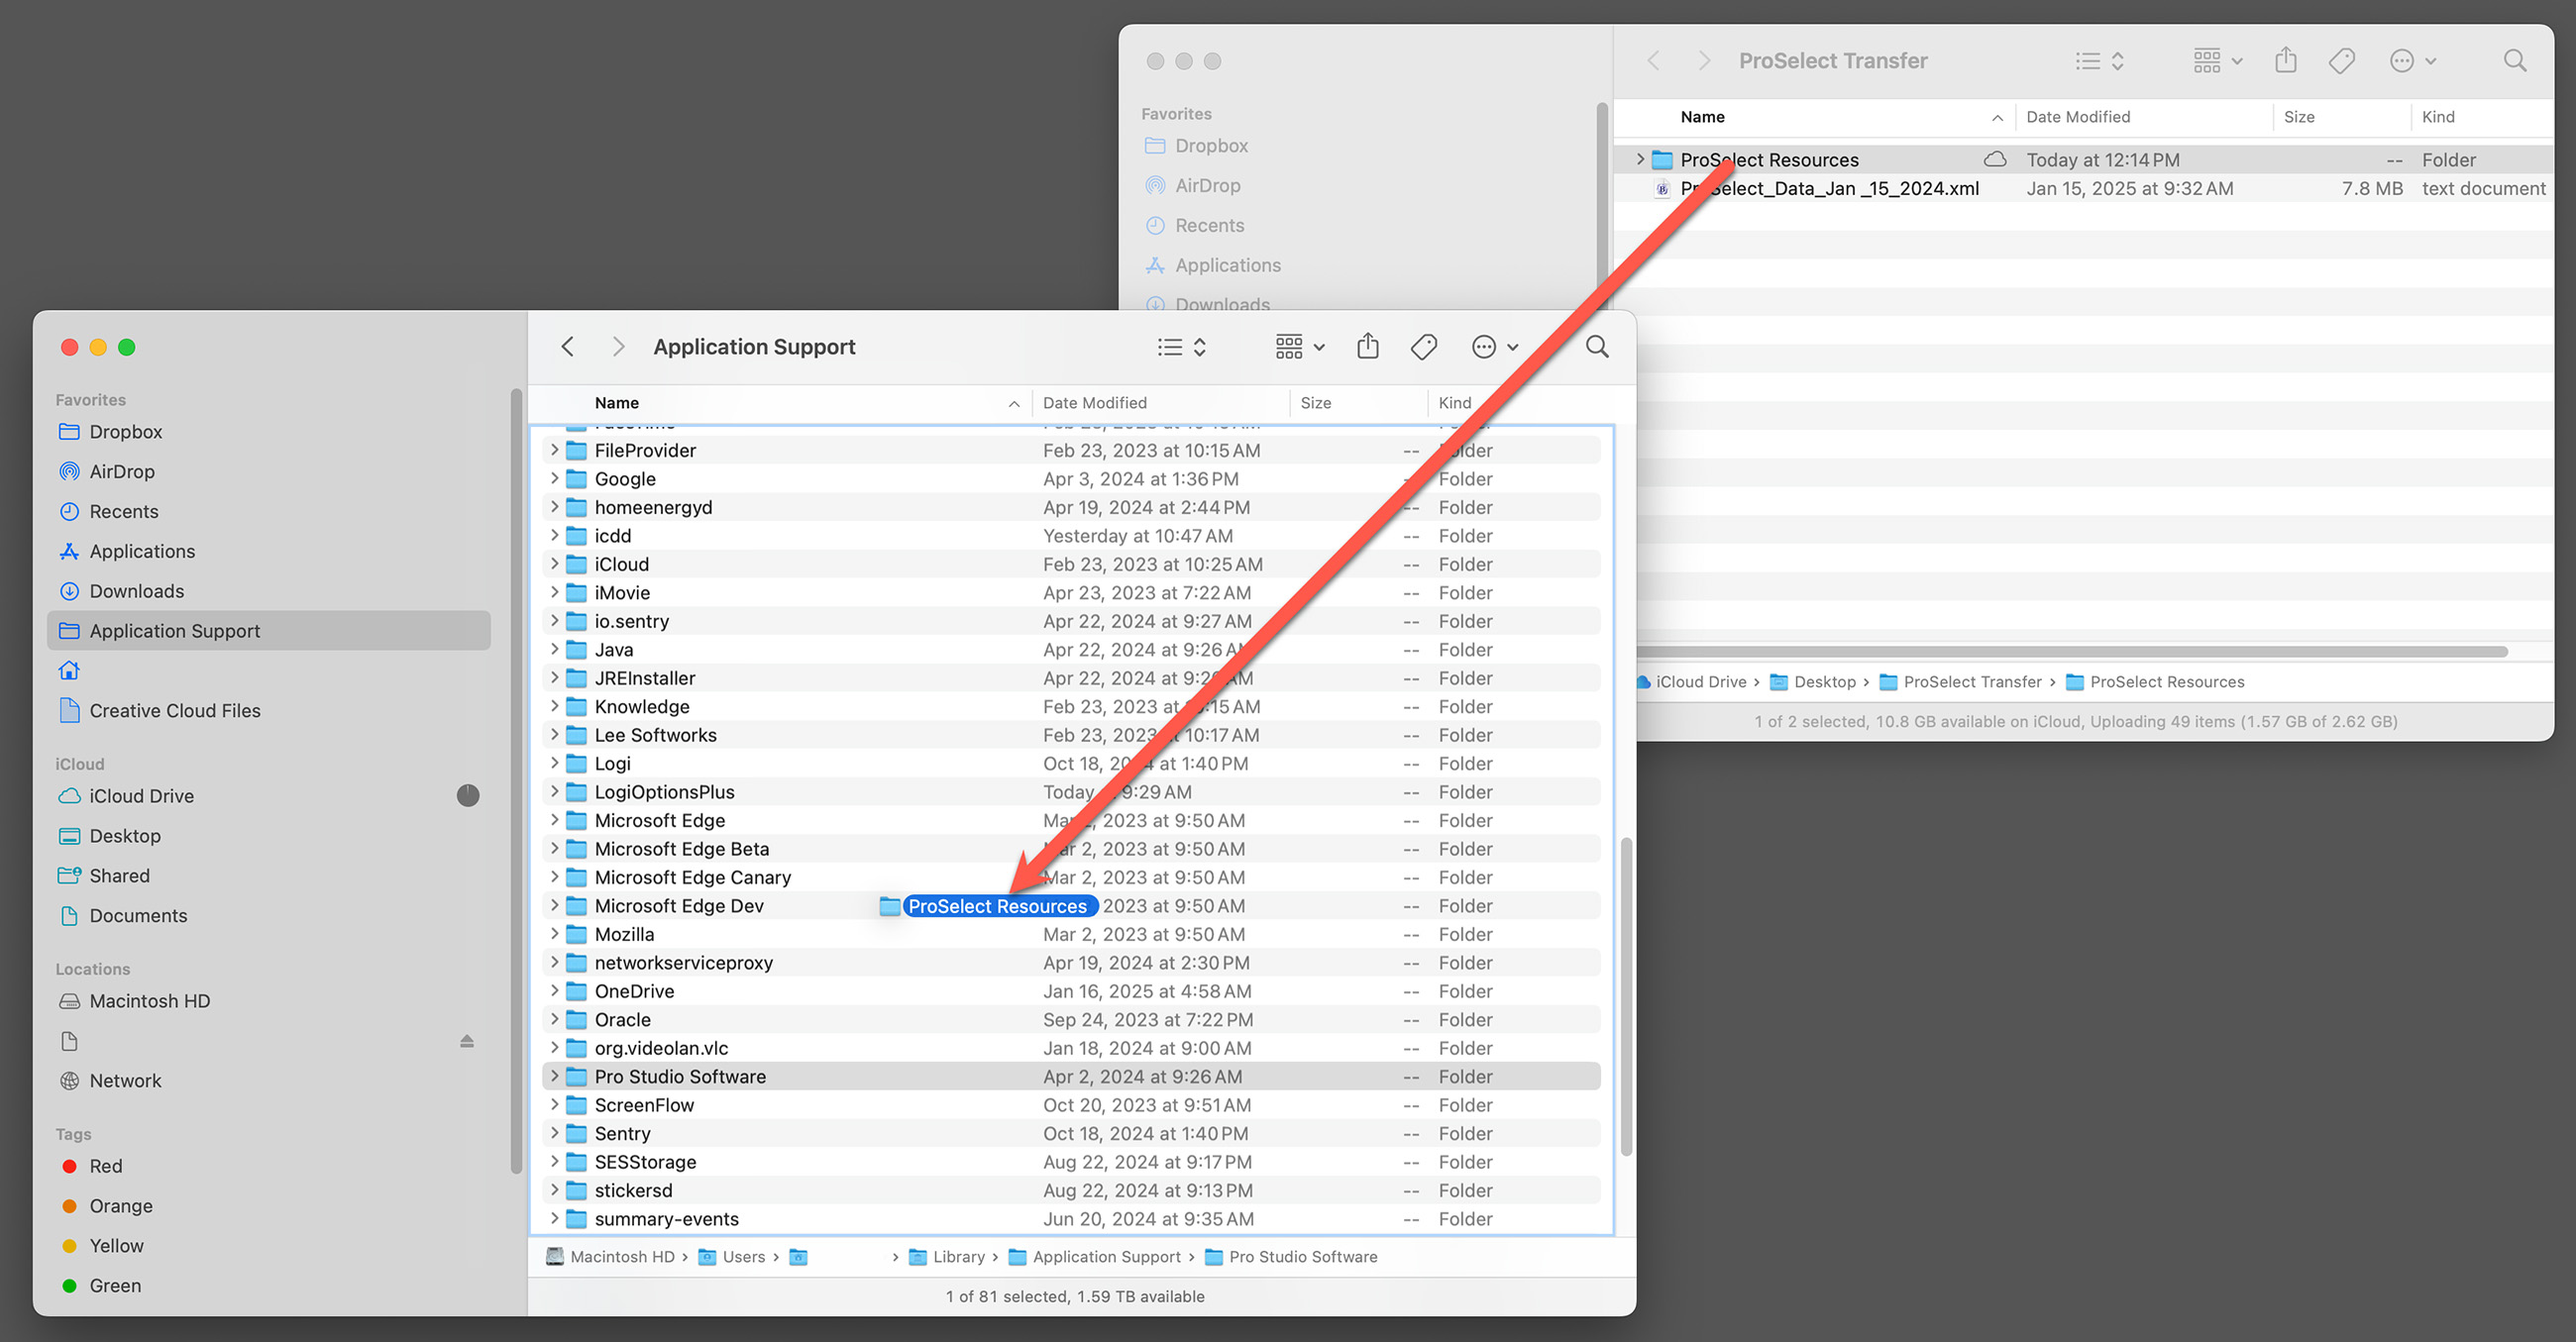
Step 2: Copy the ProSelect Resource Folder
- In ProSelect, go to the top menu, Resources > ProSelect Resources Folder > Show in FinderExplorer.
- Open the folder you are transferring to the other computer. In this case, we created a folder on our desktop called "ProSelect Transfer."
- With both windows open, hold down the OptionCtrl key and drag the ProSelect Resources folder across to the transfer folder. This action creates a copy of the folder, instead of moving it. A green circle with a plus indicates the copy.
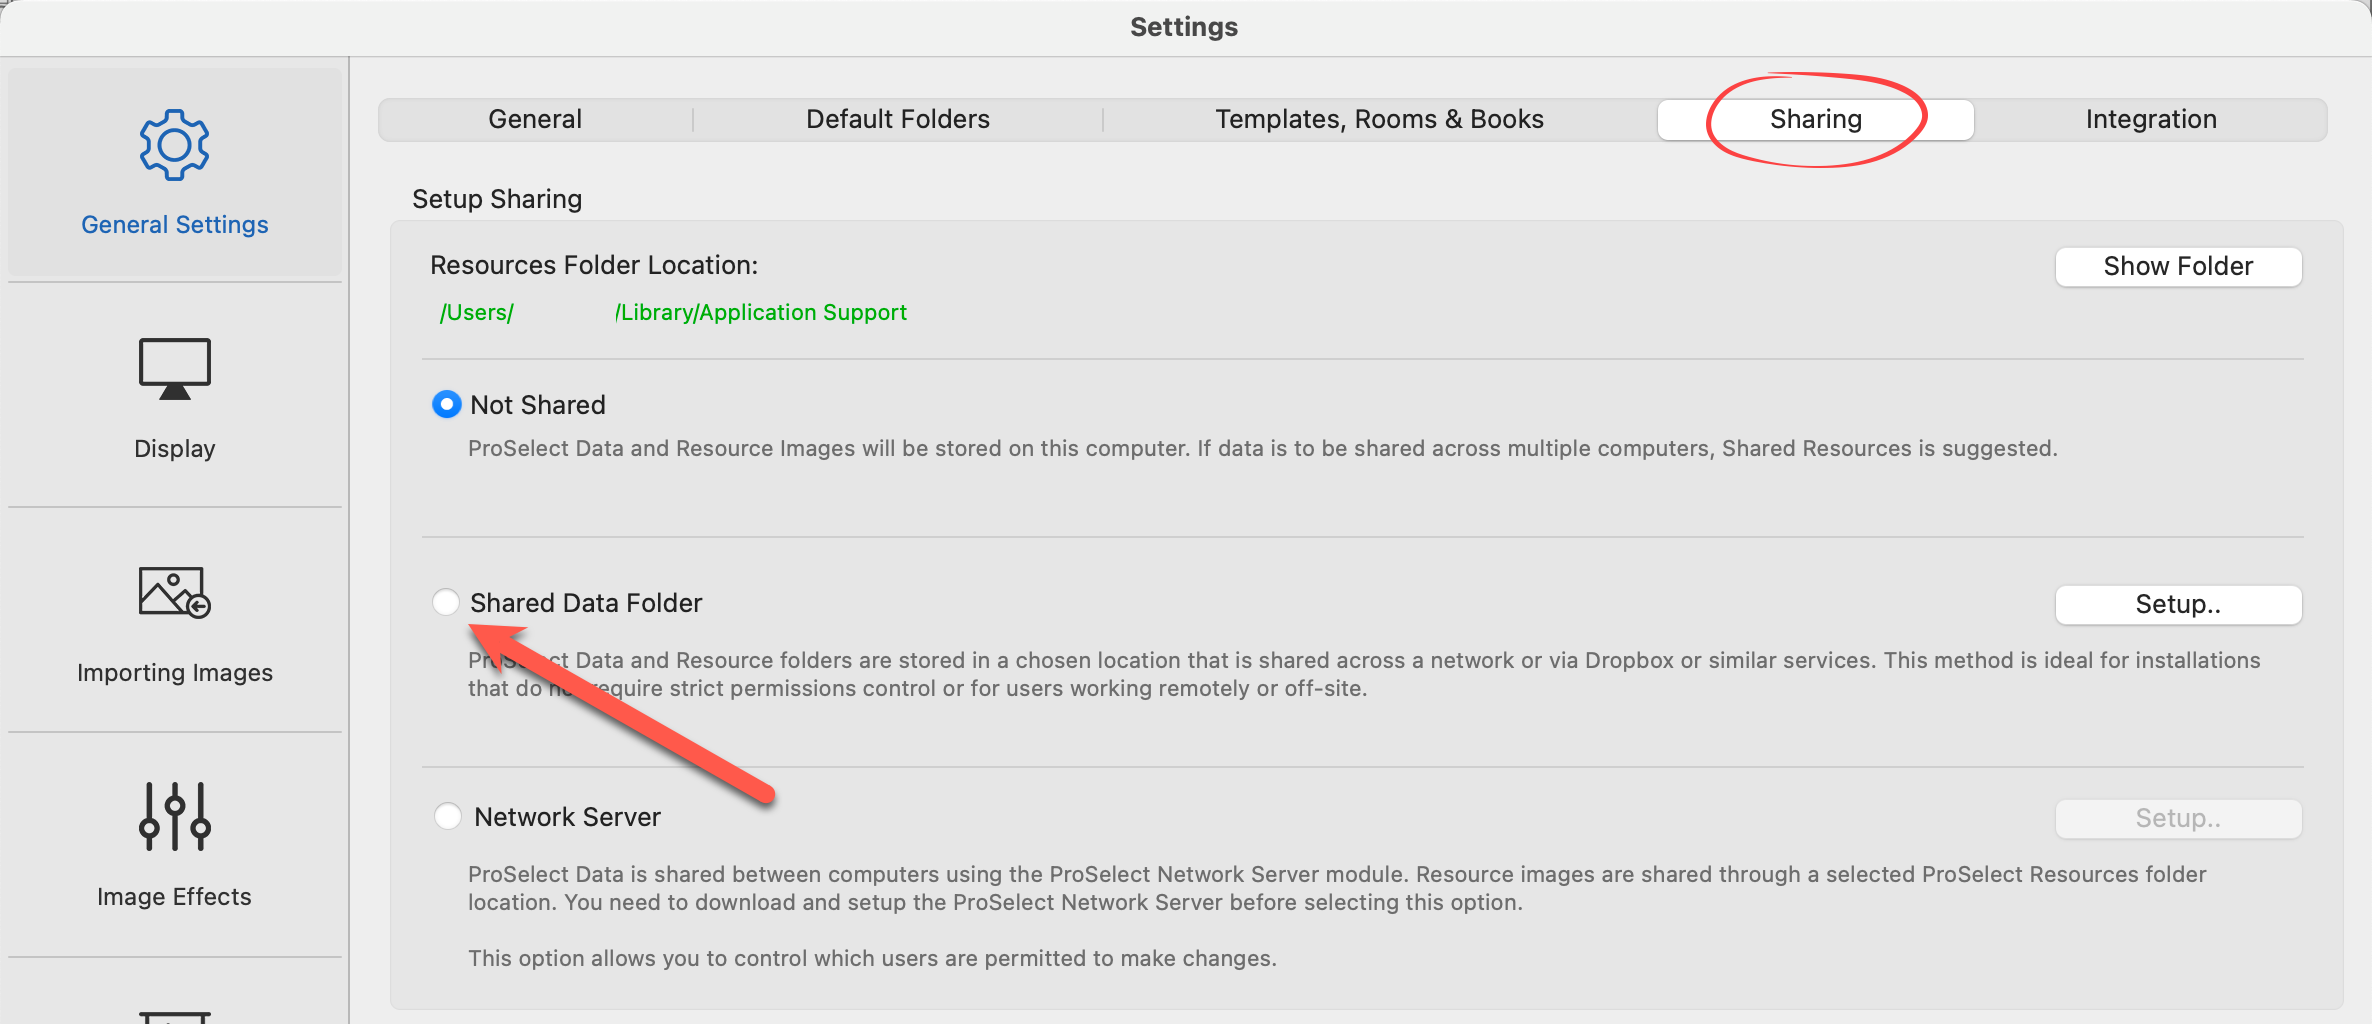
Step 3: Copy your Settings (optional)
- In ProSelect, go to the top menu, ProSelectEdit > Settings.
- Under General Settings, select the "Sharing" tab.
- In the Sharing Settings area, select "Selected Folder" and click on the Save button (next to the Load button).
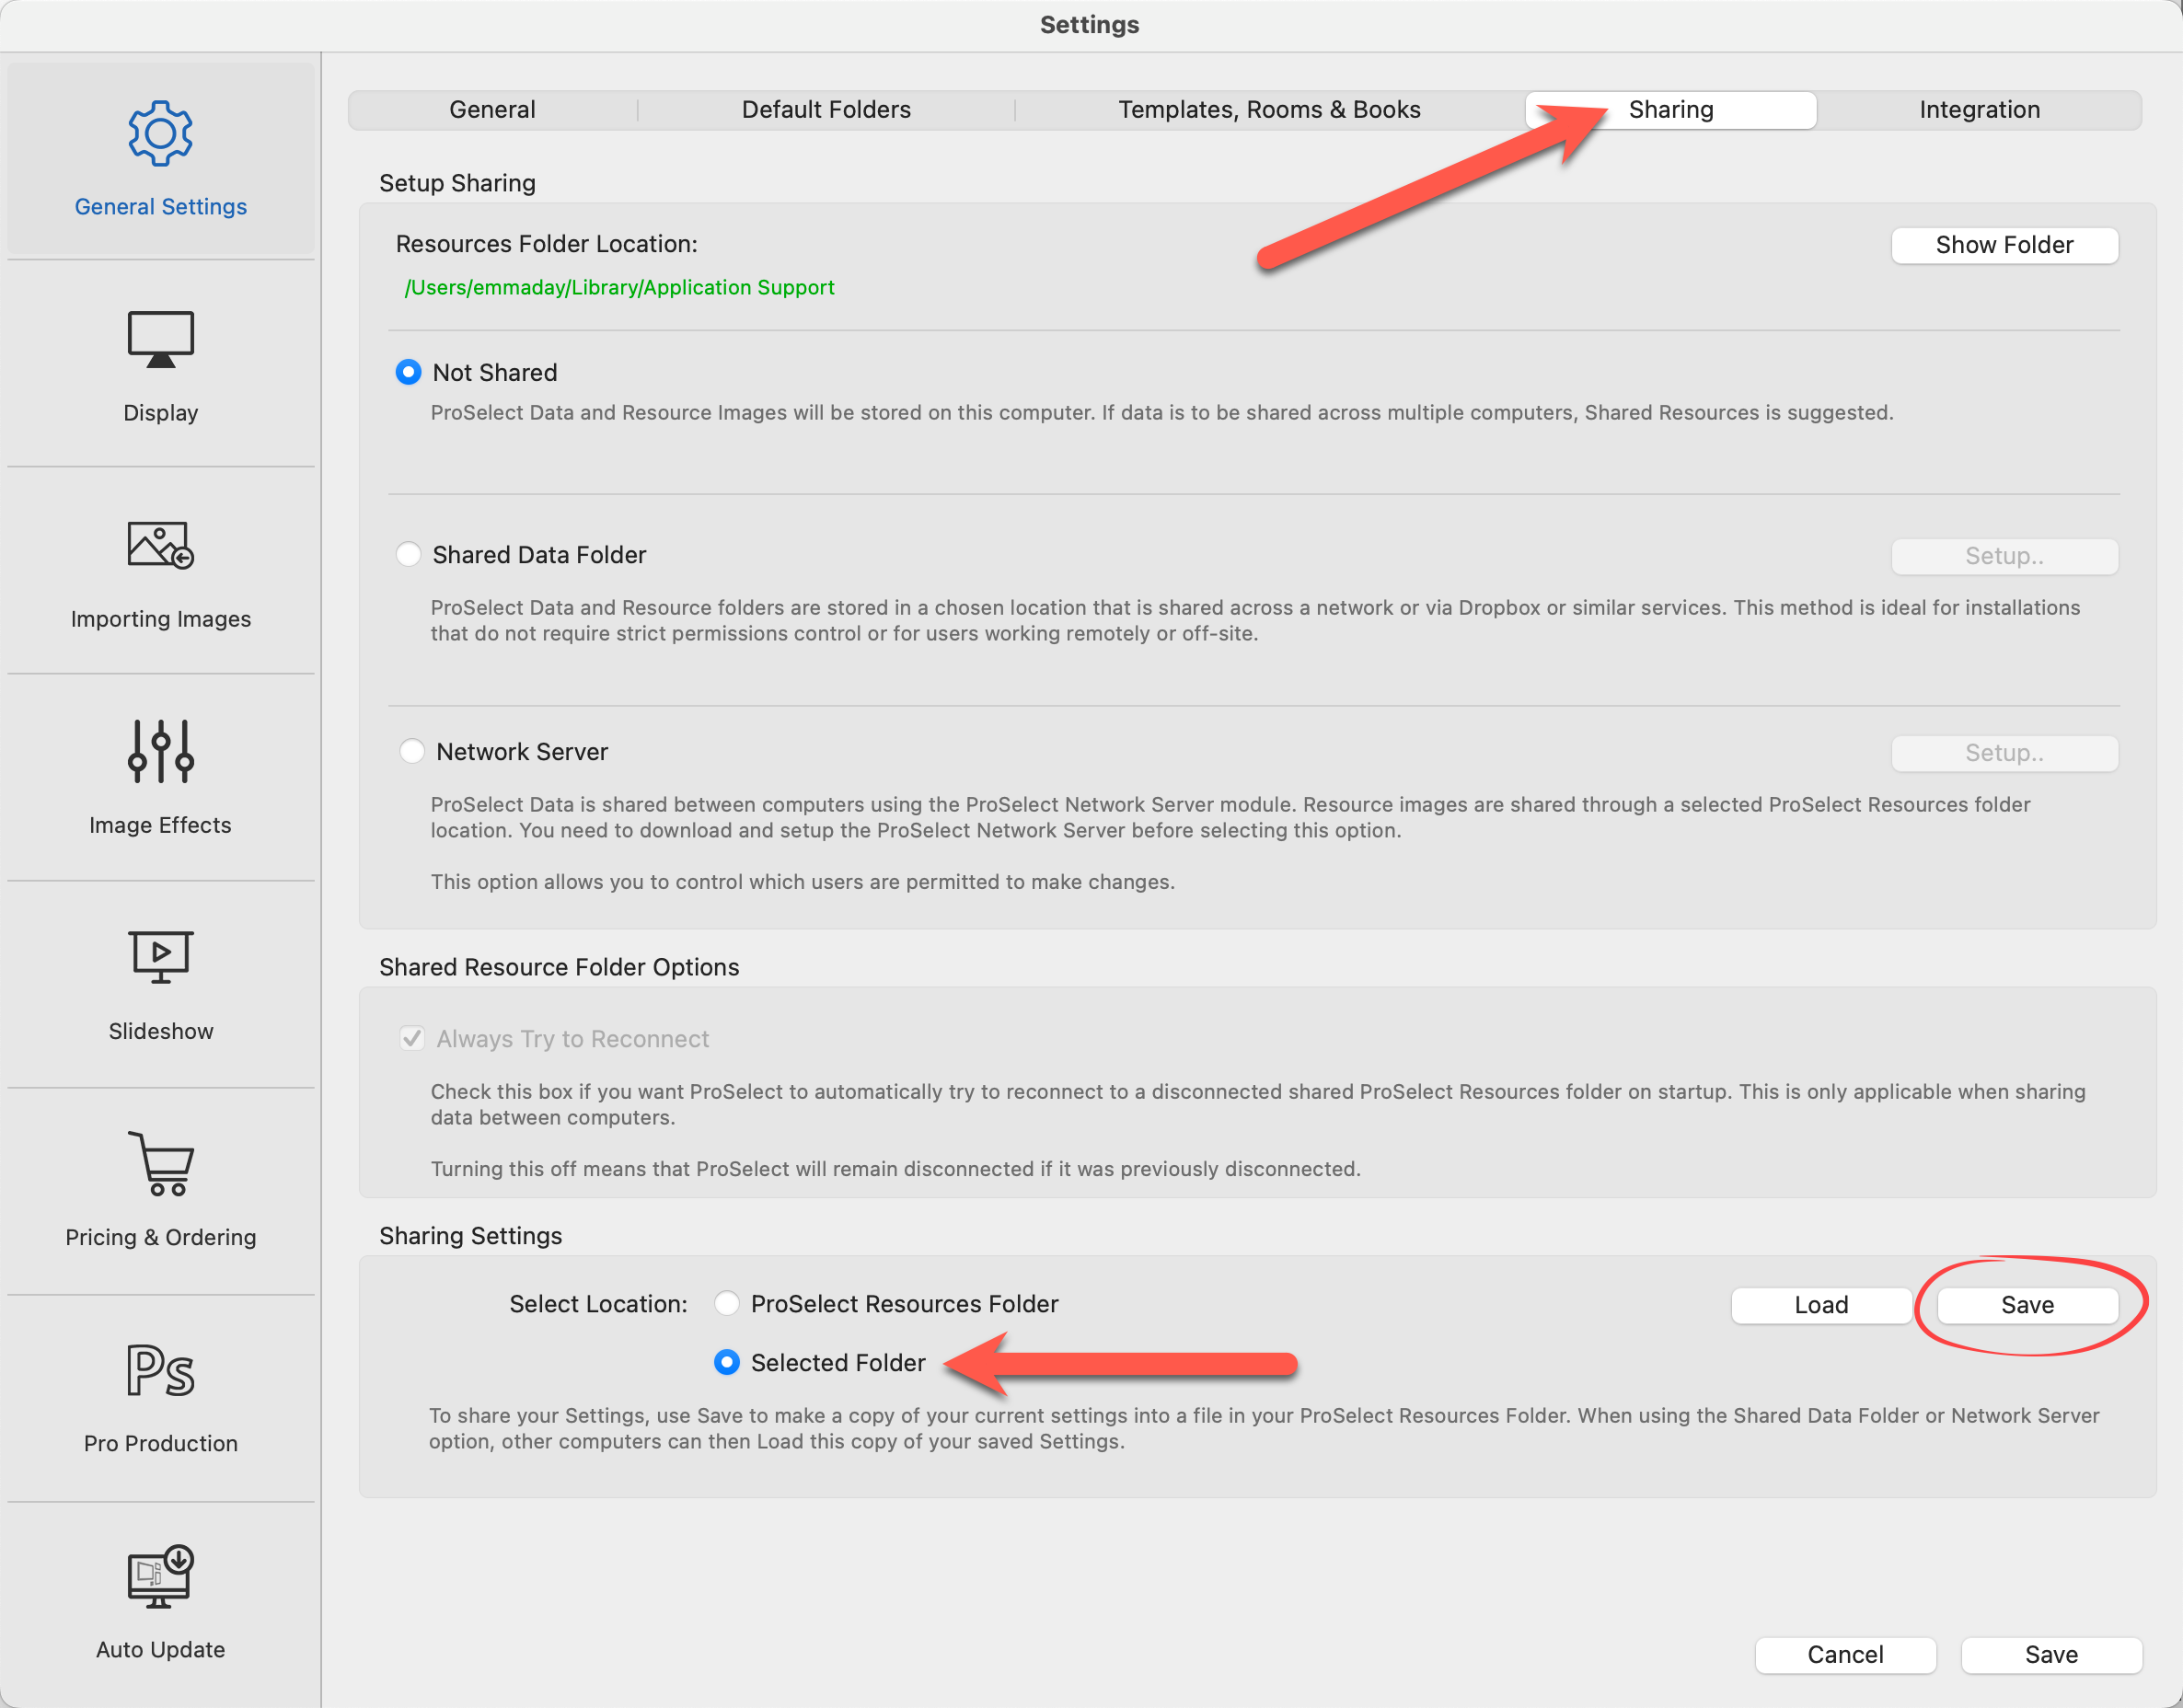
- You can now save your Settings into the same ProSelect Transfer folder with your Data File and Resource Folder.
Step 4: Transfer to Another Computer
- There are many ways to accomplish this including using Dropbox, Cloud Services, or an external drive.
Step 5: Import the ProSelect Data File on the New Computer
- Open ProSelect.
- Go to the top menu, File > ProSelect Data > Import Data from.
- Navigate to the folder you just transferred.
- Click on the ProSelect Data File and select Open.
- The data file has been transferred and is now being used on the new computer.
Step 6: Move the Resource Folder onto the New Computer
- In ProSelect, go to the top menu, Resources > ProSelect Resources Folder > Show in FinderExplorer.
- Rename the current Resource Folder to "Archive_ProSelect Resources." This will serve as a backup.
- Open the transfer folder.
- Drag the ProSelect Resources folder from the transfer folder into its new location on the new computer.
- This new ProSelect Resources folder will now be used on the new computer.
- Important note: Do not rename the new folder. It must be called "ProSelect Resources" for the software to work.
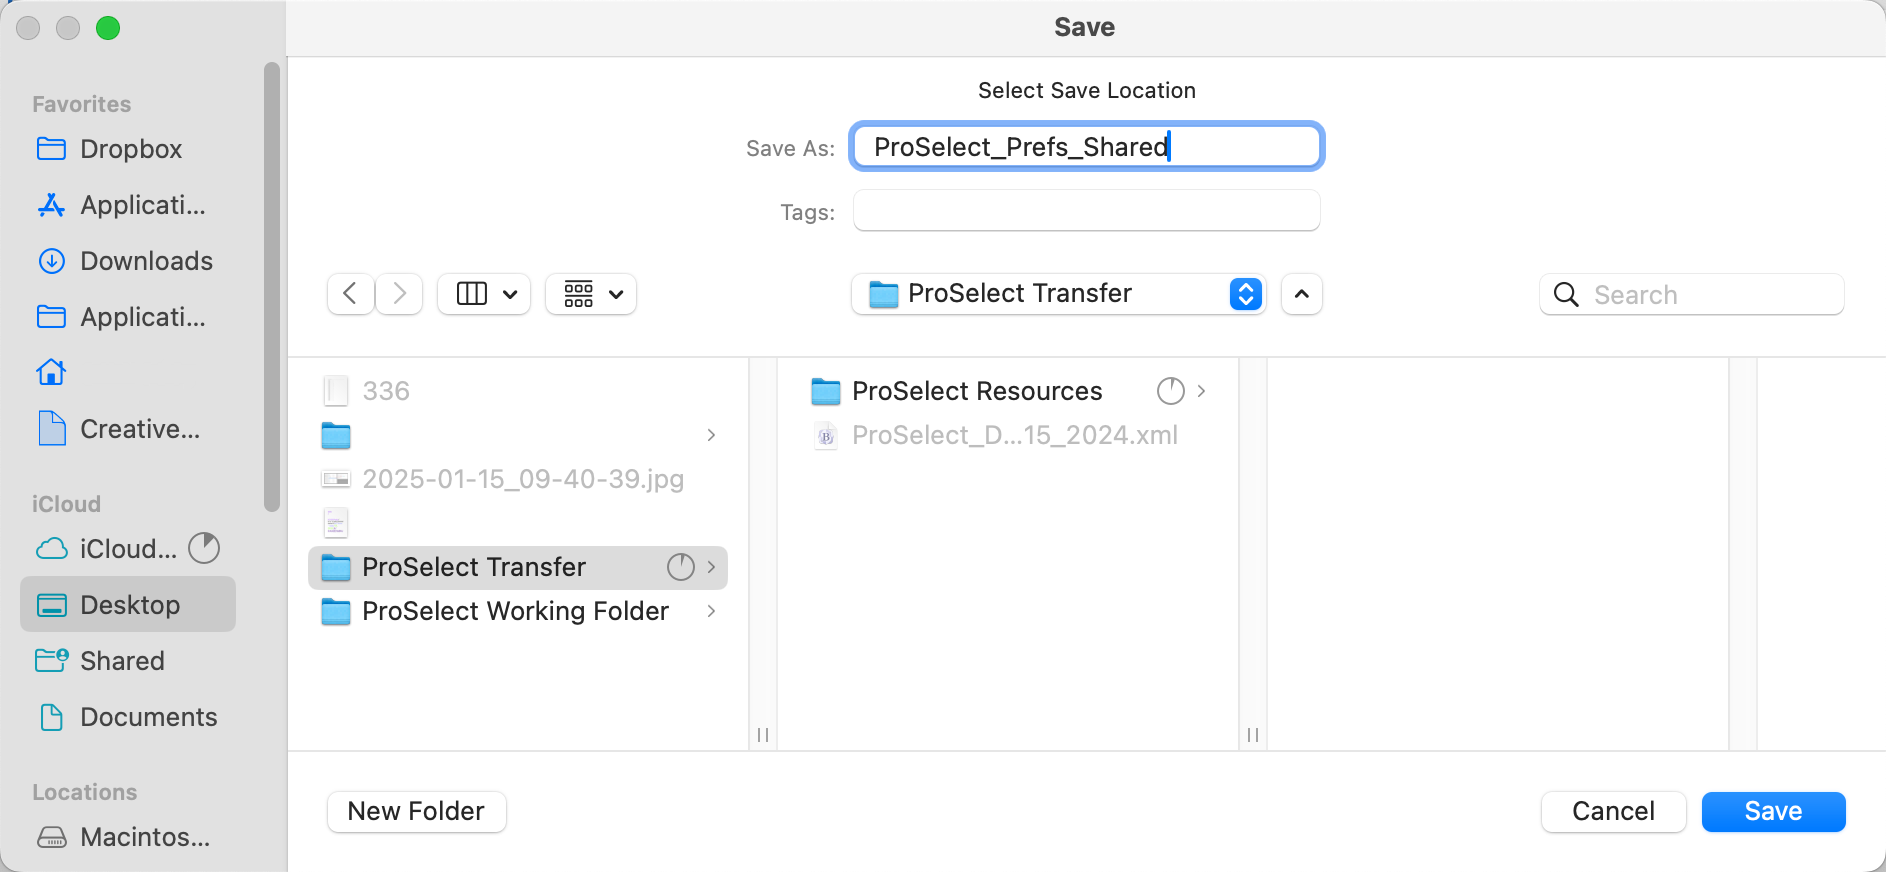
Step 7: Load the Settings
- In ProSelect, go to the top menu, ProSelectEdit > Settings.
- Under General Settings, select the "Sharing" tab.
- In the Sharing Settings area, select "Selected Folder" and click on the Load button.
- Navigate to the transfer folder.
- Click on ProSelect_Prefs_Shared.xml.
- Then click Open.
- Your Settings have been imported.
Your new computer is now set up with the same data file, resource folder, and settings as your main computer.
It should be noted that each computer is independent of the other. If changes are made to the data file, resource folder, or settings AFTER the transfer, these changes will not be shared.
Requirements for Setting up a Shared Folder
- Local Area Network (LAN): Ensure your LAN uses wired connections for increased speed and reliability. For a detailed guide on setting this up, refer to Networking Basics for Photography Studios.
- Shared Folder/Drive: You need a shared location accessible by all computers on the network, with both read and write privileges. This ensures that all users can access and modify files as needed.
-
Auto-Login: Each computer must be configured to login to this shared location upon startup. This auto-login feature guarantees that the shared resources are consistently available to all users without the need for manual connections each time.
 Caution - Preventing Data Loss
The Shared Folder option is suitable for studios where users can coordinate their updates to avoid conflicts. If two users open ProSelect simultaneously, both will access the same data file. If one user saves changes, the other won't see these updates until they restart ProSelect or manually update from the shared location. If the second user saves changes before updating their data, it could overwrite and erase the first user's modifications. Coordination is essential to prevent data loss.
On Your Main Computer
- Begin by locating your ProSelect Resources folder. In ProSelect, go to the top menu, Resources > ProSelect Resources Folder > Show in FinderExplorer.
-
Manually copy the entire ProSelect Resources folder to a shared network location. This process can take a few minutes depending on the size of your resources folder and your network speed. Ensure this is done before proceeding to further steps to prevent any data loss. Look at Step 2: Copy the ProSelect Resource Folder for detailed instructions.
Important InfoTo maintain data integrity, restrict access to the shared resources folder to advanced users only, potentially by placing it within a clearly marked "Keep Out" folder. This setup ensures that all networked computers can access and use the latest data without conflicts or data loss.
- Before making any changes, it’s important to backup your current ProSelect Data file. In ProSelect, go to the top menu, File > ProSelect Data > Export Data to: and save a backup copy to your desktop.
- Open Settings: Go to the top menu, ProSelectEdit > Settings > General Settings > Sharing.
- Enable the "Shared Data Folder" option.
- Click on the drop-down arrow under the Resource Folder Location and choose "Select Folder."
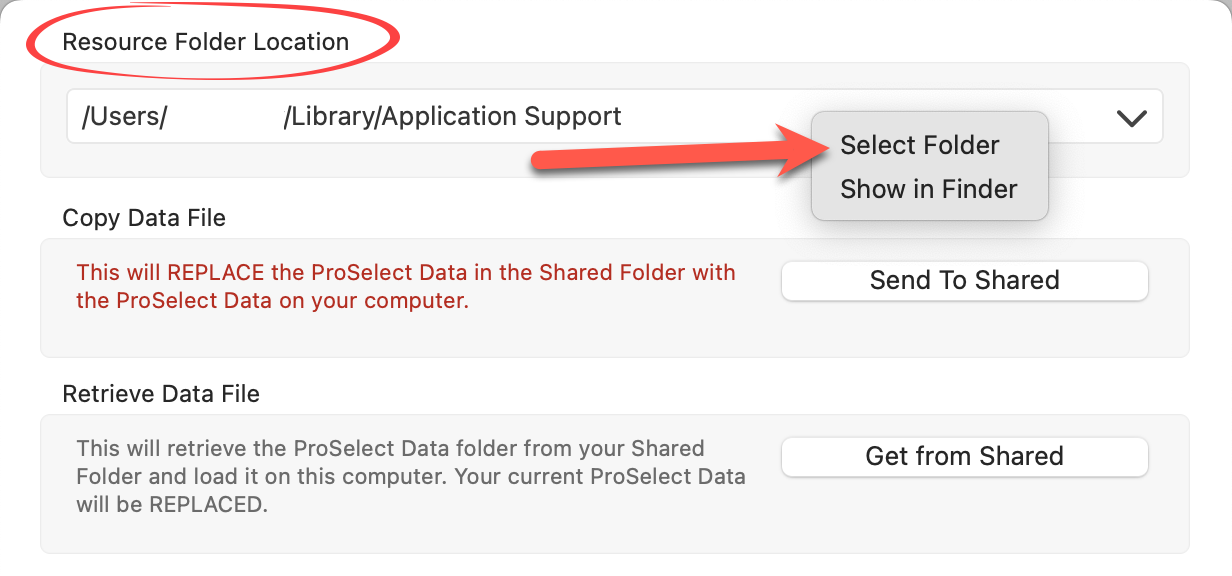
- Navigate to the shared drive/folder location where you previously copied your Resource Folder. Click Open.
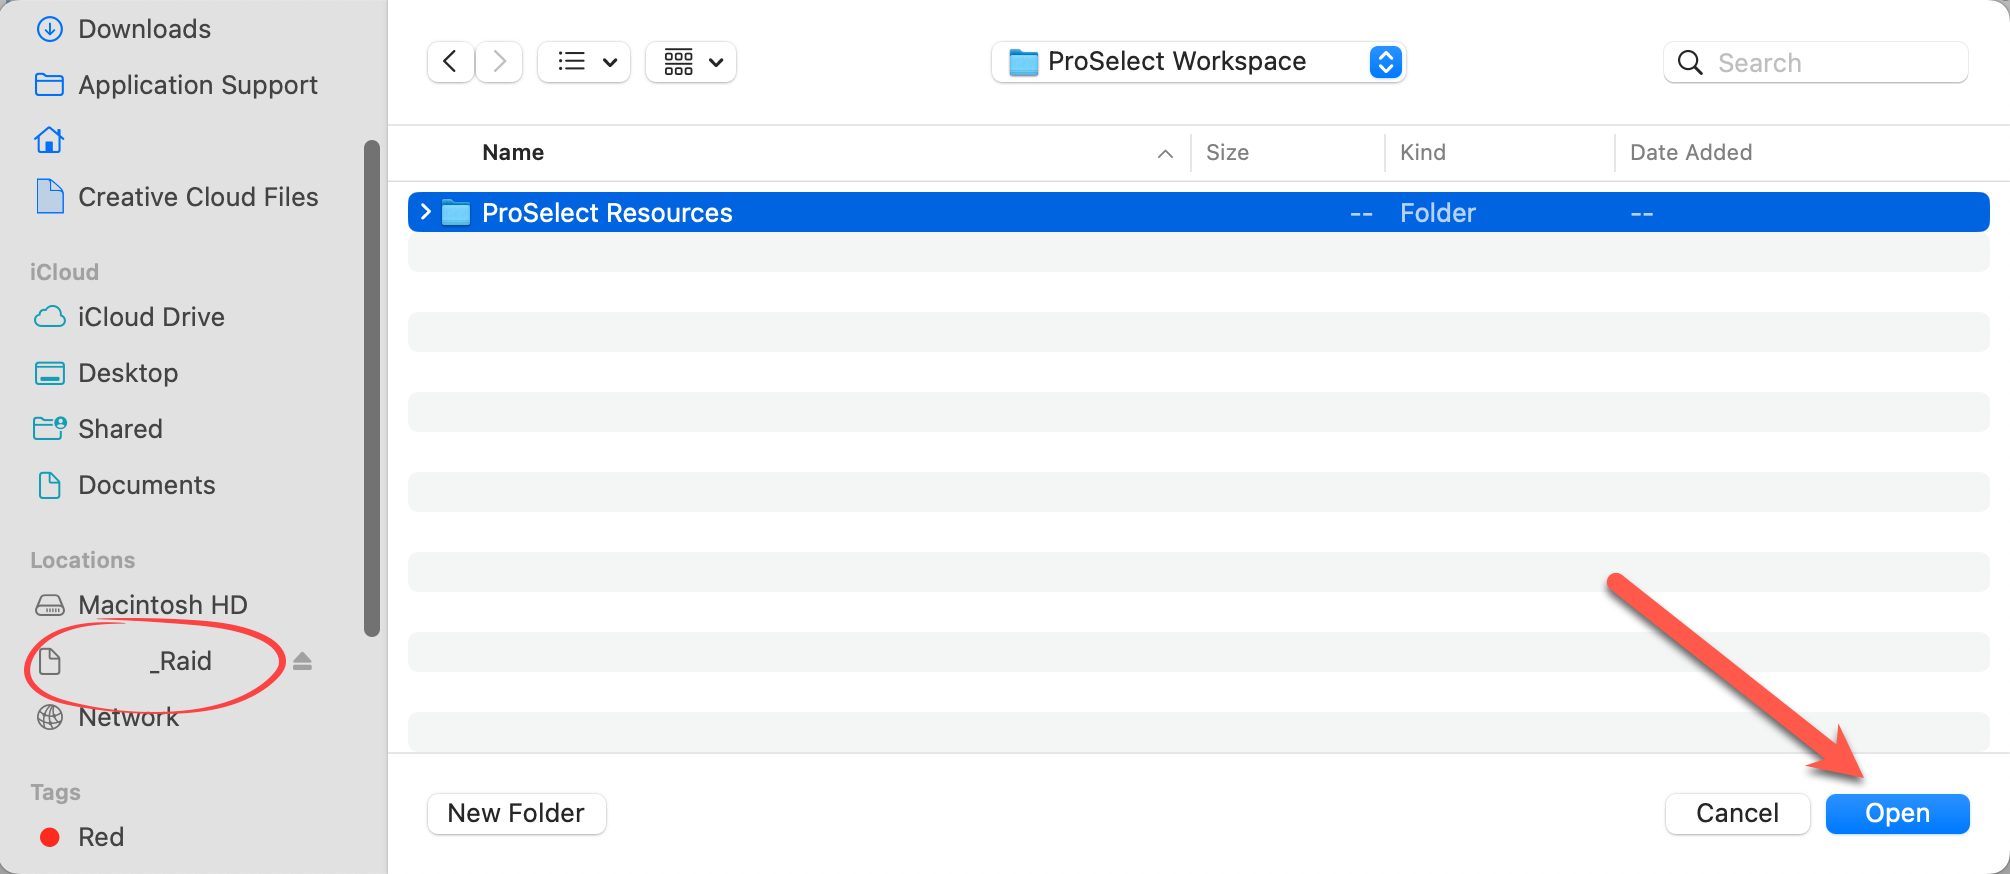
- Back in the Sharing window, you will notice that your Resource Folder Location has changed. It now points to the new Resource Folder location.
- Under the Copy Data File section, select "Send to Shared" to copy your current ProSelectData.xml file into the new resources folder in the shared location. A confirmation will popup.
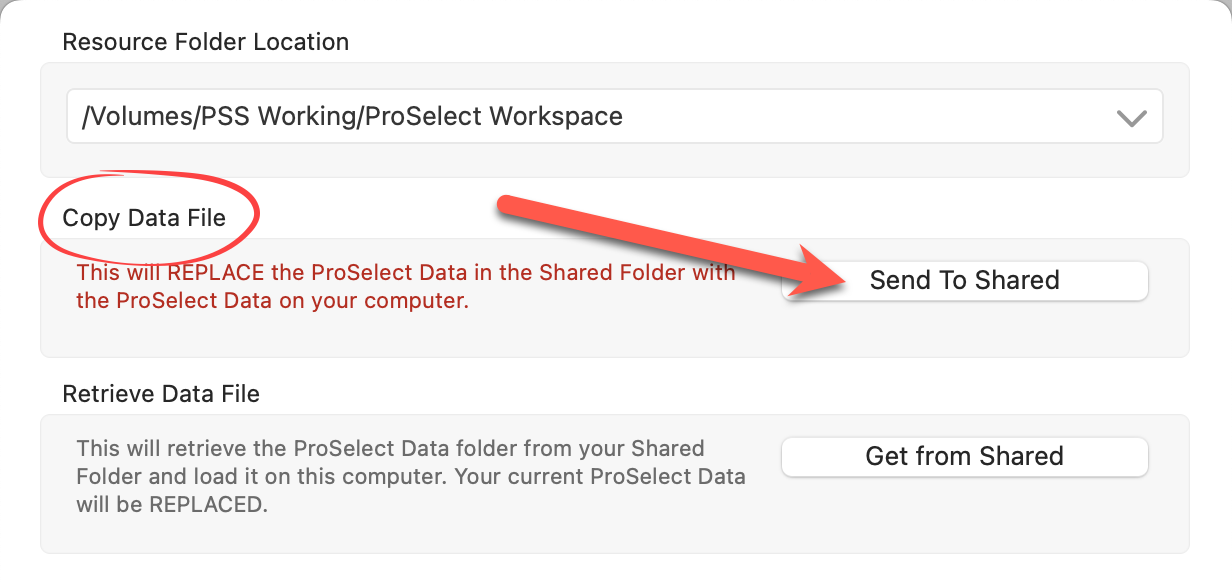
- Under Updating from Shared Folder, review the information and choose "Always Update..." to ensure your ProSelect loads the latest shared data on startup.
- Under Saving ProSelect Data File Changes, review the information, and choose "Save on this computer and update the shared file."
- Close the dialog to apply the changes.
- Click on the Save button to save the changes and exit Settings.
Adding Additional Computers
To integrate another computer into the resource-sharing setup, follow these steps:
- Open ProSelect on the computer you wish to add to the resource-sharing setup.
- Open Settings: Go to the top menu, ProSelectEdit > Settings > General Settings > Sharing.
- Enable the "Shared Data Folder" option.
- Click on the drop-down arrow under the Resource Folder Location and choose "Select Folder."
- Navigate to the shared drive/folder location where the Shared Resource Folder was saved. Click Open.
- Back in the Sharing window, you will notice that your Resource Folder Location has changed. It now points to the SAME Resource Folder location as your main computer.
- Select "Get from Shared" under the Retrieve Data File section. This action points the computer to use the shared resources and updates the local low-resolution resources and the ProSelectData.xml file.
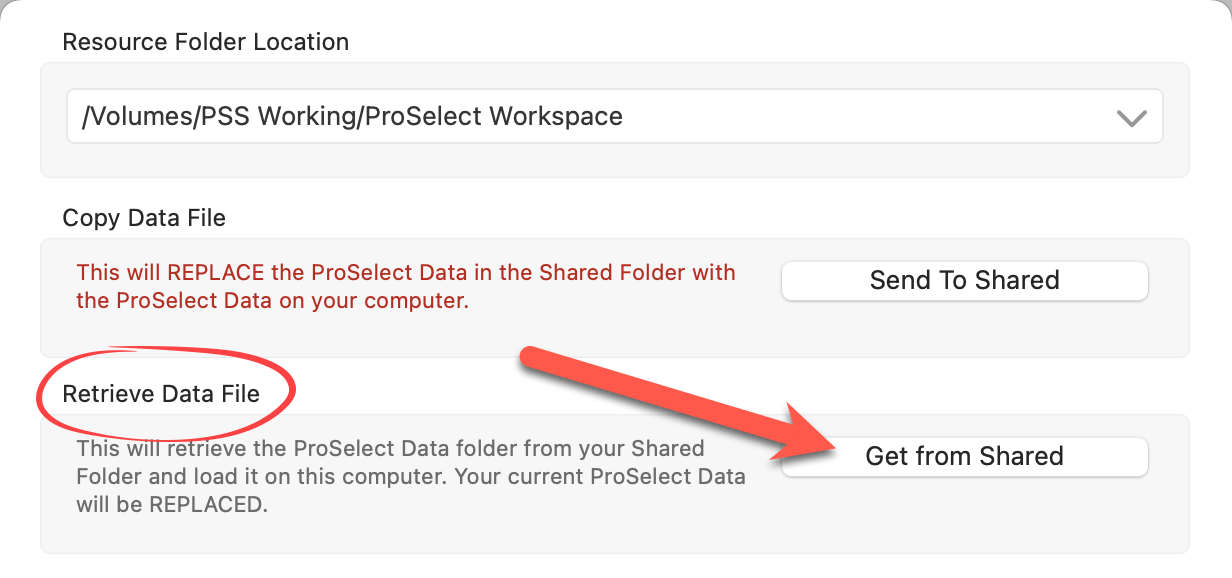
- Under Updating from Shared Folder, choose "Always Update the data file on this computer without asking" to ensure the data file is always current on startup.
- Under Saving ProSelect Data File Changes, decide whether this user can alter the pricing or modify templates. If the user should not make changes, uncheck "Save on this computer and update the shared file". If user modifications are allowed, ensure this option is checked.
- Close the dialog to apply the changes.
- Click on the Save button to save the changes and exit Settings.
- Restart ProSelect: Close and reopen ProSelect to ensure all settings take effect correctly. Verify that pricing and templates are correct and appear as expected.
- Repeat this process to add as many additional computers as required.
Studios often operate in multiple physical locations (for some this means working on product templates and pricing at home). Data must be shared effectively.
- Each location must have its own ProSelect license as per the licensing policy detailed on the ProStudio Software's Sales Policy page.
- Set up Sharing so that these locations have access to the same pricing data and resources.
- Employing a cloud storage solution such as Dropbox or Google Drive is essential. This setup allows access to crucial data regardless of your location, ensuring that all changes to pricing or templates are synchronized across all operating bases.
Using Dropbox for ProSelect Data Sharing
Dropbox is a convenient cloud storage service that syncs a local folder—your Dropbox folder—across all linked devices, while also backing it up to the cloud. This dual-access setup ensures that you have a local copy of your files on your computer and a backup version online. For studios looking to share ProSelect resources across multiple locations, the Dropbox desktop application is essential.
- Installation and Account Setup: Ensure that Dropbox is installed on all computers that need access to the ProSelect resources. You’ll know it's active when you see the Dropbox icon in the System TrayMenu Bar. The local Dropbox folder should be accessible via File ExplorerFinder.
- Choosing the Right Account: Dropbox offers both free and paid accounts. The primary difference is the storage capacity. For sharing sizable ProSelect Resources folders, which can range from a few GB to over 100GB, a paid account is likely necessary.
- Utilizing Smart Sync: If you opt for a Dropbox Professional or Business account, you can use Smart Sync. This feature allows you to set files as online-only, local, or a mix of both. For ProSelect data, set the Resources folder to "Local" to ensure all files are downloaded and stored on each computer’s hard drive. This is done by right-clicking the ProSelect Resources folder in Dropbox, selecting Smart Sync, and then choosing "Local."
- Setting Up Resource Folder Sharing: To sync your ProSelect data across multiple locations, place the ProSelect Resources folder inside your Dropbox folder. Click on Setup Shared Folder for step-by-step instructions. When you are asked to select a location for the ProSelect Resources folder, navigate and select the ProSelect Resources folder within your Dropbox.
- Access Across Locations: Ensure that all other locations are either logged into the same Dropbox account or have access to a shared folder from the main Dropbox account. This setup allows seamless synchronization of the ProSelect data across different physical locations, ensuring that all linked computers have up-to-date access to necessary resources.
- Using Dropbox means that all shared resources are stored locally on each computer. This can consume more disk space compared to traditional network shares. However, if your studio only has a wireless network, Dropbox can provide a more reliable sharing solution since it doesn’t rely on continuous network connectivity.
- Changes made to ProSelect data on one computer need to sync across the Dropbox network. This involves uploading the updated data to Dropbox's cloud servers and then downloading it to other linked computers. Depending on your internet speed, this synchronization process could take from a few minutes to several, during which the updated data may not be immediately available across all devices.
- If you’re using shared Dropbox folders across different accounts, ensure that each account has sufficient storage capacity to accommodate the entire ProSelect Resources folder. This is particularly important if different locations or team members use separate Dropbox accounts with shared access to common resources.
Using Google Drive File Stream
This setup will also allow seamless access and synchronization of ProSelect data across different computers, utilizing Google Drive's cloud capabilities to maintain up-to-date resources and pricing information.
- Install Google Drive File Stream: Ensure that Google Drive File Stream is installed on all computers that need access to the shared data. This application is necessary for integrating Google Drive's cloud storage directly with your file system.
- Set Up Google Drive Access: All computers must either have direct access to the main Google Drive account or be granted shared access to the specific folders.
- Copy ProSelect Resources to Google Drive: Place the ProSelect Resources folder in the Google Drive > My Drive location on the computer where you are setting this up. Click on Setup Shared Folder for step-by-step instructions. When you are asked to select a location for the ProSelect Resources folder, navigate and select the ProSelect Resources folder within your My Drive location.
- Enable Offline Access: Once the folder is in Google Drive, right-click on the ProSelect Resources folder to open the context menu and select 'Drive File Stream' followed by 'Available Offline'. This setting ensures that the folder's contents are automatically downloaded and kept synchronized on every computer, allowing for offline access.
- Access Across Locations: Ensure that all other locations are linked to the Google Drive folder and set for offline access.
When you launch ProSelect and the shared folder isn’t accessible—maybe due to a disconnected network or if the folder has been relocated—you'll encounter a notification prompting you to resolve the issue. However, you can opt to work disconnected by choosing this option in the prompt.
- Select "Work Disconnected" from the options list.
- ProSelect will load the local version of your ProSelect data file, which contains all the settings and configurations used during your last session. This local copy is usually synced from the shared folder when connected.
- While disconnected, you won't be able to access any high-resolution images from your ProSelect Resources folder. This restriction means you cannot add new overlay images, room views, or frames. You also won't be able to run Pro Production tasks that require overlay images. However, you can still use all resources that were previously set up and are available in your local ProSelect Low Res Resources cache.
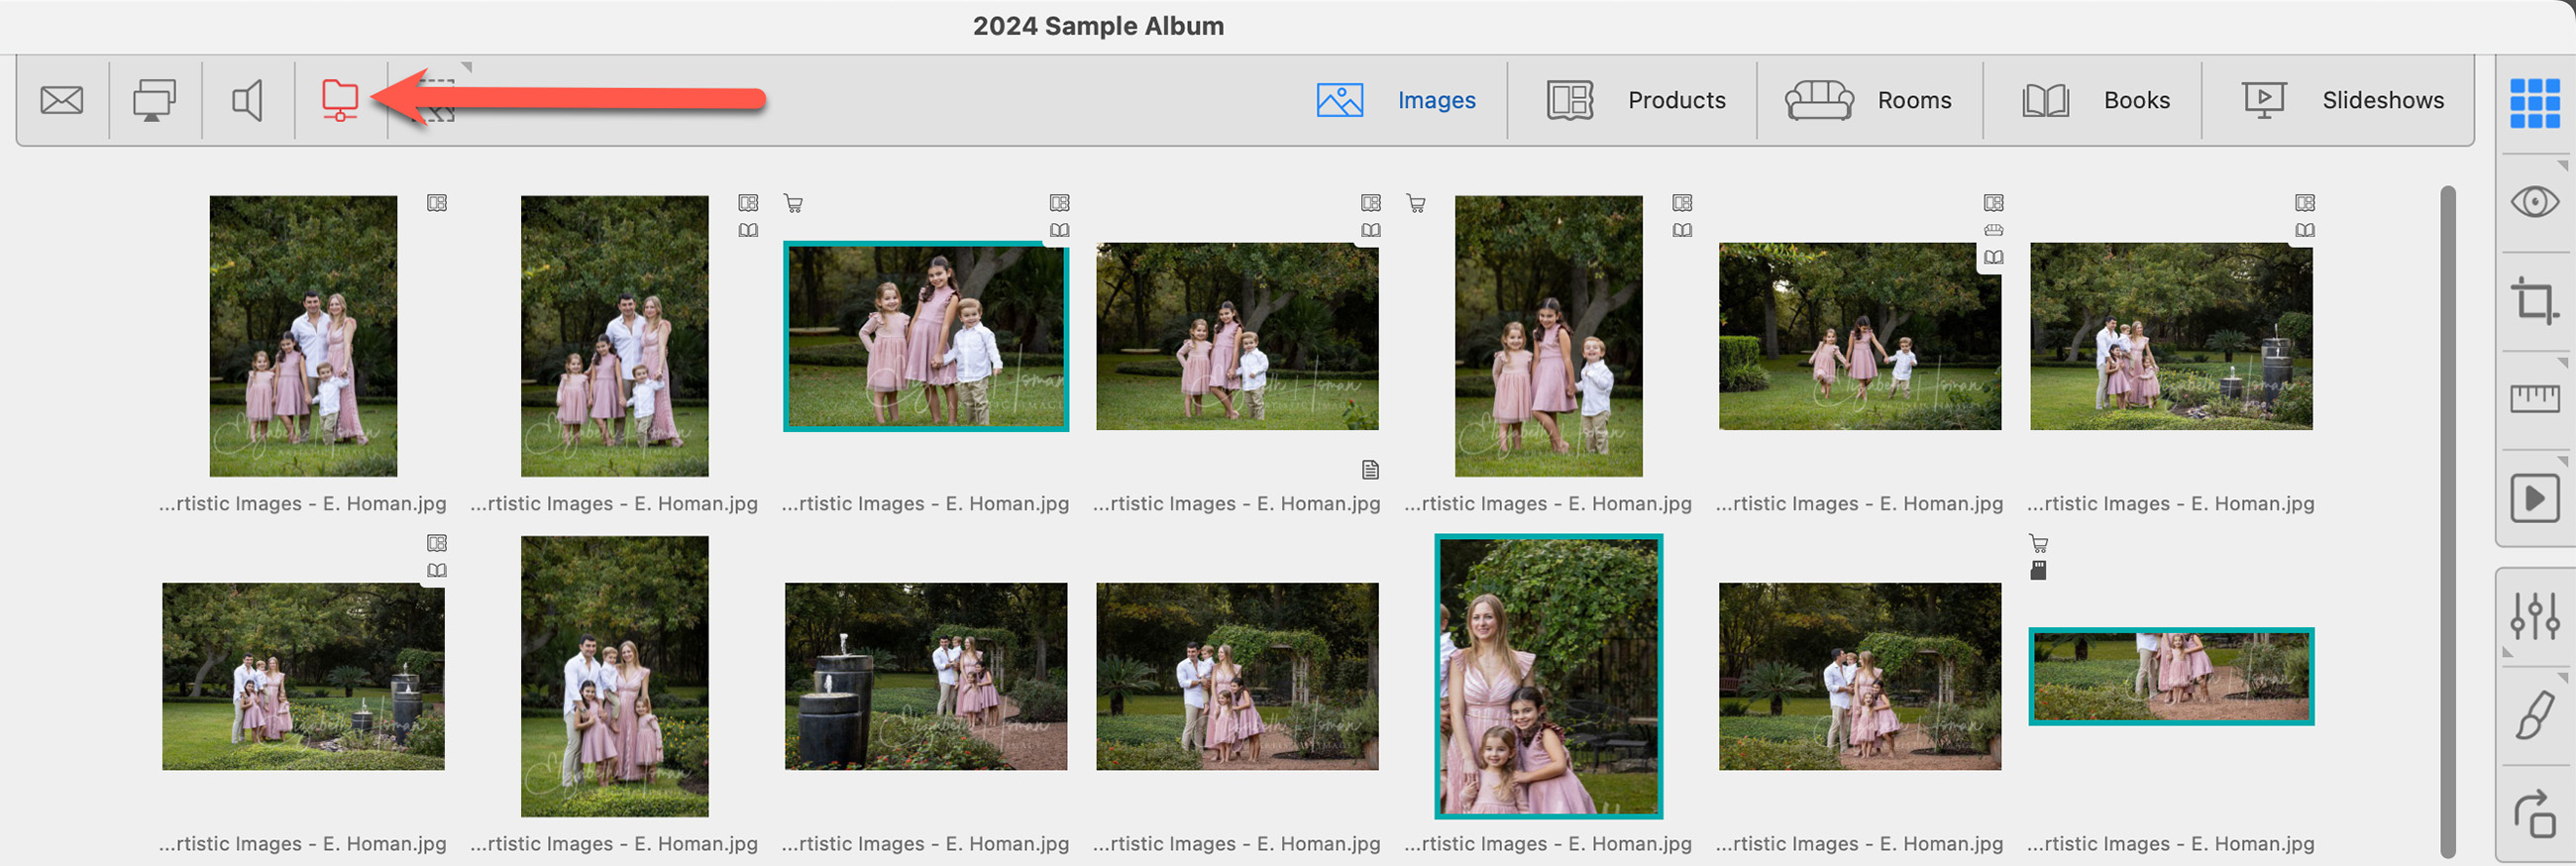
- The Shared Folder icon
 on the ProSelect main interface will appear in red while disconnected.
Reconnecting to the Shared Folder
Once the network is connected again, you can reconnect to the Shared Resource folder location.
- On the top menu, go to Resources > ProSelect Resourced Folder > Reconnect.
- Alternatively, click on the Shared Folder icon on the ProSelect main interface.
- Select "Try Again."
- You can now resume full functionality within ProSelect.
Networking Basics for Photography Studios
Setting up a network for sharing data within a photography studio requires a reliable and speedy connection to handle the transfer of large files and streaming of media. It is highly recommended to use a wired network configuration, as this offers faster data transfer rates compared to wireless setups, ensuring that music and video play smoothly without buffering. All computers should be connected to a gigabit network switch using network cables.
For the shared data point, you can opt for several solutions like a network server, an internal or external drive attached to a networked computer, RAID storage for better reliability, or a Network Attached Storage (NAS) device. However, be cautious with NAS devices as they can sometimes be slow and less reliable for intensive media streaming.
If you're setting up on a Windows network, create a shared folder, for example, "Studio Data", and map it as a network drive on all computers, ensuring to enable the "reconnect at login" feature for continuity. For Mac networks, set the shared folder to automatically mount on each machine by adding it to the login items in user accounts and saving the password for automatic connections at startup.
Make sure that read and write permissions are set correctly for all machines and user accounts that require access to the shared folder or drive. This is crucial in a collaborative environment to ensure all team members can access and modify files as needed. If you are not familiar with network setups, hiring a local network professional to configure and secure your network is advisable.
Shared Data Storage Options
Once your studio's wired network is established, implementing a central storage system for your jobs can streamline your workflow and ensure easy access to all projects. Organizing your files in a well-structured directory is crucial. Here’s a suggested structure for your directory:
- Studio Jobs
- Children
- HS Class of 2016
- Smith_Nancy_Job#
- Smith_Nancy-01234.JPG
- Smith_Nancy-01234.CR2
- Smith_Nancy-01235.JPG
- Smith_Nancy-01235.CR2
- Smith_Nancy-01235.PSD
- Smith_Nancy-01236.JPG
- Smith_Nancy-01236.CR2
- Smith_Nancy-01234 Album.PSA
- Smith_Nancy_Job#
- Family
- School Events
- Output Images
In this structure, each job folder consolidates all relevant files such as JPG, RAW, PSD or TIF files, and the ProSelect Album (.PSA) into a single folder, avoiding further subdivisions which can complicate file retrieval. An “Output Images” subfolder created during production holds final images ready for lab submission.
This central "Studio Jobs" folder must be accessible by all networked computers. Ideally, manage this from a production computer by uploading files directly to this networked folder, potentially bypassing local storage. Additionally, consider making a backup copy of the original camera files to a separate physical drive for added security.
Accessing job files like the ProSelect Album is straightforward from any networked computer; navigate to the shared network drive, locate the appropriate .PSA file, and open it. It’s important not to move or copy the file to the local machine. With a properly configured network, you should be able to open, edit, and save the file directly from its original network location, ensuring all changes are universally accessible and updated.
Shared Storage Devices
Shared storage devices on your network can vary widely, ranging from a hard drive inside a networked computer to sophisticated RAID systems connected to a network server. The types of storage you might use include:
- Hard drives within networked computers.
- External drives connected to networked computers.
- External and network-attached RAID devices.
- Network servers equipped with RAID systems.
It's crucial to maintain backups, especially of active job files. RAID devices offer a robust solution by providing redundancy, which means they duplicate data across multiple drives to prevent data loss. RAID, which stands for Redundant Array of Independent Drives, can be set up in various configurations. For instance, RAID 1 mirrors data across two drives, offering total redundancy; however, the effective storage capacity is only that of one drive. If one drive fails, the data remains secure on the other. On the other hand, RAID 5 spreads data across four drives, allowing for the failure of one drive without data loss—the system can rebuild the lost data once the failed drive is replaced, utilizing the data remaining on the other drives.
For a RAID 1 setup with two 2TB drives, the total usable storage would be 2TB, as data is mirrored on both drives. In contrast, a RAID 5 setup with four 2TB drives would yield about 6TB of usable storage. It's vital to monitor RAID systems closely; failure to replace a defective drive promptly can lead to catastrophic data loss, particularly if a second drive fails before the first is replaced. RAID systems can be integrated within a single workstation, across a server, or as a standalone external device, depending on your studio's specific needs and network configuration.
Configuration Advantages and Disadvantages of Shared Devices
When configuring shared storage devices for a photography studio, various options exist, each with its own set of advantages and disadvantages:
- Hard Drive in a Networked Computer: Ideal for small studios with one or two users. If the computer lacks an internal RAID for data redundancy, external backup solutions such as backup software or Apple's Time Machine are necessary to ensure data safety.
- External Drive in a Networked Computer: Similar to using an internal drive, but data transfer speeds may be slower unless connections like USB 3.0 or Thunderbolt are used. This setup is also suitable for small operations.
- External RAID Device Connected to a Networked Computer: Effective for small to medium-sized studios (two to five people). An external RAID provides redundancy and is best connected to the workstation with the highest data usage, typically the production or retouching computer. This computer should be powerful, preferably with a quad-core processor and substantial RAM, and must remain on to keep data accessible across the network.
- NAS RAID Device Connected to a Network: Network Attached Storage (NAS) devices connect directly to the network via a network cable. However, due to their limited internal processors and memory, they often perform too slowly for studio environments, although high-end models might be adequate.
- RAID Device Connected to a Network Server: This setup involves a RAID connected to a server, such as a Mac mini via Thunderbolt. It offers extensive storage and is managed by the server, which is dedicated solely to serving the network, thus not used for direct work.
- Network Server with RAID: A premium solution ideal for large studios with many users, providing fast connections and sophisticated permission management. This system requires setup and maintenance by an IT professional to ensure optimal performance and security.
Each option must be chosen based on the specific needs of the studio, considering factors like the size of the operation, the volume of data handled, and the required data access speed. For studios using high-resolution images and complex workflows, more robust solutions like a network server with RAID are recommended to handle the increased data load and provide necessary redundancy and quick access.
Dropbox
When configuring Dropbox for ProSelect, it's crucial to ensure that all files are stored locally on each computer's hard drive rather than being set to "Online-Only." By default, Dropbox stores files locally, which is the required setting for ProSelect. This setup guarantees that all necessary files are immediately accessible on your computer, providing stable and efficient performance without the need for an internet connection to access these files. Double-check that the "Make Online-Only" option is not selected to maintain proper synchronization and functionality of ProSelect across different workstations.