Exporting
Exporting in ProSelect is primarily used to generate image, product, and room previews. You can also export slideshow movies and order summaries. It's ideal for sharing selections with clients or merging data with studio management software.
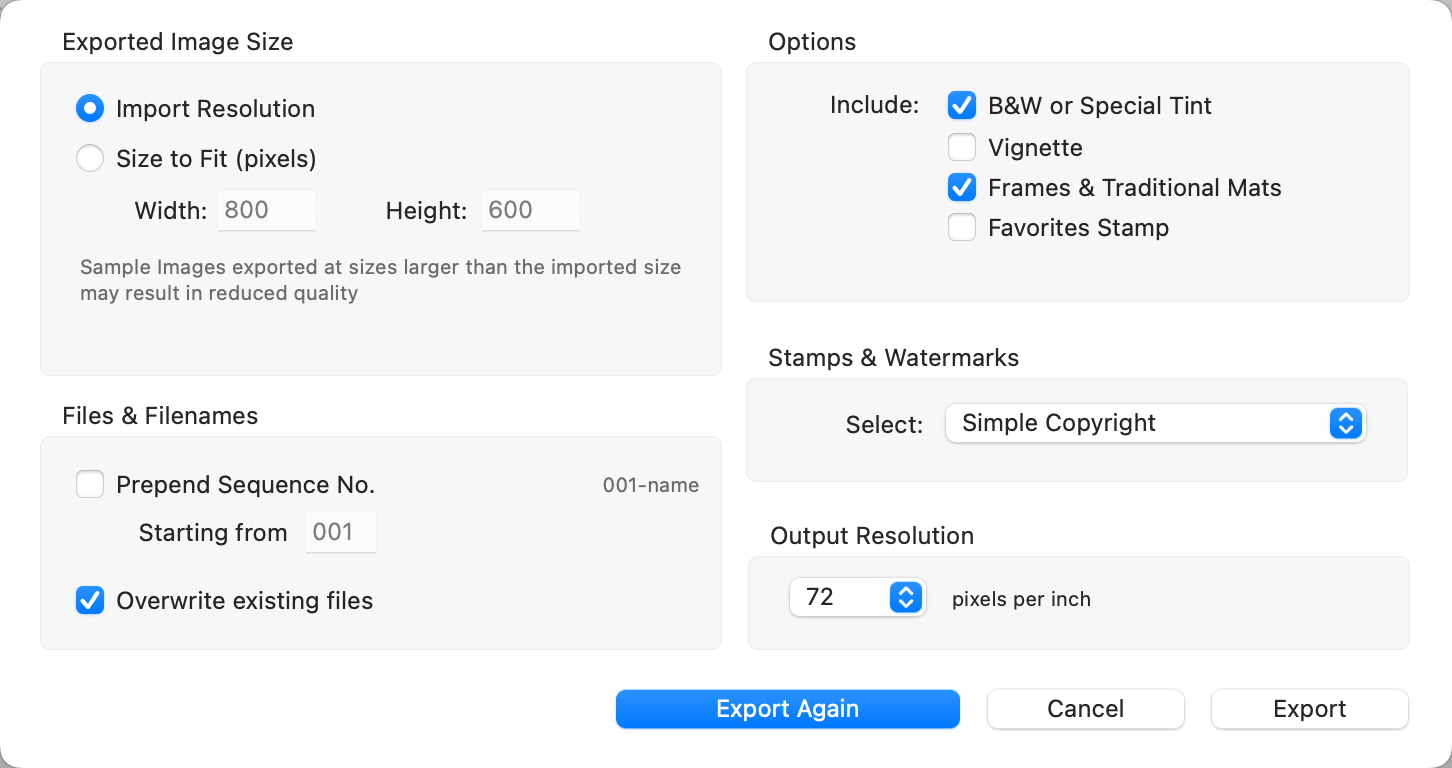
You can export low-resolution versions of your images for use on social media, websites, blogs, or for client reference. Before exporting, a dialog will appear where you can choose export settings. The size of exported images is based on your Imported Size setting, found under Settings > Importing Images. All exported images include an embedded sRGB color profile.
Go to the top menu, File > Export > Low Res Images in All Sets, Low Res Images in Current Set, OR Selected Low Res Images.

- Prepend Sequence No: Adds a three-digit sequence number to the beginning of each filename to match the image order in ProSelect. You can define the starting number.
- Append Effects Tag: Appends tags to filenames to indicate applied effects:
- RG – Original image
- BW – Black & White effect
- ST – Special Tone effect
- CXX – Custom Effect 1–25
- CXX+ – Multiple custom effects applied. For example: F1234 with a Black & White effect exports as F1234BW.jpg.
- Overwrite Existing Files: When unchecked, any exported files with duplicate names are renamed to avoid overwriting existing versions.
- Options: Choose which ProSelect display elements (such as borders or overlays) to include in the exported image.
- Stamps & Watermarks: Apply a copyright or branding stamp to the image using presets configured under Stamps, Watermarks & Logos.
- Output Resolution: Sets the image resolution (dpi) embedded in the exported file. The default is 72 dpi, suitable for screen display.
- If an image is tightly cropped in ProSelect and exported at Imported Size, the output will reflect the cropped dimensions.
- If pretouching presets have been applied to your images, a ProSelect Pro Subscription is required to export at sizes larger than 1600 x 1600 pixels.
You can export low-resolution versions of your products for use on social media, websites, blogs, or for client reference. Before exporting, a dialog will appear where you can choose export settings. The size of exported images is based on the import resolution in Settings. All exported images include an embedded sRGB color profile.
- Navigate to Working with Products or Rooms.
- Select the Products you want to export.
- Go to the top menu, File > Export > Selected Low Res Products.
- Prepend Sequence No: Adds a three-digit sequence number to the beginning of each filename to match the image order in ProSelect. You can define the starting number.
- Overwrite Existing Files: When unchecked, any exported files with duplicate names are renamed to avoid overwriting existing versions.
- Options: Choose which ProSelect display elements (such as frames and mats) to include in the exported image.
- Stamps & Watermarks: Apply a copyright or branding stamp to the image using presets configured under Stamps, Watermarks & Logos.
- Output Resolution: Sets the image resolution (dpi) embedded in the exported file. The default is 72 dpi, suitable for screen display.
- If pretouching presets have been applied to your images, a ProSelect Pro Subscription is required to export at sizes larger than 1600 x 1600 pixels.
You can export low-resolution versions of your room designs for use on social media, websites, blogs, or for client reference. Before exporting, a dialog will appear where you can choose export settings. The size of exported images is based on the original import size of the room image. All exported images include an embedded sRGB color profile. Exported room design images are automatically named using the format: Album Name – Room Name. To export just the product images (not the room view), see Exporting Samples Product Images.
- Navigate to Working with Rooms.
- Select the Room(s) you want to export.
- Go to the top menu, File > Export > Selected Low Res Rooms.
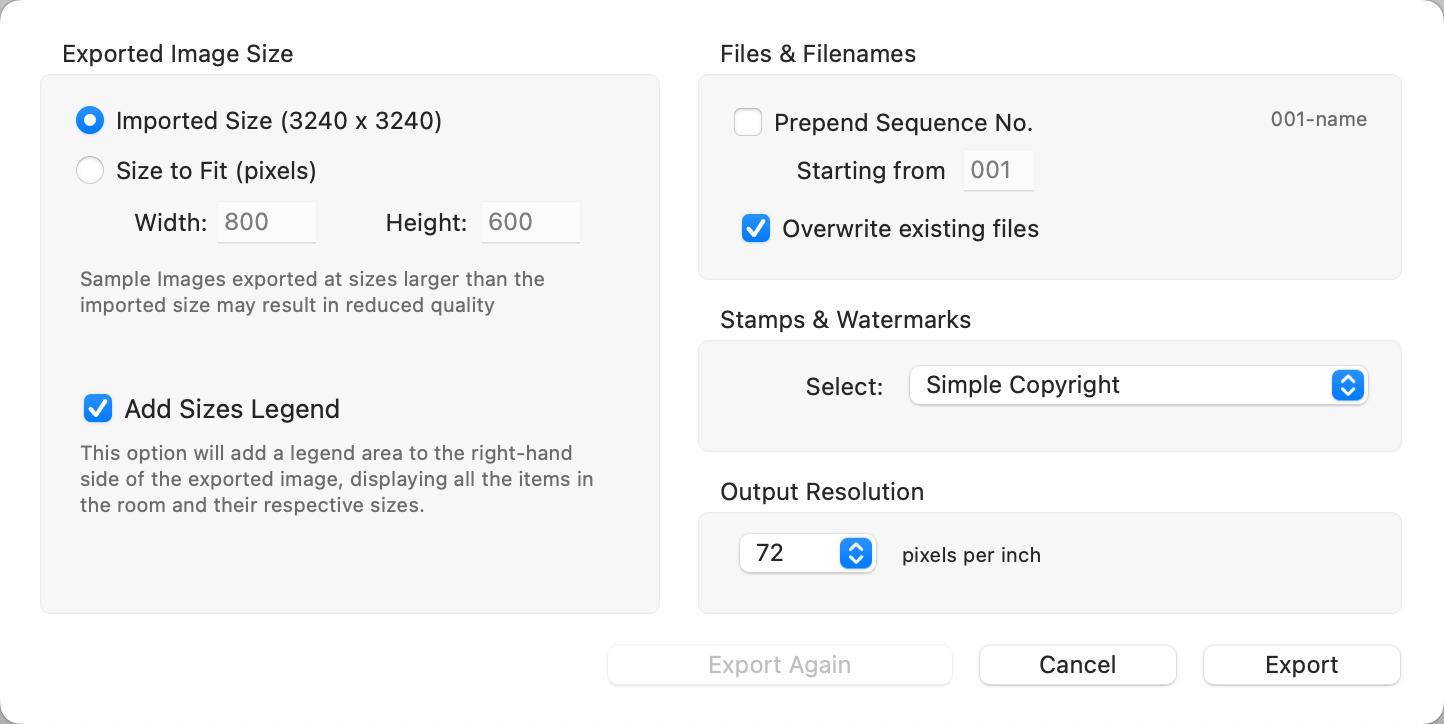
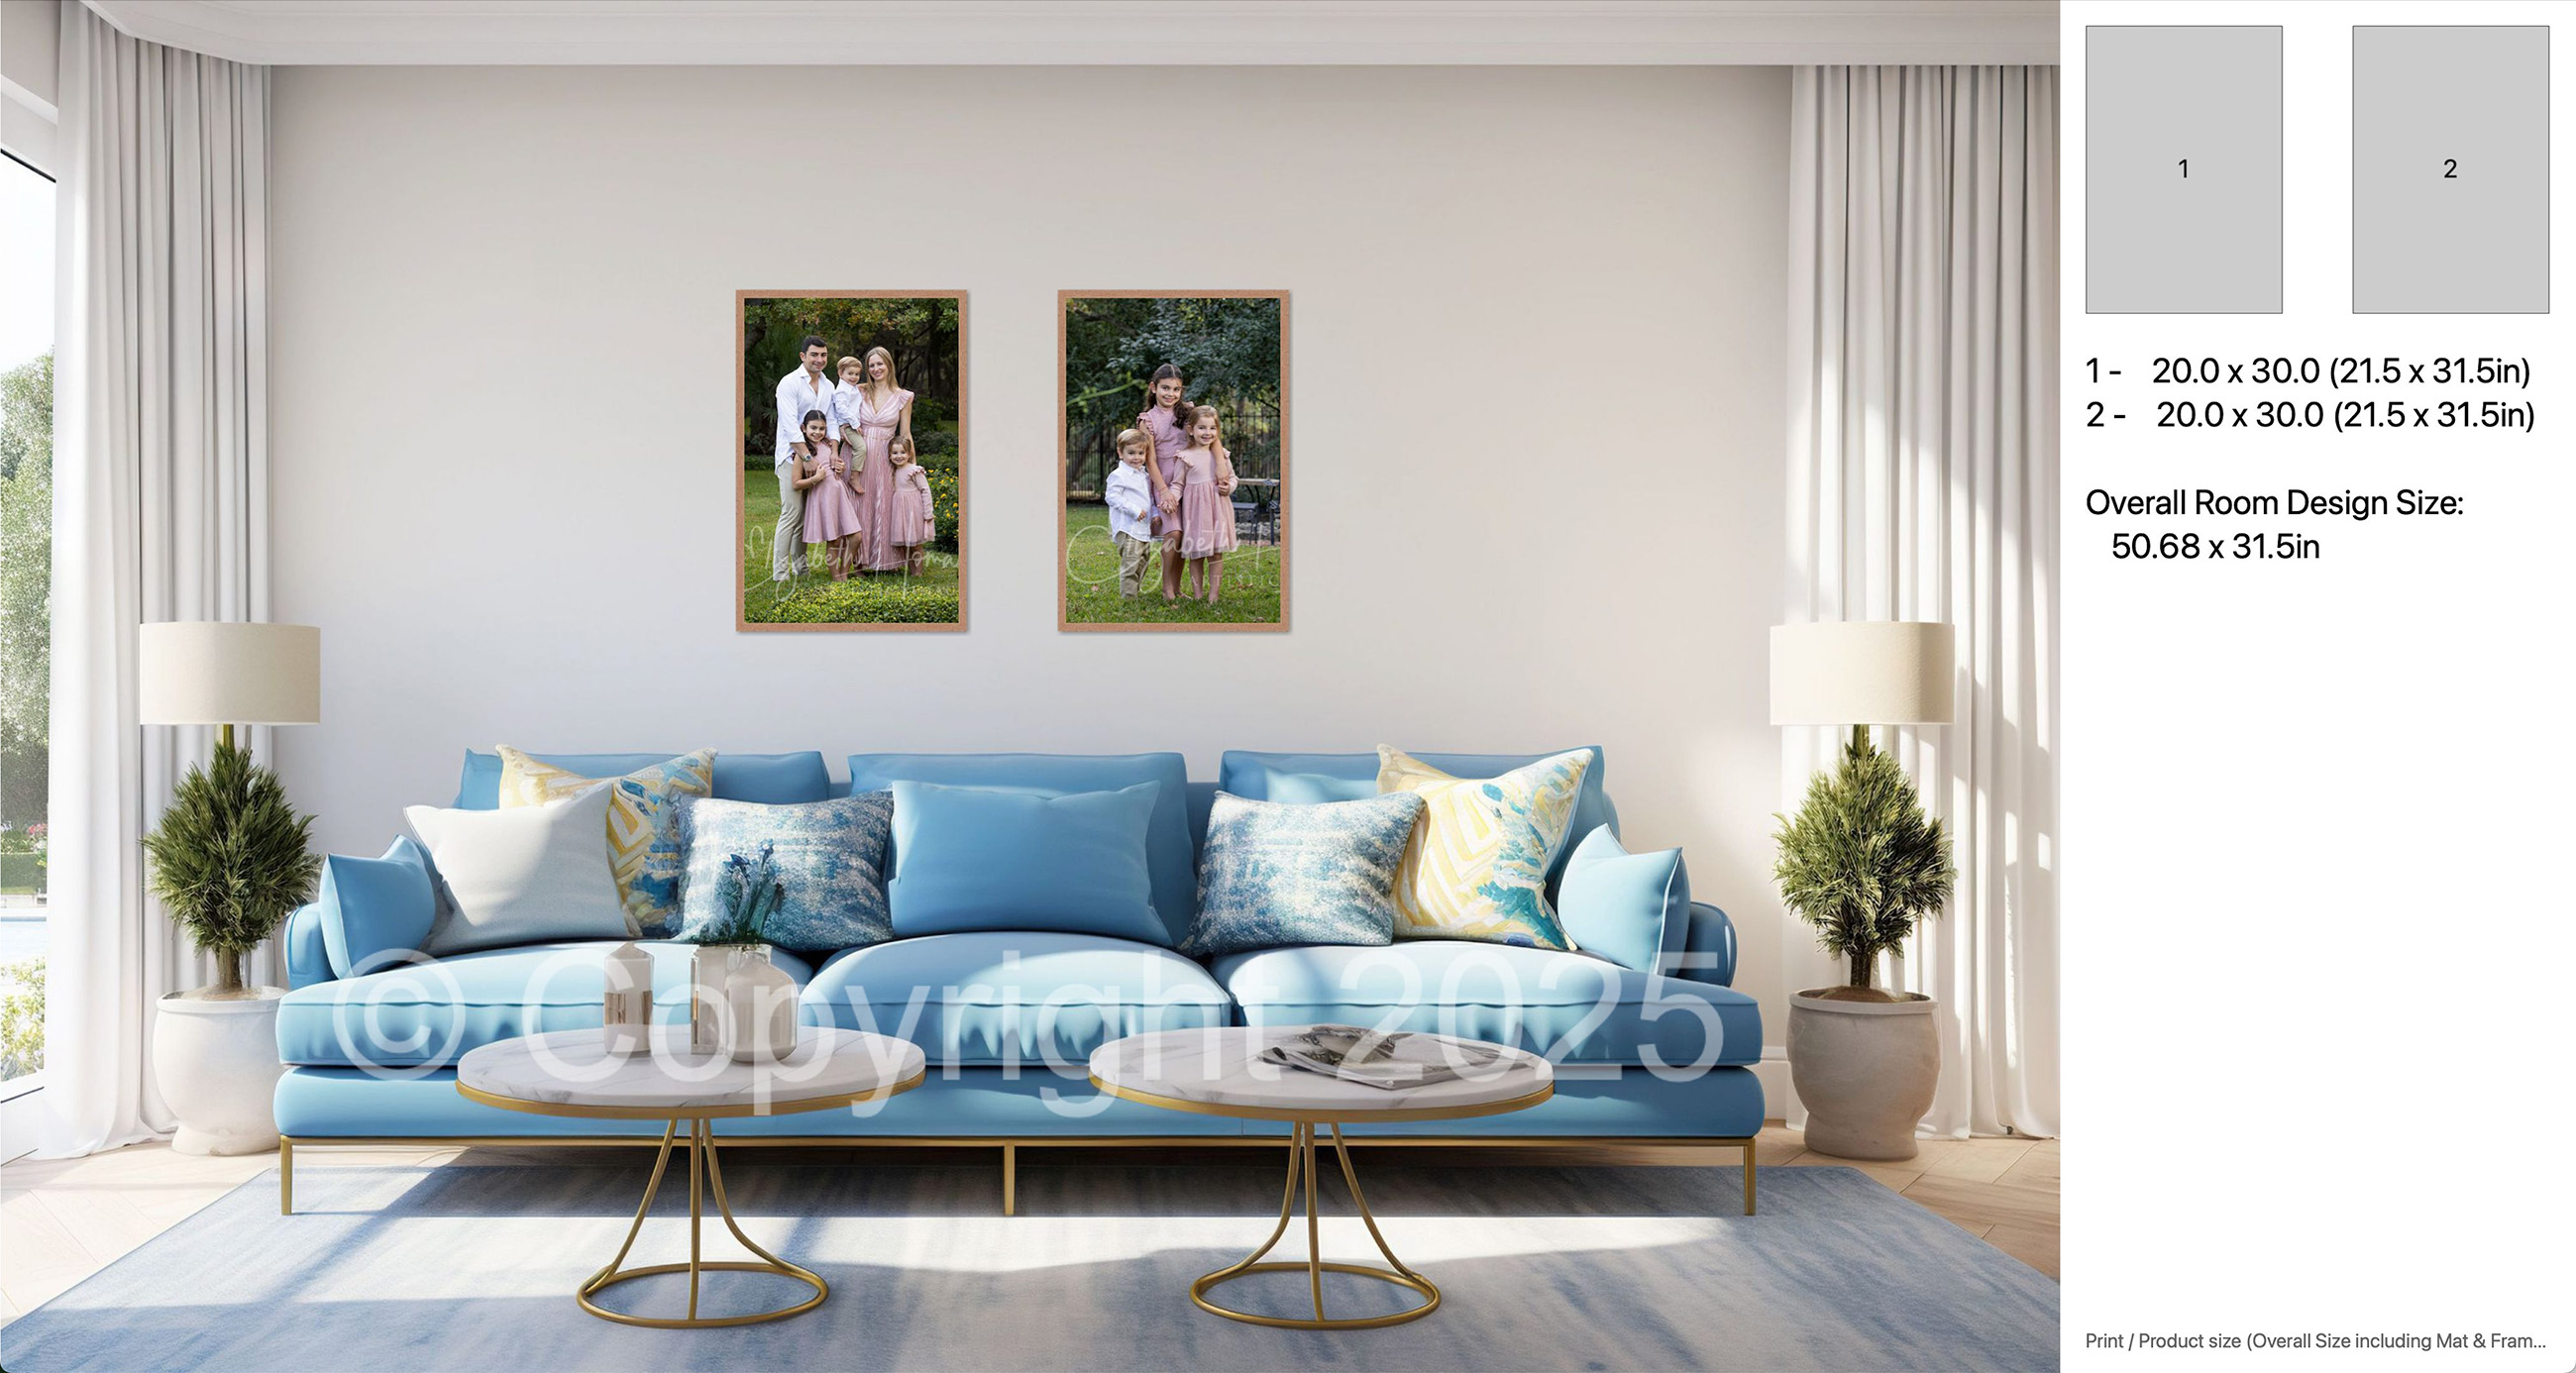
- Add Sizes Legend: When exporting a Room view image, you can choose to include a size reference alongside the exported image. This will widen the exported image to display:
- A numbered legend showing the placement of each item on the wall.
- The size and total dimensions (including mats and frames) for each item.
- If multiple items are included, the overall width and height of the full wall design.
- Prepend Sequence No: Adds a three-digit sequence number to the beginning of each filename to match the image order in ProSelect. You can define the starting number.
- Overwrite Existing Files: When unchecked, any exported files with duplicate names are renamed to avoid overwriting existing versions.
- Stamps & Watermarks: Apply a copyright or branding stamp to the image using presets configured under Stamps, Watermarks & Logos.
- Output Resolution: Sets the image resolution (dpi) embedded in the exported file. The default is 72 dpi, suitable for screen display.
- If pretouching presets have been applied to your images, a ProSelect Pro Subscription is required to export at sizes larger than 1600 x 1600 pixels.
Optional Sizes Legend
You can export low-resolution versions of your book pages for use on social media, websites, blogs, or for client reference. Before exporting, a dialog will appear where you can choose export settings. The size of exported images is based on the Import Resolution in Settings. All exported images include an embedded sRGB color profile.
- Navigate to Working with Books.
- Select the book pages you want to export.
- Go to the top menu, File > Export > Selected Low Res Book Pages.
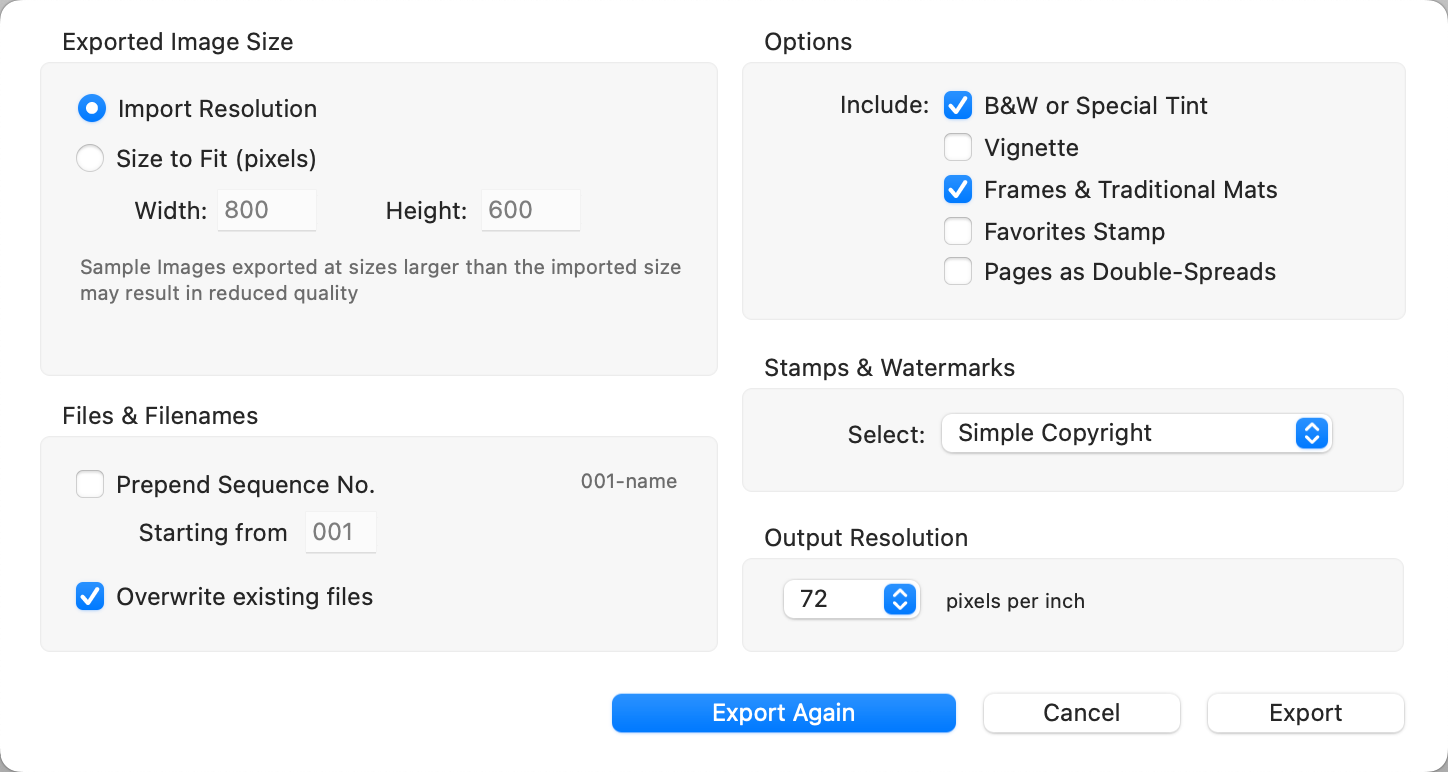
- Prepend Sequence No: Adds a three-digit sequence number to the beginning of each filename to match the image order in ProSelect. You can define the starting number.
- Overwrite Existing Files: When unchecked, any exported files with duplicate names are renamed to avoid overwriting existing versions.
- Options: Choose which ProSelect display elements (such as pages as double-spreads) to include in the exported image.
- Stamps & Watermarks: Apply a copyright or branding stamp to the image using presets configured under Stamps, Watermarks & Logos.
- Output Resolution: Sets the image resolution (dpi) embedded in the exported file. The default is 72 dpi, suitable for screen display.
- If pretouching presets have been applied to your images, a ProSelect Pro Subscription is required to export at sizes larger than 1600 x 1600 pixels.
Slideshows created in ProSelect can be exported as fully rendered .mp4 movies in various sizes. See Working with Slideshows, Exporting Slideshows for full details.
You can create a text file containing a list of all image filenames in the current album using the export feature. This list is useful for sharing with your lab or for internal reference when processing orders. Because the export is in text format, it can be easily copied and pasted into emails, spreadsheets, or other documents.
- To begin, go to the top menu, File > Export > Filename List.
- Save the text file to your computer.
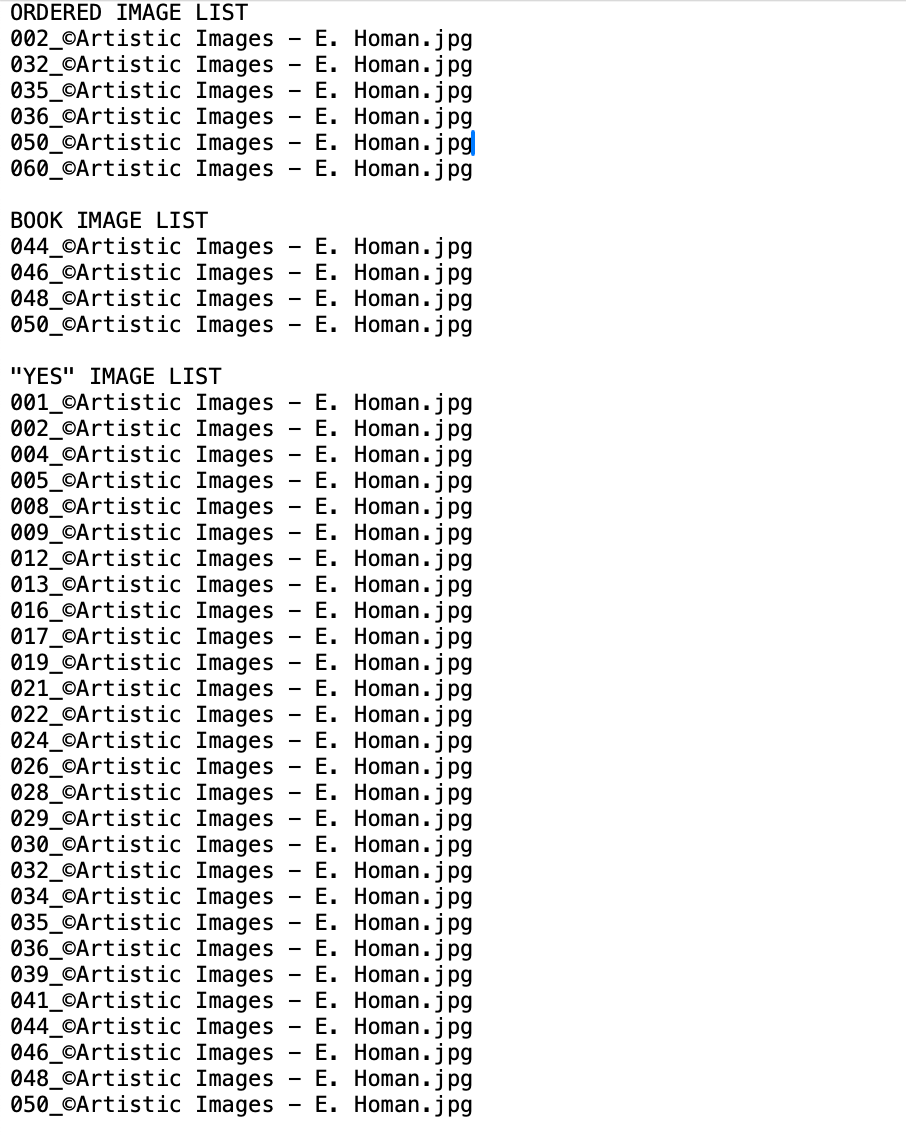
- This will generate a plain text file grouped into sections:
- Ordered Images
- Book Images
- Yes Images
- Maybe Images
- No Images
- Each filename is listed on its own line. If effects have been applied to an ordered image, the effect will be shown beside the filename (e.g. B&W for Black & White or ST for Special Tone).
Example Output
If you're using ProSelect Pro, you can export a list of image filenames from your album that’s compatible with Adobe Lightroom Classic. This allows you to quickly locate and process images in Lightroom based on your selections in ProSelect.
This is a ProSelect Pro feature. Upgrade your subscription to Pro on the Pro Studio Software website.
- To begin, go to the top menu, File > Export > Lightroom Filename List.
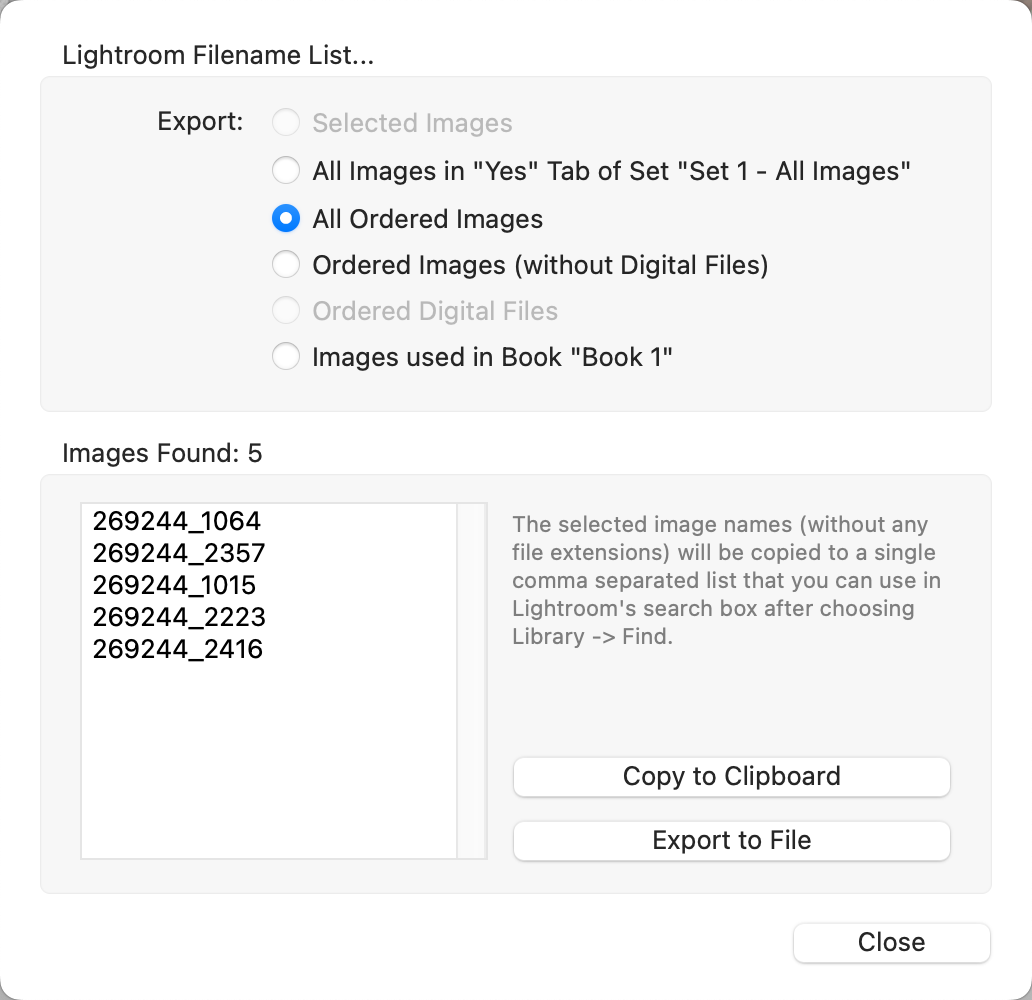
- You can choose to export filenames from any of the following groups:
- Currently selected images
- Images in the current tab and set
- Ordered images (with and without digital file orders)
- Ordered digital files
- Images in the currently selected book
- The exported list contains comma-separated filenames without file extensions so that Lightroom can match any file type with the same base name.
- You can either copy the filename list to your clipboard or save it to a text file for use on another computer.
Using the List in Lightroom Classic
In Lightroom Classic:
- Go to the top menu, Library tab.
- Select Find (or use CmdCtrl + F).
- Paste the copied filename list into the Find box.
- Set the Find Text options to:
- Field: Filename
- Condition: Contains
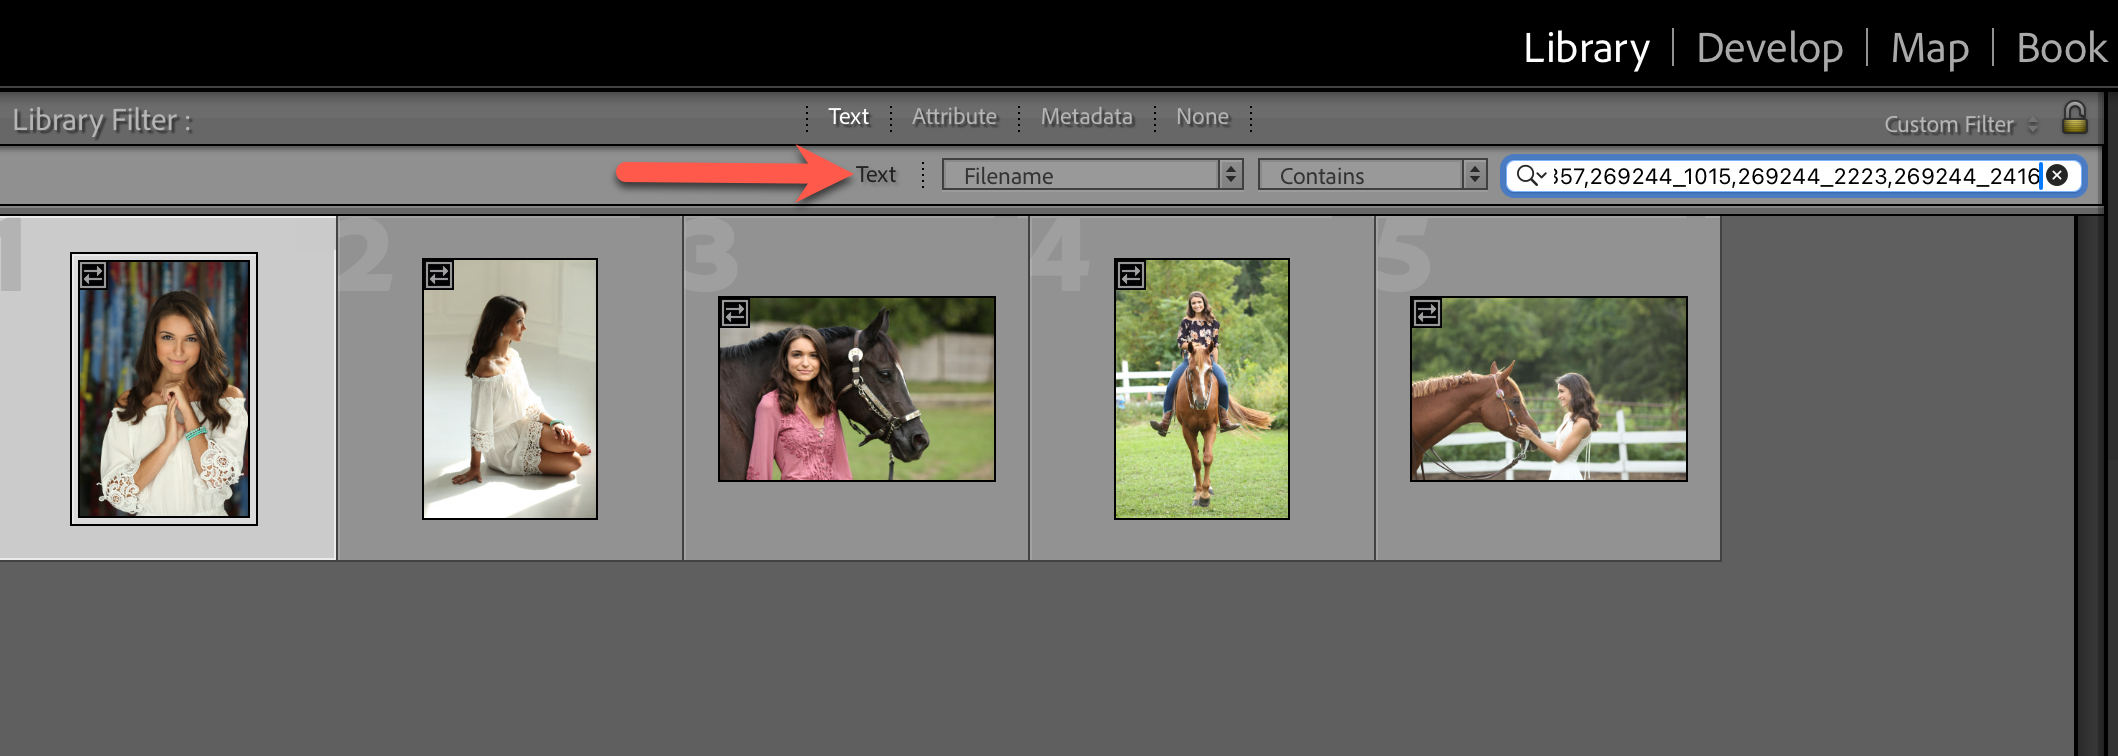
- This allows Lightroom to locate all matching files, regardless of file type.
If you have the ProSelect Plugin for Lightroom installed, Lightroom can directly open any associated raw files for the currently selected images in ProSelect.
ProSelect includes the ability to export orders to most major studio management systems. If you are using StudioCloud, please refer to the specific section for StudioCloud integration. Known systems that currently support importing ProSelect Order data are listed in the Studio Management Area on the Third-Party Links page. You will need to choose either Standard XML, Standard XML for Web (recommended for web-based systems), or CSV when exporting from ProSelect. For details on how to import this data, refer to your studio management system’s documentation or support team.
Export Format Options
You can export ProSelect order data in one of the following formats:
- Standard XML
Generates an XML file containing order data alongside a folder of thumbnail images of the ordered items. This format is typically used for importing into desktop applications. - Standard XML for Web
Similar to Standard XML, but the thumbnail images are embedded directly into the XML file using Base64 encoding. This format is better suited for web-based applications. - CSV Text
A comma-separated values file containing order data in plain text format.
How to Export Orders
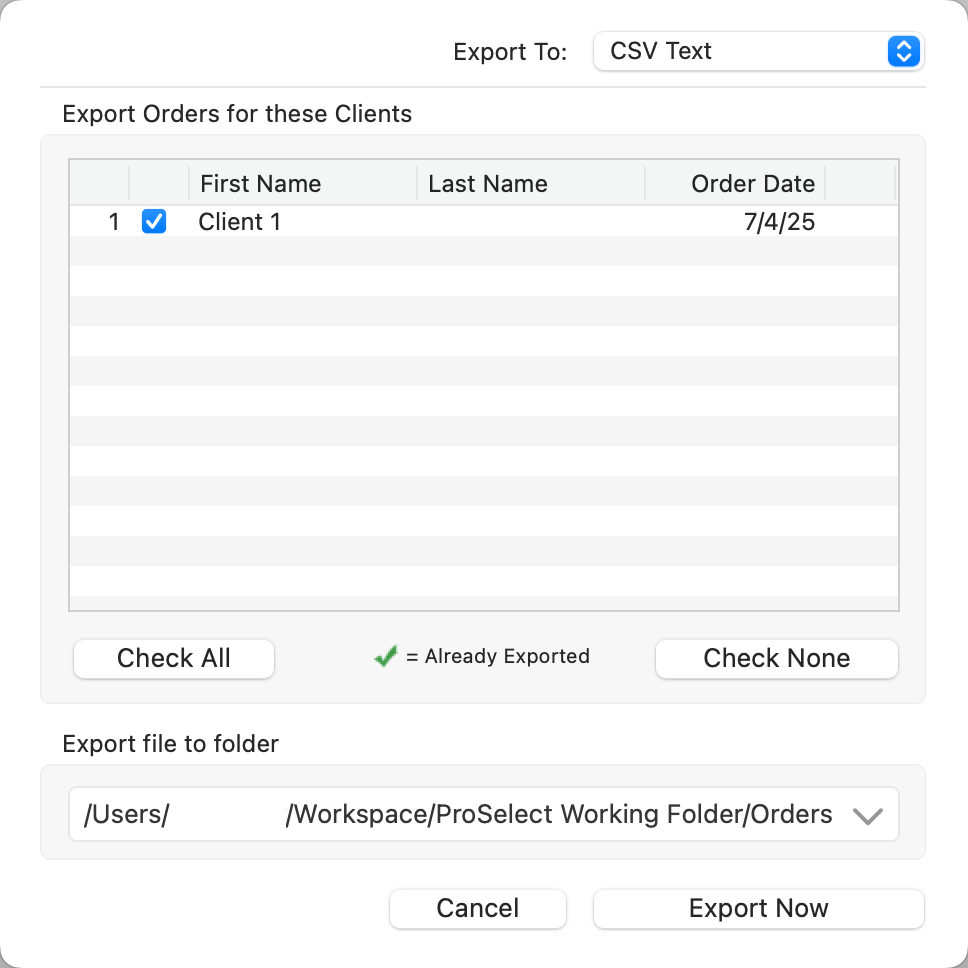
- Go to the top menu, Orders > Export Orders. Or, click the "Export" button at the bottom of the Review Order window.
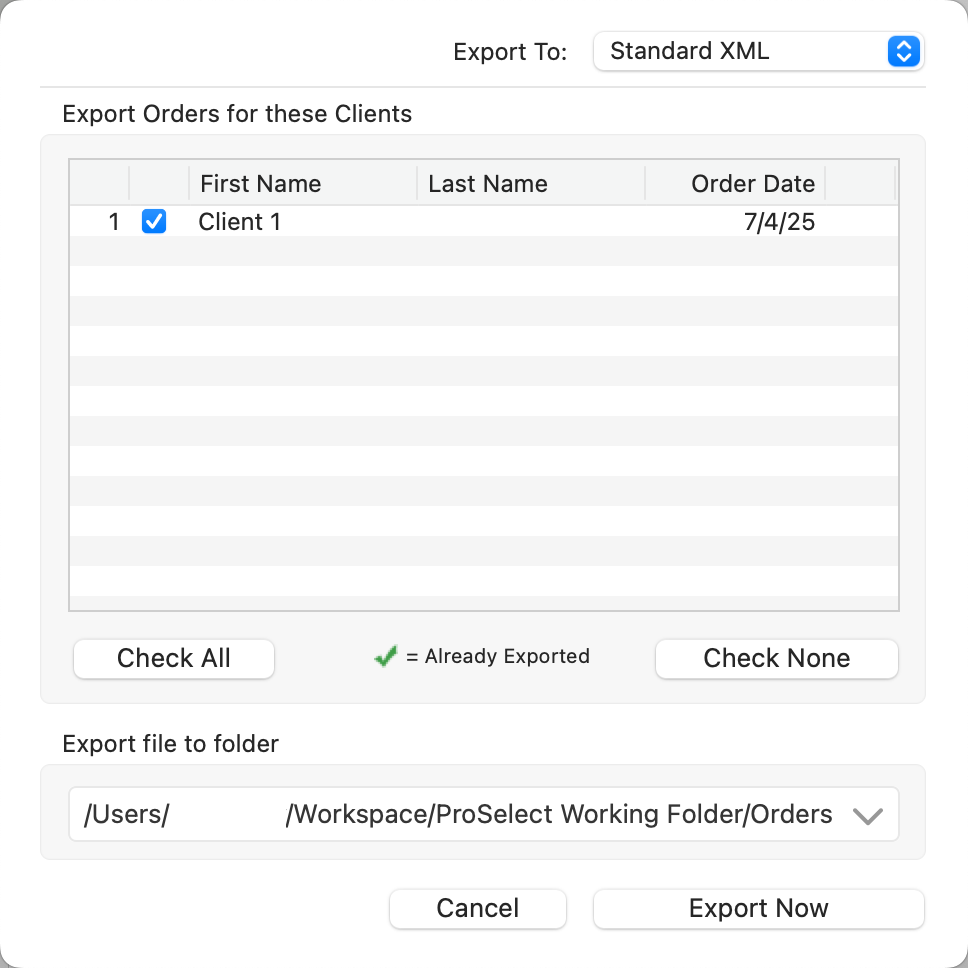
- Export To: Select your preferred format from the dropdown menu.
- Check the box next to each client whose order you wish to export.
- Choose the folder where you want to save the exported files.
- Click "Export Now."
 Quick Tips
- Clients who have already been exported from the current album will be marked with a green check mark. Re-exporting them may result in duplicate entries in your studio management software.
- Even if your studio management system is Windows-only, you can still export order data from the Mac version of ProSelect. If your Mac and Windows computers are networked, export the files directly to a shared folder accessible by both systems.
Payment Type Codes
You can define your own payment type codes for use during export. These are configured in the Setup Payments window. Most studio management systems are compatible with the default payment codes used in ProSelect. If you modify these codes, ensure they match the expected format in your studio management software.
Export Options
When exporting using the Standard XML for Web format:
- Sample images are embedded directly into the XML file.
- To keep file sizes manageable, these embedded images are automatically resized to fit within 400×400 pixels.
- Individual sample images for ordered products other than prints are not included by default.
- You can override these settings by going to Settings > Pricing & Ordering > Settings > Export Orders Options.
You can download a sample data set and full format specification here.
You can download a sample data set and full format specification here:
Order_Export_Data_Sample_and_Specs.zip
This package includes:
- A ProSelect album file (Order Export Sample Album.psa) containing sample orders representing all data types.
- Two example export folders showing the output for Standard XML and Standard XML for Web.
- A commented XML file, including explanations using
//comment linenotation, helpful for developers and integrators.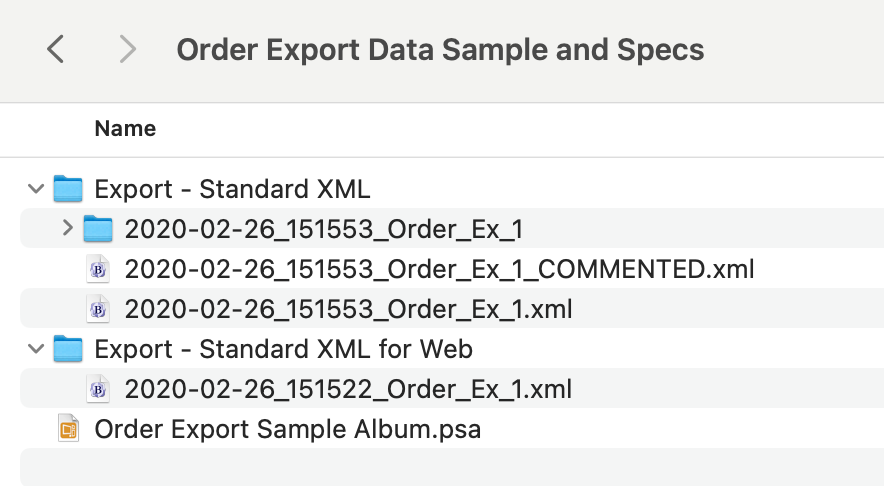
The commented XML applies to both export formats and provides guidance for interpreting the structure and content of the order data.
ProSelect allows you to export order details into a standard .CSV (comma-separated values) file that can be opened in most spreadsheet programs such as Numbers, Microsoft Excel, or Google Sheets.
How to Export to CSV
- Go to the top menu, Orders > Export Orders.
- Or, click the "Export" button at the bottom of the Review Order window.
- Or, click the "Export" button at the bottom of the Review Order window.
- In the Export Orders window, select CSV Text from the format dropdown.
- Check the box next to each client whose order you want to export.
- Choose the folder where you want to save the exported file.
- Click "Export Now."
Clients who have already been exported from the current album will be marked with a green check mark.
Product Codes and Notes
- If you have product codes enabled, these will be included in the exported spreadsheet.
- To include image and order notes in the final column of the CSV file, go to Settings > Pricing & Ordering > Settings > Export Orders Options and enable the relevant checkbox.
Exported Image & Order Notes
Because CSV format restricts the use of line breaks and commas:
- Any newline characters in the image or order notes will be replaced with spaces.
- Any commas will be replaced with hyphens (-).
- Order notes appear after image notes in the same column.