


Article updated in December 2015
Many composite layout designs include some text. While you cannot directly change the text on the layout within ProSelect, you can use the following techniques to update the text on your layouts or to have custom text set automatically during Hi-Res Production.
Text generally falls into two categories:
- Text that you change occasionally and use the same way for a number of different clients or jobs such as updating the year number (eg "2015" changed to "2016"), or
- Text that you are customize for a particular image or job such as setting a person's name, team name, etc.
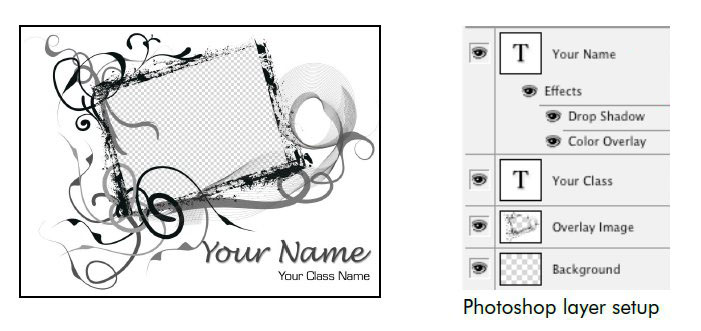
Setting up your text in Photoshop
In both of the above cases, it is best to keep the text on separate text layers in your Photoshop file so it can be easily updated and it's best to always put the job/image related text layer(s) at the top of the layer stack in Photoshop so you can use ProSelect's Automatic Text Replacement feature (see sections below).
(If you don't know how to use overlay images at all, see the article Using Photoshop Templates in ProSelect.)
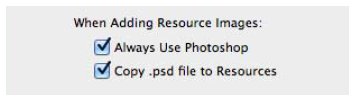
When adding this image as an overlay image in ProSelect, make sure that you have "Copy .psd file to Resources" checked. This will bring the .psd file into the resources folder as well as creating a .png file which ProSelect uses when displaying the template. Note: Any overlay images with a green PSD icon have been imported this way.
Updating Commonly Used Text
For text that is related to a particular image or job you can handle this two ways.
For text that you only want to change occasionally, you can open the original .psd file in ProSelect's Manage Resource Images window (under Resources menu -> ProSelect Resources folder -> Manage Resource Images -> Template Overlays) or from the Template Editor (click on the gold magnifying glass next to the Overlay Image name).
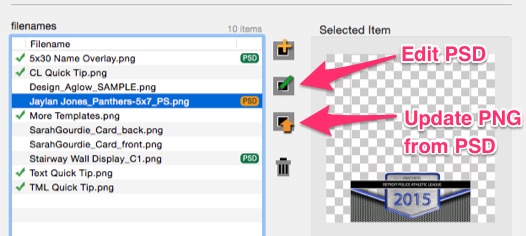
Any image with a PSD icon can be opened in Photoshop using the Edit PSD in Photoshop button, text changes made and saved back over itself. After doing this you must use the Update PNG from PSD button to convert the updated PSD file into a PNG so it shows correctly in ProSelect.
Note: If you have already created some layouts using this template in a ProSelect album, if you wish to see the updated overlay image on those layouts then you will also need to use Update Album Resource Images (under Album menu). This replaces the cached copy of the overlay image in the ProSelect Album file and updates all the displayed layouts.
Updating Custom Text in ProSelect
The Manual Method:
When using Hi-Res production, check the "Keep Open In Photoshop" option on the selected composite layout that you wish to change the text in. Then run production. When it has finished, switch over to Photoshop and change the text on the layer, flatten the image and save it as a .jpg file ready for printing.
Alternatively, setup your Preferences, Hi-Res Production, Output Settings to produce PSD files and then run production on all of your files and then edit them in Photoshop later.
IMPORTANT: For this to work make sure that you have selected "Use PSD files for Overlay Images" selected in Preferences (Hi-Res Production --> Output Settings --> Output File). This will tell ProSelect to look for the .psd file in the Resources Folder and use that instead of the regular .png file. If the .psd file is not found, then the .png file will be used instead. Because any applied layer effects are also preserved, you can have effects such as drop-shadows setup on your text layer as well.
Automatic Text Replacement Method:
- Create a new layout from the template and add your images.
- Add a note to the layout, entering the text to be used in between square brackets, at the start of the note. During Production each bracketed text
will be placed in the text layers, in order from the topmost layer down.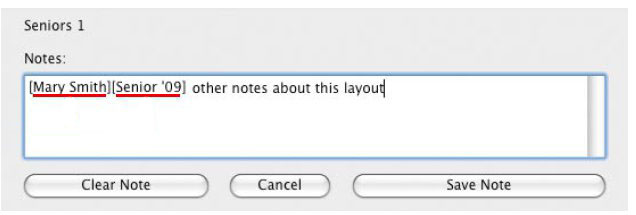
- After ordering the layout at the size that you want, you can run Hi-Res production to produce the final image with the text inserted.
IMPORTANT: For this to work make sure that you have selected "Use PSD files for Overlay Images" selected in Preferences (Hi-Res Production --> Output Settings --> Output File). This will tell ProSelect to look for the .psd file in the Resources Folder and use that instead of the regular .png file. If the .psd file is not found, then the .png file will be used instead.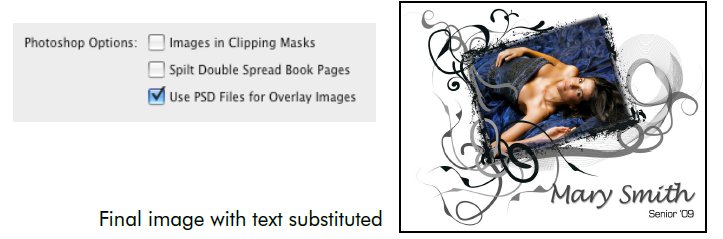
- In Hi-Res Production Preferences -> Output Settings -> Output Files, you can optionally set the Output Format to "Layered Photoshop files". You can then open the file in Photoshop and change anything further if necessary keeping the layered .psd format.
Further Information
You will find the above information on "Handling Text in Composite Layouts" in the ProSelect Reference Manual (quick access under the Help menu in ProSelect).
The movies "Hi-Resolution Production Workflow" and/or "All About Templates | Part II" on the Webinar Recording Archives page (under the Training menu on the TimeExposure web site) covers this topic also.
If the substituted "text" layer does not show up in Photoshop after using the Production system in ProSelect, then see the article "Text layer not showing up in Photoshop".
If the text formatting is not correct after Production, then see "Text formatting/size incorrect after Production".
KnowledgeBase Article: Using Overlay Images with Text layers