


If you are using a lot of overlay images on your templates, your ProSelect resources folder can get quite large and unmanageable especially if you are keeping the .psd versions of the overlay image files in there as well. This article will show you how to clean up your Resources folder and reduce your files sizes using the new resource management features (introduced in ProSelect 2015r1) and the new .png compression (introduced in ProSelect 2015r2).
Before your begin, you should make sure that you have a current backup of your data. See this article for how to do this: Transferring or Backing up your Prices and Templates.
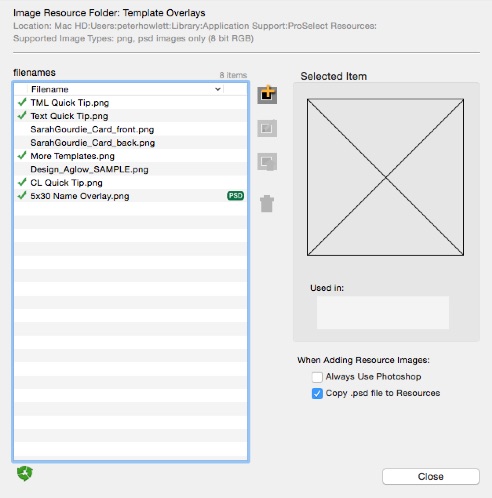
First open the Manage Resources window for Template Overlays (under Resources Menu -> ProSelect Resources Folder -> Manage Resource Images). In this window you will see all the current resource .png images listed. The green checkmark in the left column indicates that the image is used on one or more of your templates.
The PSD icon in the right column means that there is a .psd file with the same name as the .png file also in this resources subfolder. This icon will be green if the .png file is newer than the .psd file and orange if the .png file is older than the .psd file. The latter situation will occur if you make changes to the .psd file since you first imported the file into ProSelect and have not yet used the Update PNG from PSD button to create a new .png file from the updated .psd file.
Cleaning up Steps
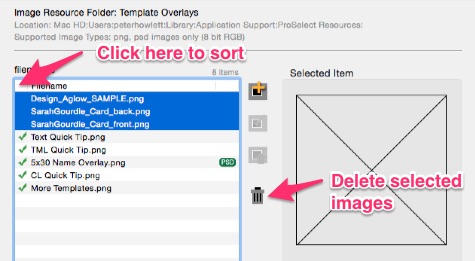
Remove any unused images
1. Click the top of the left most column to sort the list by used files. This will group all the unused images (the ones without the check marks) together at the top of the list.
2. Select all of these by clicking on the first one and then shift-clicking on the last one (without a check mark) to select all unused files.
3. Click the Trash icon to delete the selected files. Caution: This is not undo-able and will delete both the .png and the .psd (if there is one) files from your resource folder immediately.
Compressing your PNG files
This step involves getting Photoshop to regenerate your .png files from the .psd files in the same folder. This will only work in ProSelect 2015r2 or newer and will only make a difference if the images were added in an earlier version of ProSelect or from a third-party Collection using an earlier version.
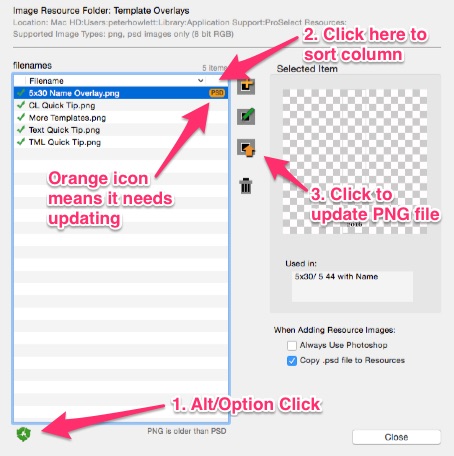
Since you would normally only update your .png files after you have updated your .psd file, ProSelect disables the Update PNG from PSD button when the PNG file is newer than than the PSD file (and the icon is green). However, you can override this by Option/Alt-clicking on the Refresh button at the bottom of the list box. So the steps are:
1. Option/Alt click on the Refresh button to turn all PSD icons to orange
2. Click the top of the right most column twice to sort the list so that all the images with PSD icons are together at the top of the list.
3. Select the first image with a PSD icon and click the Update PNG from PSD button. The .psd file will be sent to Photoshop and saved back as a compressed .png file.
4. Repeat step 3 for all images with an orange PSD icon.
Cleaning up your Low-Res Resources folder
ProSelect keeps a low-res copy of all of the .png files in the its low-res cache folder so they are still accessible during a presentation if your ProSelect Resources folder is not available (e.g. when you have sharing turned on but the shared location is off-line).
These files are located in the "ProSelect" folder which is located in the same folder as your default ProSelect Resources folder as follows:
On Macs this is: StartupDisk:Users:YourUserName:Library:Application Support:
On Widows this is: C:\Users\YourUserName\AppData\Roaming\
(See the ProSelect Reference Manual for more about the Low-res cache location)
When you delete images from your ProSelect Resources folder it does not delete the Low-Res cache images. So you can save some space on your disk after you have removed images from your ProSelect Resources folder by also using Re-build Low-res Cache (under Resources Menu -> ProSelect Resources folder). This will delete all your low-res cache images and generate them again from those make as used in your ProSelect Resources folder.
Caution: If you have a lot of resources images this may take a very long time!
KnowledgeBase Article: Reducing files sizes in your Resources folder