


When working with images, select Show Images View by clicking on the Eye button in the Tool Bar or by choosing Show Images (View Menu).
In this view, from one to thirty images can be viewed in the Display Area. The images will be automatically arranged and sized to best fit within the space.
Selecting images in the image list
You can select images to View by:
- Select the images in Thumbnail View and switch to Show Images View.
- Select the images in Thumbnail View and double-click* on them to automatically switch to Show Images View.
- When in Show Images View, double-click on one or more selected images in the Image List.
- Select one or more images from the Image List and drag them to the Display Area while hold down the Alt/Option key or just press the "V" key.
The Command (on Mac)/Control (on Windows) and Shift key combinations are used when selecting items in Show Images/Layouts/Pages Views.
*Make sure that you take your finger off the key(s) before you double-click (otherwise you will de-select the image that you are double-clicking on).
Main Display Area
As of ProSelect v2011r2 and newer, when Working with Images or Layouts, you can show one image or one layout only in Select Size View (with or without a room image background). Use the Show Images/Layouts View to view and compare multiple Images/Layouts as mentioned above. To create and save multiple images and/or layouts on a room (and compare Wall Gallery designs in ProSelect Pro), use the Working with Rooms mode (see below).
In ProSelect 2010r1 and earlier, selecting and comparing images for the main display is handled in a slightly different way to newer versions.
(Please note: A bug was fixed as of ProSelect 2011r2.3, so the software no longer de-selected other items in the Display Area when you click on an already selected item. This change makes it behave in a similar way to selecting items in the Image List as discussed above).
Adding Extra Images to the Display Area
To add extra images to those already being displayed, select one or more images from the Image List and press the “A” key or just drag them into the Display Area. No more will be added after the limit of thirty is reached.
Removing Images from the Display Area
Click on the images to select the image(s) in the Display Area and press the delete key. Note: This does not delete them - it just removes them from the Display Area.
Note: In ProSelect v4 and earlier versions, you would drag an image a little way and release it to remove it. And in ProSelect 2010r1 and earlier, selecting and comparing images for the main display was handled in a slightly different way to newer versions.
See the short demo movie Editing, Comparing, Zooming & Cropping (under the Training menu on the TimeExposure web site).
Working with Rooms
To add multiple items to a room, make sure you are in Working with Rooms mode (as of ProSelect v2011r2), select your room image and then drag images and layouts from the Image List on the left into the room. You can do this in any of the views - Thumbnail, Show Rooms and Select Size.
You can Duplicate a Room image/design (left hand menu icon) to enable comparison of different Wall Gallery designs for the same Room. You need to have ProSelect Pro to do this, and also to have the ability to swap between the saved designs and make changes instantly. Use the Next/Previous (or left and right arrow keys) to do this.
(Hint: If using ProSelect (basic), you could use the Screen Shot icon (or File --> Export --> Current Display Area Image) to export an image of the design(s), then reimport the Room Design image(s) back into the Album for presentation.)
Other General Information..
Show Rooms View (the eye ball) is used to size items and adjust positions on the wall. When you select one or more items and drag them around to position them in this mode, they will automatically "snap" into position when close to an edge or the middle edge of other objects in both the vertical & horizontal directions. Holding the Alt/Option key down while dragging an items position will disable the snapping feature.
Select Size View will show the current gallery design at actual size without the room background so you can easy switch from showing your gallery with the room background to actual size on the wall if your projected space is large enough.
You can also use Select Size View for fine-tuning a design... to do this hold Alt/Option key down when clicking the Select Size View button, and the current gallery design will be shown at a size that just fits within the display area space effectively allowing you to "zoom in" on the design.
Compare Image Snapshots
As of ProSelect 2016r1 and newer, when selecting and comparing images with your client, by default ProSelect will save the last five groups of two or more images that you selected and double-clicked on in Thumbnail View.
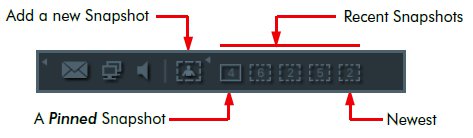
These are called Compare Image Snapshots and you can re-display the images remaining in each snapshot by clicking on the icons in the Working with Bar at the top of the main window. You can automatically or manually add snapshots, pin or remove.
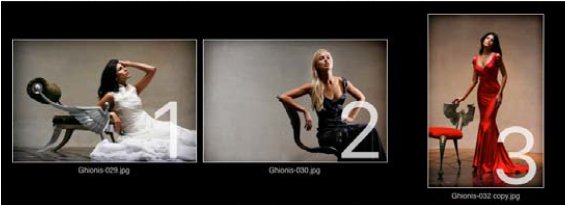
Comparing - Using Selection Numbers
Also as of ProSelect 2016r1 and newer, to help your clients identify images from a group shown in the Display Area, you can temporarily overlay the image with an "Selection Number" by holding down the "N" key. You can adjust the size, color and opacity of the overlay number in your Preferences.
For the above information and more, please see the Thumbnail View and Show Images View - Show & Compare, Compare Image Snapshots and Using Selection Numbers sections of the ProSelect Reference Manual (quick access under the Help menu in ProSelect).
KnowledgeBase Article: Selecting and comparing images